Plastic Greenhouse Cultivation Techniques for Early Spring Beans
Symptoms of bean blight: It mainly affects stems, leaves and pods. When the stem is infected, it initially appears water-soaked, then becomes wet-rotted and constricted around the stem, and the leaves and vines above the diseased part wither and die. When humidity is high, the cortex rots and white mold appears on the surface. When leaves are infected, the diseased part initially shows dark green water-soaked spots, which then expand into round light brown spots with white mold on the surface...
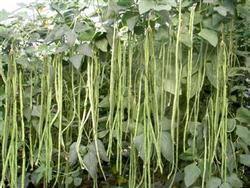 The main cultivation techniques for early spring beans in plastic greenhouses include: variety selection, seedling raising, transplanting, field management, pest and disease control, harvesting and other important technical steps.
I. Variety Selection
Early-maturing, high-quality and high-yield varieties should be selected. The main varieties are: Purple Flower Oil Bean, Peanut Material Oil Bean, and Harbin Bean No. 1.
II. Seedling Raising
Seedlings are raised in nutritional pots in a greenhouse.
1. Sowing The sowing period is generally early to mid-March in southern regions and mid to late March in northern regions. The seeding rate requires 4-5 kg of seed per 667 sq m of transplanting field, and 100 g per sq m of seedbed. At sowing, the soil moisture content of the seedbed should reach above 80%, and the seedbed soil temperature in the greenhouse should be maintained above 12°C. The air temperature should be 20-25°C during the day and 15-16°C at night. When sowing, water the nutritional pots thoroughly with bottom water. After the water seeps in, sow 3-4 germinated seeds in each nutritional pot, cover with 1.5 cm of soil, and then set up a small arch shed.
2. Preparation Before Sowing The preparation work before sowing mainly includes the following 3 aspects.
(1) Making the sowing bed and preparing nutrient soil
For the sowing bed in the greenhouse, its size should be determined according to the size of the greenhouse, and the nutritional pots should be placed in the seedling bed. Preparation of nutrient soil: use 60% garden soil, 30% decomposed organic fertilizer, 10% decomposed night soil fertilizer, then add rhizobium fertilizer and long-acting microbial compound fertilizer and mix evenly. Then put the prepared nutrient soil into nutritional pots. The nutritional pots have a diameter of 8 cm or 10 cm and a height of 12 cm.
(2) Seed treatment At sowing, select dry seeds that are large, plump and free of disease spots, soak them in 1% formalin solution for 20 minutes to kill anthracnose bacteria on the seed surface, rinse them clean with clear water and dry them in the shade.
(3) Germination promotion 2-3 days before sowing, soak the seeds in room-temperature water for 3-4 hours, then germinate at 30°C for 24 hours, until the radicle breaks through the seed coat.
3. Temperature and Water Management During the Seedling Stage From sowing to emergence, keep 20-25°C during the day and 15-16°C at night. After 3-4 days, when the seedlings push through the soil and the cotyledons flatten, remove the film and lower the temperature. Keep 15-20°C during the day. 10 days after emergence, true leaves appear. From true leaf expansion to 10 days before transplanting, increase the temperature to 20-25°C during the day to favor flower bud differentiation and root and leaf growth. 10 days before transplanting, harden the seedlings, keeping 15-20°C during the day and 12-15°C at night. In terms of water management, since bean seedlings are relatively drought-tolerant, after emergence, according to seedling growth and soil moisture, appropriately replenish water 2-3 times, neither too dry nor too wet.
Standard for strong seedlings: well-hardened strong seedlings have short but sturdy plant clumps, well-developed root systems, 2-3 true leaves, and a seedling age of 30-35 days.
III. Transplanting
1. Preparation Before Transplanting
(1) Land preparation and basal fertilizer application Select a flat, sunny plot, apply 45-60 tons of organic fertilizer per hectare as basal fertilizer, then plow the land and make beds.
(2) Installing the greenhouse frame Install the greenhouse frame 20-25 days before transplanting, generally in February to mid-March. Use anti-drip anti-aging greenhouse film. The amount of polyethylene plastic greenhouse film is 120 kg per 667 sq m.
2. Transplanting
(1) Temperature indicators and insulation measures for the safe transplanting period When beans are transplanted into the greenhouse, the soil temperature in the greenhouse must be stable above 10°C, and the nighttime air temperature should not be lower than 8°C. Transplanting is generally done in early to mid-April. Insulation measures at transplanting: for internal insulation, set up small sheds inside the greenhouse and hang double-layer screens; when necessary, use a warm-air stove inside the greenhouse. For external insulation, mainly cover straw mats around the greenhouse.
(2) Transplanting method and density For dwarf beans, the hole-to-row spacing is 30 cm * 60 cm, with 8000-10000 plants retained per mu. Climbing beans are generally planted in beds. The bed width is 1.2 cm, with two rows per bed, plant spacing 20-25 cm, and 6000-8000 plants retained per mu. Climbing varieties can also be intercropped with leafy greens such as rapeseed. For high-bed cultivation, the bed width is 1 m, with two rows transplanted per bed, hole spacing 25 cm, and three rows of rapeseed planted between the rows with plant spacing 10 cm. Before the beans flower, pull out the rapeseed, and at the same time set up trellises to guide the vines. When transplanting, open furrows and irrigate, preferably until the soil is soaked through, then cover with dry soil.
IV. Field Management
1. Management from Transplanting to Flowering and Pod Setting
(1) Cultivation and earthing up After the beans recover from transplanting, cultivation and earthing up should be carried out to loosen the soil, which helps raise ground temperature and promote root growth. Generally, from transplanting to flowering, cultivate once about every week. Cultivation should be deep, and along with cultivation, appropriately earth up toward the root crown. This helps lateral roots continue to form at the root crown.
(2) Temperature and water management For temperature management after transplanting, maintain 20-25°C during the day and 15-20°C at night. Upon entering the flowering stage, keep about 20°C during the day and above 15°C at night to favor normal flowering and pod setting. In water management, since beans have a certain drought tolerance, generally no irrigation or fertilization is carried out from transplanting to flowering, to prevent excessive vegetative growth of stems and leaves. When flowering begins, increase ventilation to remove humid air, which favors pollination, avoids flower drop, and reduces disease.
(3) Trellising For climbing varieties, when the vine stems grow out 30 cm, trellises should be set up. For double-row planting, the two rows can be brought together into an A-frame trellis. For single-row planting, upright trellises or A-frame trellises should be set up.
2. Management During the Pod Setting Stage
(1) Fertilizer and water management When dwarf beans show flower buds or after climbing beans begin to vine, start topdressing and irrigation to promote rapid growth of vines and pods. Apply diammonium phosphate once with irrigation at 225-300 kg per hectare. Irrigate once every 7-10 days, and each irrigation amount should not be too large. For climbing varieties, irrigate once every 10-15 days and apply chemical fertilizer 2-3 times, each time 150-225 kg of diammonium phosphate. Soaking seeds or spraying plants with 0.01-0.03% ammonium molybdate can promote early maturity of beans and increase early yield.
(2) Ventilation management For ventilation and air exchange, generally do not ventilate within one week after transplanting, so as to keep the greenhouse at high temperature and help seedling recovery. When the temperature exceeds 30°C, ventilate briefly at noon. From seedling recovery to the flowering stage, maintain about 25°C to promote growth. During the flowering and pod setting stage, while maintaining about 20°C, a large ventilation volume favors pollination, seed setting and pod enlargement. High temperature and high humidity can cause flower drop, and humidity should be maintained at 75%. After the final frost period, ventilate at the bottom day and night.
V. Pest and Disease Control
1. Disease control During the flowering and pod setting stage, use 2000-3000 times dilutions of triadimefon to control rust; use 600 times dilution of 75% chlorothalonil to control gray mold, red spot disease and anthracnose; use 5% chlorothalonil dust to control gray mold and anthracnose.
2. Insect pest control During the growing period, use 1000-1500 times dilutions of 40% dimethoate to control aphids. During the pod setting stage, use 2000-3000 times dilutions of 40% fenvalerate emulsifiable concentrate or 3000-4000 times dilutions of sumicidin to control cabbage caterpillars, cabbage armyworms, aphids and red spiders.
VI. Harvesting and Marketing
The edible part of beans is the tender pod. When the pods reach commercial maturity, they should be harvested in a timely manner. Generally, dwarf varieties begin harvesting 25-35 days after transplanting, and climbing varieties begin harvesting 35-45 days after transplanting. Harvest once every 3-5 days, and once every 1-2 days during the peak pod setting period. Harvesting too late affects quality and pod setting of subsequent inflorescences. Harvested pods should be marketed promptly; those not yet marketed can be kept fresh at 3°C.
VII. Cleaning the Field
Diseased plants and diseased leaves should be promptly removed from the field. Burn them in one place and bury them well. Harvest pods in early July. Trellis rods should be stored together to prevent pathogens and insect eggs on diseased plants from causing harm the following year, thereby achieving the effect of pest and disease control.