Detailed Explanation of Key Points for Plastic Film Mulch Cultivation Techniques for Spring Peanuts
Anxi County has promoted plastic film mulch cultivation techniques for spring peanuts. Under similar conditions, yields are generally 15-20% higher than open-field cultivation, and Aspergillus flavus disease is reduced, peanut quality is improved, and good benefits are achieved. The cultivation techniques are as follows: 1. Variety selection: Choose "Shanyou 71," a variety with strong disease resistance, good waterlogging tolerance, and suitability for paddy fields with good fertilizer and water conditions...
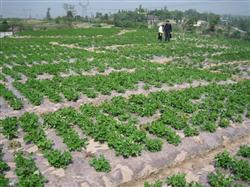
Anxi County has promoted plastic film mulch cultivation techniques for spring peanuts. Under similar conditions, yields are generally 15-20% higher than open-field cultivation, and Aspergillus flavus disease is reduced, peanut quality is improved, and good benefits are achieved. The cultivation techniques are as follows:
1. Variety selection: Choose "Shanyou 71," a variety with strong disease resistance, good waterlogging tolerance, and suitability for paddy fields with good fertilizer and water conditions.
2. Sowing time: The suitable sowing time is mainly determined by air temperature and soil moisture. When the temperature inside the film reaches above 15°C and the field water-holding capacity of the soil reaches about 50%, sowing can begin. According to production experience in recent years, the sowing time can be advanced from the original open-field mid-to-late March to late February to early March.
3. Seed treatment before sowing: Before sowing, sun-dry the seeds with shells for 1-2 days to promote seed germination and seedling emergence, while also reducing disease occurrence. To prevent seed rot caused by low temperatures and continuous rain in early spring, seed pre-sowing osmotic treatment can also be adopted: First spread a 10cm layer of dry field soil, place the seeds contained in mesh bags on the soil layer (seed thickness about 5cm), then cover with another 10cm of dry field soil. After 3 days, sowing can begin.
4. Fertilization and land preparation: For film-mulched peanuts, fertilization throughout the entire growth period is applied only once as a full-layer base fertilizer before mulching. Therefore, the base fertilizer must be applied sufficiently and adequately. Generally, before bed preparation, apply 25kg of compound fertilizer per 667 sq m, or 10-15kg of urea, 10kg of potassium chloride, and 50kg of superphosphate as base fertilizer. In fields with many underground pests, soil treatment with Mirel should also be combined with fertilization. After the base fertilizer is applied, perform one plowing and multiple harrowings to evenly mix the fertilizer into the soil to avoid burning the seeds. After the base fertilizer is evenly mixed, prepare the land into trapezoidal beds. The bed surface should be level and finely crumbled. According to the current width of degradable plastic film, the bed including the ditch should be 85-90cm wide, the bed surface 45-50cm wide, and the bed height 30-40cm.
5. Sowing density and method: Sowing density should be determined based on factors such as variety type, climate, soil conditions, and cultivation level. Generally, small beds with double rows are used, with 2 seeds per hole, hole spacing of 17-18cm, and about 10,000 holes per 667 sq m. Sowing depth is generally about 5cm.
6. Application of herbicide: After sowing, mix 45ml of Henais (90% acetochlor) with 60kg of water per 667 sq m and spray. Two-thirds of the solution should be evenly sprayed on the bed surface, then cover with film; the remaining one-third should be evenly sprayed around the bed ditches after mulching.
7. Film mulching: First use a hoe to pull soil from both sides of the bed edges at one-third the distance from the bed surface down to the ditch bottom. Then, working in pairs, manually cover with film. After laying the film, pile soil from the ditch onto both sides of the film, pressing it firmly and tightly. Every 2m, place a small mound of soil on the bed surface to prevent wind and protect the film.
8. Field management
1. Breaking the film: When the peanut cotyledons emerge from the soil and push against the film, promptly use a bamboo strip or other small hard object to puncture the plastic film to prevent high temperatures inside the film from scorching the seedlings, allowing peanut seedlings to grow normally.
2. Water management: During the seedling stage, water should be minimal. Appropriately dry soil can promote deep root growth and sturdy, compact seedlings. During the flowering and pegging stage, the soil should be relatively moist to promote flowering and peg penetration. During the pod-setting stage, the soil should be moist, satisfying pod development needs while preventing excessive water from causing excessive stem and leaf growth and pod rot. When water is insufficient, furrow irrigation with water flowing through the ditches can be used, but the water depth should not exceed one-third of the ditch depth. After the beds have absorbed enough water, drainage should be carried out promptly. If there is excessive water on rainy days, the ditches should be cleared and drained promptly to strictly prevent waterlogging.
3. Pest and disease control: If bacterial wilt or root rot occurs, promptly use agricultural streptomycin for control. If leaf spot disease occurs in the late growth stage of peanuts, carbendazim, thiophanate-methyl, etc. can be used for control.
4. Timely harvest: When the above-ground part of the peanut plant stops growing, the lower leaves drop off, the top leaves turn yellow, most pods underground have clear reticulation, are plump and full, the pod shells are hard and thin, and the seed coat shows the variety's inherent color, harvest can be carried out promptly. When harvesting, choose sunny days and avoid harvesting on rainy days.