Detailed Explanation of Key Techniques for Spring Cultivation of Mini Pumpkins
Mini pumpkin is a first-generation hybrid bred by the Suzhou Vegetable Research Institute, a variety specifically for protected cultivation, with medium growth vigor, dark green leaves, vines 2.0-2.5m long, short internodes, medium branching, and both main and side vines can bear fruit. It has strong adaptability, fast growth, high yield, small individual size, golden yellow color, and good taste, suitable for long-distance...
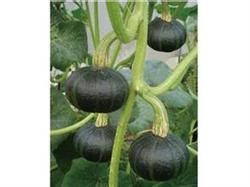
Mini pumpkin is a first-generation hybrid bred by the Suzhou Vegetable Research Institute, a variety specifically for protected cultivation, with medium growth vigor, dark green leaves, vines 2.0-2.5m long, short internodes, medium branching, and both main and side vines can bear fruit. It has strong adaptability, fast growth, high yield, small individual size, golden yellow color, and good taste, suitable for long-distance transport and long-term storage, and is deeply loved by consumers.
The paired county of the "Attach to County to Strengthen Agriculture and Enrich the People" project in Jiangsu Province is Suining in Xuzhou. This county is located in the southern part of the Huanghuai alluvial plain, at east longitude 117°55′, north latitude 33°53′, belonging to a warm temperate semi-humid monsoon climate. The four seasons are distinct, with an annual average temperature of 14°C, precipitation of 800mm, a frost-free period of 210 days, abundant sunshine, and annual sunshine of 2200h; the soil is sandy saline-alkali soil of the old Yellow River channel, with a low groundwater table. This location meets the conditions required for mini pumpkin cultivation, so we chose to trial-plant mini pumpkins in the implementation of the "Attach to County to Strengthen Agriculture and Enrich the People" project. To ensure pumpkin quality, the trial required all farmers to use greenhouse cultivation to facilitate moisture control.
1 Cultivation Season
Spring protected cultivation and autumn delayed cultivation can be carried out. Spring protected cultivation can be sown in staggered batches from February to March to avoid too concentrated market supply. In this trial, sowing was on March 28, transplanting on April 9, pollination began on May 12, harvest began on June 26, and harvesting ended and vines were removed in early July.
2 Sowing and Seedling Raising
2.1 Seed Treatment
For spring protected cultivation, seedlings are raised in greenhouses and other facilities. Various forms such as colorless transparent plastic film mulching or plastic film plus small arch tunnel covering can be used to ensure the suitable temperature needed for seed germination.
When the temperature is low, germination can be promoted. After washing the seeds, soak them in 55°C warm water for 15-20min, stirring continuously. Let the water naturally cool to about 30°C and continue soaking for 2h. Finally, take out the soaked seeds, wash them, wrap them in a wet towel, and place them in a constant-temperature chamber at 28-30°C to promote germination. After about 3 days, when more than 60% of the seeds have sprouted, they can be sown.
When the temperature inside the facility is relatively high, the seeds can be directly soaked and sown. Soak the seeds in clean water for 12h, changing the water 2-3 times. Take out the soaked seeds, wash them, drain the water, and sow directly. Complete seedling emergence can be achieved in about 5 days. The sowing rate in the seedbed is 200g/sq m. Appropriate thin sowing is beneficial for cultivating strong seedlings.
2.2 Sowing Method
After preparing the bed, water it first. Because the relatively dry sandy soil tends to cause water to flow sideways during watering and infiltrate slowly, after watering once, wait for the water to seep down before watering a second and third time, until the soil layer of about 10cm is moistened, then sow evenly by broadcasting. After sowing, gently pat the bed surface with a flat-bottomed iron shovel or wooden board so that the seeds lie flat on the bed surface and closely contact the soil. Then cover with soil about 1cm thick, and water once lightly. If exposed seeds are found, cover them with soil promptly. Colorless transparent plastic film or plastic film plus small arch tunnel covering can be used, which can both retain water and increase temperature.
2.3 Seedling Stage Management
① Bed temperature management before emergence: During the day, as the temperature inside the facility rises, uncover the small arch tunnel promptly so that sunlight shines on the seedbed and raises the soil temperature. Observe temperature changes through a thermometer buried in the seedbed soil, and control the seedbed soil temperature at about 28°C to promote seed germination. When the soil temperature exceeds 30°C, the greenhouse should be properly ventilated to prevent the soil temperature from becoming too high. Around 3:30 in the afternoon, cover the small arch tunnel promptly for insulation. If rainy weather occurs during the emergence period, covering for insulation should be strengthened.
② Temperature management after emergence: When the seeds push through the soil and emerge, remove the plastic film promptly to prevent seedling scorching. Increase ventilation and reduce seedbed soil moisture. According to the seedbed moisture and emergence situation, spread a layer of dry fine soil, which can both reduce seedbed moisture and prevent seeds from "wearing caps." On sunny days, control the temperature at 22-25°C during the day and around 15°C at night, with the minimum not lower than 12%; on cloudy days, short periods of slight ventilation should also be carried out around noon when the temperature is relatively high, to reduce humidity, prevent disease, and prevent excessive growth.
③ Water management during the seedling stage: After the seedbed is watered thoroughly before sowing, no more watering should be done during and after emergence. Water control and humidity reduction should be the main focus to promote good root development. When the seedlings have 1 true leaf and 1 heart leaf, with thick and plump cotyledons, sturdy stems, many white roots, and a seedling height of about 5cm, they can be transplanted.
④ Hardening off: 5 days before transplanting, gradually increase ventilation during the day to enhance the adaptability of the seedlings and shorten the recovery period after transplanting.
3 Transplanting Management
3.1 Preparation Before Transplanting
Mini pumpkins are harvested as fully ripe fruit, so the application of organic fertilizer should be strengthened. Per 667 sq m, spread 3000kg of decomposed pig manure or cow manure and 50kg of ternary compound fertilizer, then plow the land and prepare the beds. To increase yield per unit area, this trial planted 8 rows in 5 beds in a standard galvanized steel pipe greenhouse 6m wide and 100m long. The ditch width is 40cm. On each side of the greenhouse, there is 1 narrow bed 65cm wide, planted with 1 row; in the middle, there are 3 wide beds 100cm wide, each planted with 2 rows, with a plant spacing of 45cm, and about 1800 plants transplanted per greenhouse. After preparing the beds, cover with plastic film promptly to maintain good soil moisture. The greenhouse is fully closed, and raising the soil temperature by closing the greenhouse can promote recovery.
3.2 Transplanting and Recovery Period Management
① Transplanting: It is best to start at around 2:00 in the afternoon on a sunny day, which can avoid direct sunlight exposure and, after one night, is beneficial for recovery. If the planting scale is relatively large, transplanting can also begin in the morning, and water can be added again around noon when the sunlight is stronger to prevent seedling wilting.
According to the transplanting spacing, use a small bamboo pole to punch holes in the plastic film as marks. To facilitate future vine training, a "triangular" transplanting method should be used. Then cut open the plastic film at the corresponding marked positions, dig holes, transplant the seedlings, and finally water. In relatively dry sandy soil, when the amount of water is large and fast, water tends to overflow, and when the soil is soft, depressions form, causing seedlings to lodge. Therefore, watering should be slow and even, or can be done in two times: first water lightly, and after the water seeps down, water heavily once. This can both prevent seedling lodging and make the roots closely contact the soil, improving seedling survival rate. If lodging is found during watering, cultivate soil to support the seedlings. If mud sticks to the leaves during watering, rinse the leaf surface with a small amount of water.
② Management after transplanting. a. Water and fertilizer management. On the second day after transplanting, according to soil moisture conditions, water lightly once if dry; avoid flood irrigation. If soil moisture is sufficient, stop watering. After the seedlings survive, water lightly once promptly to promote seedling growth. When the seedlings have 3 true leaves and 1 heart leaf, according to growth vigor, apply 10kg of urea per 667 sq m with watering to promote seedling growth. Water management should be done in small amounts and multiple times, alternating dry and wet, combining promotion and control, to prevent excessive growth caused by too much water and affecting yield. When the first young fruit grows to egg size, the second fruit sets, and the third female flower opens, apply 20kg of potassium sulfate per 667 sq m with water once to promote fruit expansion. If the seedlings are weak in growth, at this stage 15kg of 45% ternary compound fertilizer plus 10kg of potassium sulfate per 667 sq m can also be applied.
b. Temperature management. After transplanting and before recovery, close the greenhouse to raise the greenhouse temperature and promote recovery, minimizing or avoiding ventilation. After the seedlings survive, ventilate to reduce humidity and prevent excessive seedling growth and disease occurrence. Control the temperature at 25-28°C during the day and around 15°C at night to promote healthy seedling growth.
In the middle and late growth stages, strengthen ventilation to prevent diseases caused by high temperature and high humidity in the greenhouse. That is, after mid-May, remove the greenhouse skirts to enlarge ventilation openings, and also open both ends of the greenhouse completely to accelerate heat dissipation.
c. Trellising. When trellising, stretch 1 wire directly above the narrow beds on both sides, and fix the wire directly on the inner side of the greenhouse frame for vine training; for the 3 beds in the middle of the greenhouse, set a cement support pillar about every 10m in the middle of the bed, place the wire on top of the pillars, and fix both ends of the wire with iron stakes at an angle. To prevent the wire from sagging under force, about every 3m, use thin wire to hang the wire on the greenhouse arch frame to enhance stability.
d. Vine training. When the seedlings begin to fall over at 6 true leaves, train the vines promptly. If vines are not trained for a long time, the vines will also break due to their own weight drooping, affecting flowering and fruiting. It is best to use cloth strips for vine training because the vines are hollow and easy to break; cloth strips are soft and thick, with a large contact area with the vines, which can reduce damage to the vines. The best time for vine training is in the afternoon, after the leaves have lost water through transpiration, when the vines are more flexible and less likely to be damaged. In the morning, the leaves and stems have high water content, are brittle, and easy to break, so vine training is not suitable. Loosely tie the cloth strip at the base of the seedling, then wind the vine around the cloth strip, guide it toward the opposite side of the bed, and then tie the cloth strip to the wire to let the vine climb onto the trellis. This can increase vine length and increase the number of fruits set.
e. Removing side branches. Mini pumpkins mostly use main vine fruiting and single-vine pruning. Remove side branches and male flowers promptly. If side branches are found to be too large, cut them off with scissors to reduce the wound area and reduce damage to the main vine. It is worth noting that when removing side branches and male flowers, appropriately leave more of the male flowers that appear earlier at the base, to prevent the situation where female flowers bloom later but there are no male flowers for pollination.
f. Pollination and fruit retention. Pollination should be carried out promptly after the dew has dried, generally required to be completed before 10:00 in the morning. As the temperature rises, pollen vigor declines, and the suitable pollination time moves earlier. Select male flowers that open on the same day, pick them, remove the petals, and apply the pollen directly to the stigma of the female flower. If the pollen amount of 1 male flower is relatively small, the pollen of 2-3 male flowers can be used to pollinate 1 female flower stigma. The first fruit retention node is around node 11, retain 1 fruit every 4-5 nodes, retain 4-5 fruits per plant, and pinch the growing tip after leaving 5-6 leaves above the last fruit.
g. Pest and disease control. The main pest is aphids, which worsen in spring as the temperature rises, so preventive work should be done promptly. Spray with 10% imidacloprid 2000 times dilution for control.
Ventilation is an important measure to prevent disease occurrence. In the middle and late growth stages of pumpkins, if ventilation is insufficient, high temperature and high humidity in the greenhouse can easily cause powdery mildew. From mid-to-late May, spray with triadimefon 1500 times dilution to control powdery mildew, about once every 10 days, for 2 consecutive treatments. In the later stage, high temperature can easily cause viral disease, which can be controlled by spraying with Virus A 800 times dilution. Once infected plants are found, they should be pulled out promptly.
4 Timely Harvest
Mini pumpkins become fully ripe 40-45 days after pollination, with the fruit surface yellow-white, the fruit ribs showing orange-yellow, a waxy layer appearing on the fruit surface, the rind hardening, and the fruit stalk becoming lignified. Harvesting work is best done in the morning, and the harvested pumpkins should be placed in a cool, ventilated place for storage until sale. Young pumpkins can also be harvested for market according to market demand, generally about 20 days after pollination, after the fruit has fully expanded. Mini pumpkins with a single fruit of about 500g are most welcomed by the market. The current market wholesale price is 1.5 yuan per fruit, with good economic benefits.