Hybrid Tomato Cultivation Methods and Key Technical Points
How are hybrid tomatoes cultivated? Here is an introduction. For hybrid tomatoes, you can refer to the following cultivation techniques: 1. Raising strong seedlings is the prerequisite for high seed yield. 1. Seedbed preparation. Suitable seedling-raising methods can be adopted according to local characteristics, such as hotbeds, cold frames, greenhouses, plastic tunnels, or electrically heated hotbeds. Because foreign parent seeds are relatively scarce, for safety's sake, greenhouse bed sowing is best. To better control the temperature inside the seedbed, a cold frame is best used as the transplanting bed. The cold frame consists of cold-protection material, polypropylene rope, new plastic film, bamboo strips, and bed soil. The cold frame specifications are 1.8 m wide, and the length can be determined according to the seedling-raising area, but it must be no less than 2 m at the shortest. The female parent transplanting bed must be no less than 2.5 m at the shortest. The bed soil is made by uniformly mixing sieved disease-free field soil, decomposed barnyard manure, and decomposed horse manure in a 5:3:2 ratio, with a thickness of 20 cm, and the bed surface is 10 cm deep from the ground.
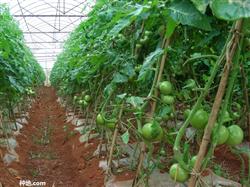
How are hybrid tomatoes cultivated? Please introduce.
For hybrid tomatoes, you can refer to the following cultivation techniques:
1. Raising strong seedlings is the prerequisite for high seed yield.
1. Seedbed preparation. Suitable seedling-raising methods can be adopted according to local characteristics, such as hotbeds, cold frames, greenhouses, plastic tunnels, or electrically heated hotbeds. Because foreign parent seeds are relatively scarce, for safety's sake, greenhouse bed sowing is best. To better control the temperature inside the seedbed, a cold frame is best used as the transplanting bed. The cold frame consists of cold-protection material, polypropylene rope, new plastic film, bamboo strips, and bed soil. The cold frame specifications are 1.8 m wide, and the length can be determined according to the seedling-raising area, but it must be no less than 2 m at the shortest. The female parent transplanting bed must be no less than 2.5 m at the shortest. The bed soil is made by uniformly mixing sieved disease-free field soil, decomposed barnyard manure, and decomposed horse manure in a 5:3:2 ratio, with a thickness of 20 cm, and the bed surface is 10 cm deep from the ground.
2. Seed soaking, sprouting, and sowing. The male parent is sown 10-12 days earlier than the female parent. First put the parent seeds in water at about 25°C to wash off the seed coating, then soak for 8-12 hours, with full soaking as the standard. Wrap the fully soaked seeds in a wrung-out wet towel, place them in a container, and put the container on a heated kang at 28-30°C to sprout. They will sprout in 2-3 days. During sprouting, wash the seeds once each morning and evening with warm water at 25-30°C, and be careful to turn the seeds frequently so the temperature is uniform and sprouting is. When about 80% of the seeds have sprouted and the sprouts are no more than 2 mm long, sow immediately. Sow at 12 noon on a sunny day, and cover with soil evenly. Then, mix fried fragrant crushed soybean cake with carbofuran in a 50:1 ratio, and broadcast 50 g per square meter of seedbed to control underground pests, then cover the bed surface with plastic film to preserve moisture. When the seedlings emerge, remove the plastic film and ventilate so the temperature inside the bed stays at 15°C during the day and 8-10°C at night. After two days, stop ventilating and keep the temperature at 25-30°C during the day and 15°C at night.
3. Transplanting and management. When the seedlings grow 4 leaves, begin transplanting, with a seedling spacing of 8-10 cm x 8-10 cm. Five days before transplanting, prepare the seedbed, dig furrows 5 cm deep on the bed surface according to the seedling spacing, place the seedlings in, then water into the furrows, and after the water seeps down, cover the furrows with dry soil. After the seedlings recover, according to the soil condition, remove the tunnel film in the early morning, water thoroughly with a watering can so the bed soil is wet to 10 cm, then seal the tunnel film tightly to raise the bed soil temperature, so the temperature inside the bed reaches 28-30°C during the day and 15-18°C at night. After transplanting and before the seedlings recover, if the air temperature inside the bed exceeds 30°C, use straw curtains or other shading materials to provide dappled shade on the tunnel film to lower the temperature, avoiding covering too tightly and blocking light. After the seedlings recover, the main task is to control the temperature inside the bed and meet their water needs, and the temperature must be controlled through ventilation. The ventilation openings should be set on both sides of the seedbed, arranged alternately, and their positions should be changed frequently. As the temperature rises, the ventilation openings should gradually become larger. Five days before field planting, gradually remove all the tunnel film to harden the seedlings so they adapt to the open-field environment. Before field planting, drench the roots with 50% thiram 500-fold solution, using 2-3 kg of solution per square meter, and spray the seedlings with 75% chlorothalonil.
2. Positioning
1. Plot selection and crop rotation arrangement. Choose sandy loam, loam, or clay loam with convenient irrigation, good drainage, deep soil, and rich organic matter as the seed production field, and carry out a 3-5 year rotation with crops other than Solanaceae. Female parents of different varieties can be planted adjacent to each other, but there must be an isolation zone of more than 30 m between the male parent of one variety and the female parent of another variety.
2. Land preparation, bed making, and base fertilizer application. In the autumn of the previous year, carry out autumn plowing of the selected plot to a depth of more than 30 cm. The following spring, level the land and promptly harrow and make beds. Both male and female parents use high-bed plastic film cultivation. The bed height is 10 cm for both. The male parent bed is 1 m wide, and the female parent bed is 1.2 m wide. The male and female parent beds are 10-15 m long. Beds with level land and uniform water distribution can be slightly longer; otherwise, they should be shorter. Mix 75 kg of superphosphate and 1500 kg of decomposed pure chicken manure uniformly per mu, mix into 5000 kg of decomposed farmyard manure, apply as base fertilizer into the middle furrow of the bed, and immediately level the bed surface after rain or irrigation when the soil is no longer sticky, then cover the bed surface with 90 cm wide plastic film.
3. Field planting. After the late frost ends, plant in the afternoon, planting the male parent first and then the female parent. When planting, use a hole punch to make planting holes corresponding to the plant and row spacing (both 40 cm), place more than 10 granules of diammonium phosphate at the bottom of each planting hole, plant the seedlings with soil balls into the holes, pour water into the holes twice, and after the water seeps down, seal the planting holes tightly with dry soil.
4. Trellising and vine tying. Immediately after field planting, trellis and tie the vines of both male and female parents to prevent the wind from breaking the seedlings. The male parent uses 60 cm long bamboo poles inserted as single-stick trellises, and the female parent uses 1-1.2 m long bamboo poles inserted as A-frame trellises. The trellises should be inserted on the outer side of the bed 10 cm from the roots.
5. Pruning and side-shoot removal. The male parent is not disbudded. For the female parent, when side shoots grow to about 3.3 cm long, remove them promptly. The female parent adopts a three-stem pruning method. When the main vine is topped above the third inflorescence, select and keep the lateral vines closest to the inflorescence below the first and second inflorescences of the main vine, and remove all other lateral vines. When the main vine is topped at the second inflorescence, in addition to handling it as in the case of topping above the third inflorescence, keep one secondary lateral vine on the first lateral vine and at the position closest to the first inflorescence below its first inflorescence, so that the secondary lateral vine and the two lateral vines form three stems. When the main vine is topped at the first inflorescence, keep the lateral vine closest to the inflorescence below the first inflorescence of the main vine to replace the main vine, remove the other lateral vines, and keep one secondary lateral vine at the position closest to the inflorescence below each of the first and second inflorescences of the lateral vine to form three stems.
Click to get more tomato cultivation techniques
Click to get more vegetable cultivation techniques