Detailed Explanation of Ganoderma (Reishi) Field Cultivation Technology with Soil Covering in a Wild-Simulated Style
China is rich in Ganoderma (reishi), and its products are exported to Japan, South Korea, Singapore, and Southeast Asian countries and regions. Especially after China's accession to the WTO, domestic product demand and export volume will rise substantially. However, in recent years, wild Ganoderma resources have been declining day by day due to massive logging of timber resources, and large-scale artificial cultivation of Ganoderma has become an urgent matter...
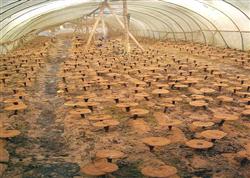
China is rich in Ganoderma (reishi), and its products are exported to Japan, South Korea, Singapore, and Southeast Asian countries and regions. Especially after China's accession to the WTO, domestic product demand and export volume will rise substantially. However, in recent years, wild Ganoderma resources have been declining day by day due to massive logging of timber resources, and large-scale artificial cultivation of Ganoderma has become an urgent matter. The field cultivation technology with soil covering in a wild-simulated style used for many years in Juancheng, Shandong, is introduced as follows:
I. Ganoderma spawn
At present, the Ganoderma purchased on the market is diverse, and the vast majority is G. lucidum (red reishi), while G. sinense (purple reishi), G. atrum (black reishi), G. leucophaeum (white reishi), and G. haematodes (blood reishi) are relatively few. What merchants and foreign buyers favor most is the black reishi variety with a smooth, flat, round cap and thick fleshy context.
II. Cultivation season
Ganoderma is a high-temperature fungus and produces fruiting bodies at constant temperature. The optimal temperature for mycelial growth is 20-28°C, and the suitable temperature for fruiting body growth is 26-29°C. When the temperature is below 20°C for a long time, mycelial growth is slow, and fruiting body growth and development are poor or differentiation cannot occur. When the temperature is above 33°C, it is prone to rot and death. In North China, April is best for cultivation, while other regions should determine the timing according to local temperature conditions.
III. Site selection and shed construction
According to the biological characteristics of Ganoderma, a site with high terrain and smooth drainage should be selected. The shed should be able to retain heat and moisture, be well ventilated, have an appropriate amount of light, and be convenient for operation and management. The materials for building the shed are bamboo poles, wooden sticks, iron wire, and so on, and local materials can also be used. The size of the shed can be determined according to the cultivation quantity; either large or small is fine. The shed height is about 2 m, with doors left at both ends and multiple ventilation openings around the sides. Three to five days before the Ganoderma enters the shed, disinfect the cultivation soil once. Quicklime powder can be used to carry out a strict overall disinfection of the bed surface, then turn and hoe the soil so that the bed surface depth matches the length of the spawn bags.
IV. Cultivation substrate formulas
Sawdust is best as the culture medium, and other raw materials should be tested before large-scale production. The following 3 formulas are introduced:
1. Sawdust 70%, wheat bran 24%, cornmeal 3%, phosphate fertilizer 1%, gypsum powder 1.5%, sugar 0.5%.
2. Corncob 50%, miscellaneous sawdust 35%, wheat bran and rice bran 14%, gypsum powder 1%.
3. Cottonseed hull 77%, wheat bran 10%, cornmeal 10%, sugar, phosphate fertilizer, and gypsum powder 1% each.
V. Preparation of cultivation substrate
The sawdust should be selected from broadleaf tree species; sawdust from pine, cypress, Chinese fir, camphor, and similar trees cannot be used. When preparing the cultivation substrate, first mix the cottonseed hulls, sawdust, wheat bran, gypsum powder, and other materials evenly, then dissolve sucrose in water and mix it in while turning the pile with water. The water content should be 60%-65%, ideally such that when squeezed tightly by hand, no water drips and the mixture does not scatter. After mixing the substrate, it can be bagged. For the bags, polypropylene or polyethylene tube bags of 15 cm x 35 cm x 0.05 cm can be selected, with 350-500 g of dry material per bag. Polyethylene bags are sterilized at normal pressure for 10 hours, while polypropylene bags are sterilized under high pressure for 2 hours. After the substrate cools below 30°C, move it into a sterile box or sterile room for inoculation. Before inoculation, fumigate and disinfect with formaldehyde and potassium permanganate, and at the same time turn on an ultraviolet lamp for 40 minutes, then inoculate under aseptic operation. Move the inoculated spawn bags into a disinfected culture room and arrange them in layers, with the bag mouths facing outward, generally 6-8 layers high per row. There should be appropriate gaps between the bags and the upper layer of shelving to avoid pile burning caused by excessively high bag temperature and damage to the spawn.
VI. Spawn-running management
During the culture period, the culture room temperature should preferably be 26-30°C, the relative air humidity 40%-65%, and ventilation should be provided for about half an hour each day. Inspect the spawn bags every day, and if the bag temperature is too high, turn the pile in time to maintain a balanced substrate temperature in the bags. When the mycelium has grown over 1/2 or 2/3 of the bag, appropriate oxygen supplementation should be given to the spawn bags. The method is to use a sterilized needle tip to poke several holes in the mycelium-grown area about 1-2 cm away from the area not yet covered, or loosen the tying cord at the bag mouth, but it must not be completely untied. After 25-30 days of culture, when the mycelium has fully covered the bag, it can be moved into the shed for soil-covered cultivation.
VII. Soil covering and fruiting body emergence
After the mycelium has fully covered the bag, move it into the cultivation shed for spawn conditioning. When moving it to the field, spread a layer of plastic film on the bed or along both sides, place the spawn bags flat on top, then cover with another layer of plastic film or set up a small arched shed, keeping the temperature at about 25°C. After 3-4 days, use a blade to cut open the spawn bags and take out the spawn cylinders to place them flat; the action should be gentle and slow to avoid damaging the mycelium. Cover with plastic film to retain heat as required above. After 3-5 days, once the layer of prostrate mycelium growing on the spawn cylinders forms a mycelial skin, they can be planted in the ground and covered with soil. Before covering with soil, place the spawn cylinders upright in rows, with a plant-row spacing of 10 cm x 10 cm. Cover with soil while arranging them, fill the spaces between the spawn cylinders with soil, and cover the fungal surface with 1-2 cm of soil, which is suitable. After covering with soil, set up a small arched shed over the bed, just like a vegetable seedling shed, then close the main shed tightly, keep the temperature at 25-30°C, raise the air humidity to 85%-95%, and after 5-7 days primordia can grow. When fruiting bodies emerge, the shed temperature should be maintained at 27-30°C, the air humidity at 90%-95%, with a certain amount of scattered light and sufficient oxygen, and ventilation and air exchange should be carried out 2-3 times a day. When spraying water, do not spray water directly onto the primordia. After 5-7 days, the primordia expand and gradually form caps. After the caps have grown for 2-3 weeks, water can be sprayed onto the caps, and the number of sprayings should be determined according to the temperature inside the shed. After 55-60 days of management, the cap edges turn from white to yellow and then to black. After spore powder is discharged, the cap and stipe are hard, and the underside of the cap changes from white to grayish brown, indicating that the fruiting body is mature and can be harvested.
VIII. Harvesting and post-harvest management
Stop watering 3-5 days before harvest, and close the shed door and ventilation openings. At harvest, cut off from about 2 cm above the base of the stipe with a sharp knife. If there is soil or other debris on the cap surface, gently brush it with a soft brush. Store in a dry room or sell.
After harvesting Ganoderma, stop watering for 2-3 days, raise the humidity to 90%-95%, and keep the temperature at 27-30°C. After 7-10 days, fruiting bodies can continue to grow from the original stipe. Following the same cultivation and management method as the previous stage for about 25-30 days, the second batch of Ganoderma can be harvested; generally 3 batches can be harvested. Each kilogram of dry substrate can produce 170-200 g of dry Ganoderma.