Detailed Explanation of Key Techniques and Operating Steps for Walnut Square Bud Grafting
Walnut square bud grafting gives a high survival rate, is labor-saving and convenient to perform, and the technique is easy to master and promote; it is suitable both for planted young trees and for nursery seedling production. The square bud grafting technique is described below: 1. Grafting time. It can be carried out from late May to mid-July, but the best time is in June, during which...
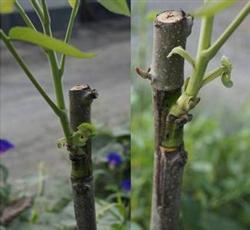
Walnut square bud grafting gives a high survival rate, is labor-saving and convenient to perform, and the technique is easy to master and promote; it is suitable both for planted young trees and for nursery seedling production. The square bud grafting technique is described below:
1. Grafting time. It can be carried out from late May to mid-July, but the best time is in June; grafting during this period gives a high survival rate and vigorous growth. Too early, and the buds on the scion are too tender, so they are unlikely to survive after grafting; too late, and the new shoots have a short growth period after grafting, the new shoots have a low degree of maturity, and overwintering is difficult.
2. Preparation before grafting.
Selecting the scion: Choose relatively plump buds from the middle and lower parts of the current year's new shoots. It is best to choose straight, smooth new shoots, and try to avoid using bow-shaped or triangular new shoots as scions. After collecting the scion, immediately remove the leaves, leaving only a 1 cm long petiole, to prevent water evaporation. It is best to graft immediately after collecting; if you cannot graft immediately after collecting, keep it carefully in a damp, shady place, and store it for no more than 72 hours.
Selecting the rootstock: For two-year-old or older seedling young trees, when selecting current-year new shoots, the growth amount should be greater than 40 cm; one-year-old branches can also be selected, and the diameter at the bud grafting site should be greater than 1.2 cm.
3. Grafting steps.
Taking the bud: Either a rectangular bud or a square bud can be taken; the upper cut should be 1 cm from the upper edge of the bud, the lower cut should be about 1 cm from the lower edge of the petiole, and the two sides should be based on the width of the petiole or slightly wider. A standard tool can be made for taking buds, which is accurate and fast.
Rootstock preparation: On the smoother side of the selected rootstock, decide the position, remove all the lower leaves at the place to be opened, keep 3 to 4 compound leaves on the upper part to supply nutrients, and remove the excess upper shoot tip. Open a cut matching the bud to be grafted; it can be a single flap or a double flap. The lower part of the opening can extend 2 to 3 mm more, serving as a drainage groove for bleeding sap, so as to prevent the bleeding sap from damaging the bud.
Inserting the bud: Immediately put the removed bud into the flap, fit it well, press it firm, and tie it tight. For curved trees, be careful to align the bud and the flap properly: belly to belly, back to back. Use transparent plastic strip 1.5 cm wide, start wrapping upward from 1 cm below the lower edge of the wound, and stop at 1 cm from the upper edge of the cut, wrapping the bud patch tightly and completely to prevent water evaporation and rainwater infiltration, and be careful to expose the bud.
7 to 10 days after grafting, the survival status can be seen: if alive, the bud stays green; if dead, the bud turns brown or black, and it should be re-grafted in time. At 12 to 13 days, surviving buds noticeably swell. After the buds survive, remove sprouts promptly so as to concentrate the nutrient supply.
Cutting the rootstock: When the new grafted bud sprouts 3 to 5 cm, leave 3 to 5 cm of branch above the bud and remove all the rest, then gently tie the newly sprouted shoot and bud to the retained branch to prevent wind breakage. In addition, according to the growth amount of the new shoot, remove the supporting plastic strip in time.
4. Management after grafting. After cutting off the upper branches, the new buds grow very fast, but in autumn they do not shed leaves easily and keep growing late and vigorously, so corresponding measures should be taken to prevent them from suffering freezing damage. From late August, begin controlling fertilizer and water to prevent excessive growth. Around the Beginning of Autumn, pinch the tips to increase the degree of lignification of the new branches. In early to mid-September, before the leaves have fallen, artificially promote their aging; ethephon at 50 ppm can be sprayed, and the concentration should not be too high.