Key Technical Points for High-Yield and High-Efficiency Cultivation of Thin-Skinned Melons in Cold Greenhouses
Thin-skinned melons have traditionally been cultivated by letting the vines trail on the ground, with the vines growing in a tangled and crisscrossing manner that is very difficult to manage, and the yield is also low. When thin-skinned melons are cultivated in cold greenhouses, using the trellising method just like growing cucumbers in large greenhouses, higher yields and economic benefits have been achieved, with an average of 667 sq m producing over 5,000 kg of melons, and a net benefit of...
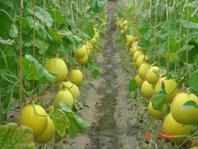
Thin-skinned melons have traditionally been cultivated by letting the vines trail on the ground, with the vines growing in a tangled and crisscrossing manner that is very difficult to manage, and the yield is also low. When thin-skinned melons are cultivated in cold greenhouses, using the trellising method just like growing cucumbers in large greenhouses, higher yields and economic benefits have been achieved, with an average of 667 sq m producing over 5,000 kg of melons, and a net benefit of 10,000-11,000 yuan.
I. The greenhouse construction style should be coordinated with the melon cultivation pattern
The greenhouse is of bamboo and wood structure. The greenhouse frame should be built before the ground freezes in the previous year. A north-south orientation is better, with the ridges inside the greenhouse running north-south; an east-west orientation is also acceptable, with the ridges inside the greenhouse running east-west. Greenhouse construction parameters: central ridge height 200 cm, both sides height 190 cm, width 12 m, length can be determined by oneself, generally 80-100 m long is better. For the columns inside the greenhouse, the row spacing is 160 cm (equal to the width of the "micro-film" used for covering inside the greenhouse, so that "micro-film" can be laid between the column rows in the future). The column spacing is 100 cm (equal to the melon row spacing, so that when melon seedlings are transplanted in the future, they and the columns will all be in a straight line, that is, the column positions will be exactly on the melon ridges). To increase ground temperature, polyvinyl chloride drip-free greenhouse film should be installed as early as possible. After the melon seedlings are transplanted, straw curtains should be placed against the outer surroundings of the greenhouse, and two layers of "micro-film" should be laid inside, making it a greenhouse with three-film covering. The "micro-film" is a light blue film with a width of 160 cm and a thickness of 0.008 cm. Method for laying the "micro-film": above the greenhouse columns, at a distance of 10 cm from the greenhouse film, in the same direction as the melon ridges, stretch a wire every 100 cm, with the wire fixed to the columns. The wire should be exactly aligned with the melon ridge below, and in the future fly strings will be tied to the wire for vine trellising. "Micro-film" is laid over the wire (perpendicular to the direction of the wire). At 10 cm below the first layer of "micro-film", stretch another wire and cover a second layer of "micro-film". Between each layer of "micro-film" and the next, clamp firmly with small clips. When ventilating, remove the small clips and open the seams for ventilation. For the polyvinyl chloride greenhouse film, leave three ventilation seams at the top (at the central ridge) and above the bottom skirts on both sides, normally closed, and opened for ventilation when needed.
II. Land preparation and fertilization
Apply over 5,000 kg of decomposed organic fertilizer, 50 kg of diammonium phosphate, and 30 kg of potassium sulfate per 667 sq m. In combination with deep plowing, plow 60% of the chemical fertilizers into the soil together with the coarse manure. Following the greenhouse orientation, open furrows at a row spacing of 100 cm, apply the remaining chemical fertilizers in the furrows, then make high ridges 15 cm high and 40 cm wide, leaving a 60 cm furrow between two ridges for watering and management. After ridging, cover with white plastic film.
III. Seedling raising
Raise seedlings on January 20, around the time of Major Cold, and the following aspects should be well controlled.
1. Preparation of nutrient soil: half farmyard manure and half fertile field soil that has never grown cucurbits or legumes. Add 2 kg of Sakefu compound fertilizer per cubic meter of nutrient soil, mix well, sieve, and fill into 8 cm x 10 cm nutrient pots.
2. Seed soaking and germination: choose thin-skinned melon varieties such as Hongcheng No. 7 or Century Sweet. Soak the seeds in 12-15 degrees C cool water for 1 hour, then soak in 800-fold chlorothalonil or 300-fold watermelon continuous cropping agent for 5 hours. Wash with cool water and place in a 25-30 degrees C environment for germination. After the sprouts emerge uniformly, place under 10-15 degrees C conditions for low-temperature sprout hardening.
3. Sowing and seedling stage management: place 2 seeds flat in each nutrient pot, cover with 1 cm of fine soil, cover with a small arch shed and straw curtains to increase temperature and retain moisture. Before emergence, 25-30 degrees C during the day and 20-22 degrees C at night; after emergence, 25-28 degrees C during the day and 15-18 degrees C at night, maintaining humidity above 90%. Thin seedlings in time. When seedlings grow to 2-3 true leaves, remove the film for hardening. Transplant when they have 3-4 leaves and 1 growing point.
IV. Transplanting and management after transplanting
Transplant in late February. Plant 1 row on each high ridge, with a row spacing of 100 cm and a plant spacing of 25 cm, at a density of 2,678 plants per 667 sq m.
1. Temperature and humidity control: after transplanting, keep the greenhouse closed. During the day 25-32 degrees C, at night not lower than 15 degrees C. After seedling recovery, 24-30 degrees C during the day and 15-18 degrees C at night. After fruit set, 28-32 degrees C during the day and not lower than 16 degrees C at night. When the temperature is high, ventilate to cool and remove moisture, maintaining humidity at 60%-70%. Once hit by a cold spell, a brief 2 degrees C low temperature inside the greenhouse will not cause the seedlings to freeze.
2. Fertilizer and water management: 5-7 days after transplanting, choose a sunny day to water for seedling recovery. Early-stage moisture should not be too much, to prevent excessive growth and flower and fruit drop. During the fruit enlargement stage, water supply must be sufficient.
When the melons grow to the size of an egg, apply 10 kg of urea per 667 sq m with irrigation. After each subsequent set of melons sets fruit, apply 5 kg of urea and 5 kg of potassium sulfate. Note: do not water within 7-10 days before harvest to prevent fruit cracking.
3. Single-vine pruning: when the main vine grows 6-7 leaves, fix each plant with a rope to the wire above, tie a 10 cm long wooden stick at the bottom and insert it into the ground, pull the rope tight, and wind the vine around the rope (the same as trellising cucumbers in a greenhouse). Each leaf axil of the melon grows an axillary bud (if allowed to grow, it will become a lateral vine). First remove the axillary buds of the two leaves near the ground, keep the axillary buds from the 3rd to the 7th leaf. When the axillary bud grows its first leaf and a small melon grows in its leaf axil, pinch off the leaf before the melon, leaving only 1 leaf and 1 melon; prune the axillary buds from the 3rd to the 7th leaf in the same way. After fruit set, select and keep 3-4 melons with thick fruit stalks and proper fruit shape. The main vine continues to grow upward, and when it reaches the top of the greenhouse, pinch off the tip. At this time, count downward from the top and keep 3-4 axillary buds, prune the axillary buds as before, then set 2-3 melons. Remove the remaining axillary buds as they grow. Each plant bears two sets of melons, top and bottom, generally 5-7 melons.
4. Artificial supplementary pollination: dip the tip of a brush in male flowers, then apply the collected pollen to the stigma of female flowers; alternatively, mix 5 mL of 2,4-D with 1,000 g of water and spray it into the center of female flowers with a small sprayer. Note that it should be sprayed on the day the female flower opens or the next day. To prevent repeated spraying of flowers, which can cause fruit cracking, bitter melons, and deformed melons, add some pigment to the solution as a marker. This method is simple, easy to operate, and has a high fruit-setting rate, fast fruit enlargement, early maturity, and high yield.
V. Pest and disease control
Damping-off. When sowing, mix 1 part fine copper sulfate powder, 1 part fine quicklime powder, and 100 parts fine soil evenly as the covering soil for the sowing seedbed; downy mildew, control with fosetyl-aluminum or ridomil, etc.; powdery mildew, control with thiophanate-methyl or triadimefon, etc.; fusarium wilt, use zineb or dexon for root drenching or spray thiophanate-methyl, etc.
Aphids, whiteflies, red spider mites, etc., control with 17% aphid-whitefly-mite smoke agent.