Cultivation Techniques for Cherry Tomatoes in Solar Greenhouses
Cherry tomatoes have high ornamental value and are also rich in nutritional value; they can be served as a vegetable on the dining table and eaten as a fruit in a fruit platter. With a balanced sweet-and-sour taste and a unique flavor, they are deeply loved by people. Cherry tomatoes are currently the most popular tomato variety in vegetable thinning, available all year round. Their single fruit weighs about 14 grams...
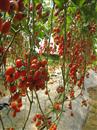
Cherry tomatoes have high ornamental value and are also rich in nutritional value; they can be served as a vegetable on the dining table and eaten as a fruit in a fruit platter. With a balanced sweet-and-sour taste and a unique flavor, they are deeply loved by people. Cherry tomatoes are currently the most popular tomato variety in vegetable thinning, available all year round. Their single fruit weighs about 14 grams, with a sugar content as high as 9.8 degrees, thick flesh, moderate sweetness and sourness, crisp skin, and good taste. They have strong fruiting ability, with a single truss bearing up to about 60 fruits, and a plant trained with double stems can bear more than 500 fruits. The cultivation techniques are as follows:
1. Soil Selection and Cropping Season Arrangement
(1) Soil selection. Loam and clay loam with good water retention, sufficient sunlight, and good ventilation in a solar greenhouse are preferable.
(2) Cropping season arrangement. Year-round production is possible. Generally, for spring cultivation, seedlings are raised in February, transplanted in mid-to-late March, and harvesting begins in mid-to-late May. For autumn cultivation, seedlings are raised in July, transplanted in September, and harvesting begins in November.
2. Seedling Raising
(1) Seed disinfection and soaking for germination. Scald the seeds with water at 50-55°C, stirring continuously until the water temperature drops to 25°C, then soak for 6-8 hours. Remove and wrap in a wet cloth, place at 27-30°C for germination, and rinse 1-2 times daily. Once the seeds show white sprouts, they can be sown.
(2) Nutrient soil preparation. 40% decomposed livestock manure or peat soil, 40% garden soil, 10% manure powder, 10% furnace slag, uniformly sieved, then mix in 1-2 kg of superphosphate per cubic meter. After thorough mixing, the nutrient soil can be placed into nutrient pots.
3. Sowing
The sowing rate is 30-45 grams per mu, and 10-15 grams per square meter of sowing bed. Spread an 8 cm thick layer of nutrient soil in the sowing bed, water thoroughly, then for each square meter of seedling bed, use 10 grams of Wudai mixture (an equal mix of 5 grams of 40% quintozene and 5 grams of 70% zineb) plus 15 grams of fine soil, mix thoroughly, and before sowing scatter 1/3 as base soil, and after sowing use 2/3 of the medicated soil as covering soil. After sowing, cover the seeds with 1 cm of soil and cover with plastic film. When 60% of the seeds have emerged, remove the plastic film. When the seedlings grow two true leaves, they can be transplanted into nutrient pots.
4. Seedling Stage Management
(1) Temperature management. Before emergence, 30°C during the day and 24°C at night are conducive to emergence. After emergence, 25°C during the day and 17-18°C at night are suitable.
(2) Light during the seedling stage. For winter and spring seedling beds, choose a location with strong light. For summer seedling raising, increase ventilation to prevent leggy growth. At noon when light is too strong, provide appropriate shading to prevent seedling scorching.
(3) Water management during the seedling stage. After sowing, keep the soil moist, and water thoroughly when transplanting seedlings. After the seedlings recover, water when the surface soil appears dry, maintain soil moisture, and keep relative air humidity between 60%-70%.
5. Transplanting
(1) Transplanting time. For the spring crop, in early-to-mid March, transplant when the minimum soil temperature at 10 cm depth in the solar greenhouse is above 15°C and stable for 5-7 days. In spring, transplant on a sunny morning; in summer, transplant on a cloudy day or a sunny afternoon.
(2) Transplanting method. Transplanting in dark water is best. That is, first dig holes, water thoroughly, then place the seedlings with their soil balls into the holes. The transplanting depth should just cover the soil ball.
(3) Transplanting density. Generally, the large row spacing is 100 cm, the small row spacing is 60 cm. For double-stem training, the plant spacing is about 50 cm; for single-stem training, the plant spacing is about 40 cm.
6. Management After Transplanting
(1) Plant training. Cherry tomatoes mostly use double-stem training, that is, keeping 1 side branch below the first truss and removing the rest. When removing side branches, wait until they grow to 6-8 cm and remove them promptly. If pruning is too early, it easily causes premature aging of the plant; if pruning is too late, it easily causes nutrient consumption and leggy growth, affecting fruit set. For year-round cultivation in solar greenhouses, after the plants grow taller, lower and coil the vines in time, and promptly remove dead and old leaves below the fruiting branches.
(2) Temperature management. For winter and spring cultivation, the key in the early stage is to prevent freezing and protect the seedlings, striving to restore the seedlings as early as possible. Do not ventilate for 3-4 days after transplanting, and maintain the indoor daytime temperature at 30°C and nighttime temperature at 18-20°C. After the seedlings recover, maintain 20-25°C during the day and 13-15°C at night. When the first truss begins to bloom, appropriately lower the indoor temperature to control vegetative growth, promote reproductive growth, and coordinate the relationship between vines and fruits. For summer cultivation, pay attention to strengthening ventilation to prevent leggy growth from high temperatures.
(3) Fertilizer and water management
① Before fruiting. Before fruiting, the transplanting water must be watered thoroughly. Combined with the soil and plant growth vigor, appropriately supplement water for seedling recovery and vine extension, and control water as appropriate to promote strong seedlings. Especially when flowering, never apply large amounts of water, which can cause flower drop. The timing of topdressing should be determined according to the plant growth condition and the application of base fertilizer. If the seedlings are not growing well enough, appropriately apply nitrogen fertilizer, combined with a small amount of phosphorus and potassium fertilizer.
② After fruit set. After the first truss has set fruit, promptly end the seedling restraint, water and topdress in time to promote fruit development. Thereafter, topdressing should focus on phosphorus and potassium fertilizers, and apply as little nitrogen fertilizer as possible. Every 5-7 days, water and topdress according to soil moisture and plant growth conditions, and also appropriately supplement foliar fertilizers such as potassium dihydrogen phosphate and potassium treasure. Water evenly, not sometimes more and sometimes less, to avoid sudden changes between dry and wet soil, otherwise cracked fruit and hollow fruit will appear.
③ Flower dipping. For winter and spring cultivation, flower dipping with fruit-setting hormone must be used.
7. Pest and Disease Control
Aphids and whiteflies can be sprayed with 10% imidacloprid, once every 7 days. For damping-off and seedling blight, spray 25% metalaxyl wettable powder at 800-900 times dilution or 75% chlorothalonil wettable powder at 600 times dilution. For early blight, use 45% chlorothalonil smoke agent or 10% procymidone smoke agent, 200-250 grams each time.