Vermicomposting: Turning Kitchen Waste into Fertilizer
Research and development of vermicomposting: How do you handle your household kitchen waste? If you always throw it away, that is actually a waste. Below we will teach you how to use kitchen waste to make valuable fertilizer. Kitchen waste is produced by every household every day
Research and development of vermicomposting: How do you handle your household kitchen waste? If you always throw it away, that is actually a waste. Below we will teach you how to use kitchen waste to make valuable fertilizer.
Kitchen waste is the organic garbage produced by every household every day. Due to the special dietary habits of people in this country, kitchen waste generally accounts for about 30% by weight. Add to that the discarded vegetable leaves and residues from general fruit and vegetable markets, and if such a huge amount of kitchen waste can be effectively treated and further utilized, it can not only extend the service life of landfill sites and greatly reduce the fuel costs of incinerators, but also save environmental protection agencies a great deal of manpower, material resources, and transportation costs. The purpose of this composting project is to address the treatment of household kitchen waste, intending to use the special habits of certain specific earthworm species to digest and decompose household kitchen waste into a broad-spectrum organic fertilizer, which can make an unparalleled contribution to many currently developing environmental protection undertakings (such as organic agriculture).
Preparation Before Making
I. Equipment, Materials, and Setup
1. Plastic bucket (rectangular): The size depends on the number being raised. About 30-50 liters capacity is more suitable for general household use, raising about 2,000-3,000 earthworms. Drill two small holes about 2 cm in diameter in the bottom of the bucket to drain excess water.
2. Plastic anti-slip mat (for bathroom use): Lay it on the bottom of the bucket to prevent water from accumulating at the bottom, which is unfavorable for earthworm activity.
3. Plastic mesh screen (for window screens): Lay the mesh screen flat over the anti-slip mat to prevent earthworms and bedding material from falling onto the anti-slip mat.
4. Water sprayer or sprinkler: One used for watering flowers is sufficient.
5. Thick cardboard or newspaper: Used for covering and shading light.
II. Earthworms
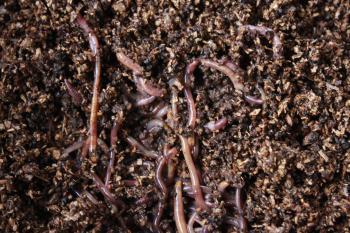
This experiment used red earthworms of the Australian genera Eisenia and Perionyx. Both genera are red compost worms. Adult worms have an average body weight of 0.5 grams, a body length of 7-10 cm, and a diameter of 0.3-0.5 cm. They mostly grow 5-10 cm below the ground surface in dark, moist, organic-rich humus soil or fermented animal manure. Their daily food intake is about 70% to 100% of their body weight. Because these two genera of earthworms have a large food intake, the reproductive period from juvenile worm to adult worm is only about 4-6 months. Red earthworms of these two genera can be collected from the moist humus soil of dark ditches everywhere on this island, and from the straw compost piles of pig farmers.
III. Basic or Covering Material
This is used as the material initially spread on the bottom of the bucket and as the material spread over the top after each addition of kitchen waste, and it can also serve as food for the earthworms. For example: peat moss, sawdust (preferably after piling and decomposing), bagasse, rice hulls, crushed peanut shells, waste paper (torn up, soaked in water until softened, then drained before use), etc. Each of the above materials can be used alone or mixed, but when used they should preferably contain about 40% water.
IV. Main Material
Household kitchen waste includes household leftovers, all kinds of fruit peels, tea dregs, leftover soup and juices, and even leftovers from the next meal.
Production Process
I. First lay the anti-slip mat flat on the bottom of the plastic bucket, cover it with the mesh screen, then place the basic material in to a thickness of about 10-15 cm. Sprinkle water thoroughly and turn the material so that it is evenly moist inside and out, then press it down slightly to prevent excessive evaporation of water.
II. Introduce about 1 kg of earthworms (about 2,500 adult worms, or about 4,000-6,000 juvenile and young worms) or more. The number of earthworms depends on the estimated daily amount of kitchen waste. The earthworms will lurk in this material for several days. As they adapt to the new environment, their activity will be relatively slow, and they will feed on the basic material. During this period, gently sprinkle water on the surface of the material every 1-2 days to keep it moist.
III. Cover the top of the setup with thick cardboard or a wooden board to avoid direct sunlight on the surface, which would evaporate too much water and affect the earthworms' activity space.
IV. After one week, kitchen waste can be added. You may first pile the daily kitchen waste in a covered plastic bucket for about 3-4 days, and after a certain amount has accumulated, add it all at once. In principle, after the added kitchen waste is evenly spread on the basic material, spread a thin layer of basic material over it, with the thickness based on the principle of covering the kitchen waste, and then gently sprinkle water on the surface.
V. After the earthworms adapt to the environment, they begin to eat large amounts. If there is insufficient kitchen waste, they will feed on the basic material. If food is sufficient, the earthworms grow rapidly. Adult worms produce 1-2 egg capsules per week. Earthworm eggs hatch into juvenile worms after three weeks, with one to several hatching from each egg. In this way, they are passed down from generation to generation, multiplying several times over after about 4-6 months. As the earthworm excrement is continuously secreted, accumulated, and thickened, the earthworms automatically climb onto the newly placed material and kitchen waste layer to continue foraging.
Implementation Results
After about 3-4 months of implementation, the kitchen waste in the lowest layer near the bottom of the setup, after being fully eaten and digested by the earthworms, has mostly all become odorless, tasteless dark brown fine powder or fine granular vermicompost soil. When touched by hand, it feels soft and elastic, slightly sticky, and easily forms clumps when rubbed.
I. During the process of forming vermicompost soil, most of the earthworms have already climbed and drilled to the upper layer to feed on new kitchen waste. Therefore, when collecting the vermicompost soil, you can first move the upper layer (about 10-15 cm) to a new culture bucket to continue feeding on kitchen waste. The excavated vermicompost soil contains only a small number of earthworms and earthworm eggs.
II. If implemented normally as described above, then after the first excavation of vermicompost soil, vermicompost soil in approximately equal quantity to the previous time can be excavated again about every 6-8 weeks.
III. Analysis of the composition of vermicompost soil shows it contains nitrogen 1-2%, phosphorus 0.2-1.0%, potassium 0.5-1.0%, calcium 0.7-1.5%, magnesium 0.15-0.4%, copper 10-25 ppm, iron 300-600 ppm, organic matter 50-60%, and pH 6-7.
IV. Vermicompost is rich in various nutrients needed by plants. It can be used directly as organic fertilizer, and can also be combined with other types of organic fertilizers to make various types of fertilizers for different uses. It can even be used directly as the fertilizer needed for the currently popular organic cultivation.