A Detailed Guide to Dong Quai (Angelica sinensis) Planting Methods and Key Technical Points
Dong Quai (scientific name: Angelica sinensis) is also known as Gan Gui, Qin Na, Xi Dang Gui, Min Dang Gui, Jin Dang Gui, Dang Gui Shen, Han Gui Wei, Dang Gui Qu and Tu Dang Gui. It is a perennial herb, 0.4-1 m tall. The flowering period is June-July, and the fruiting period is July-September.
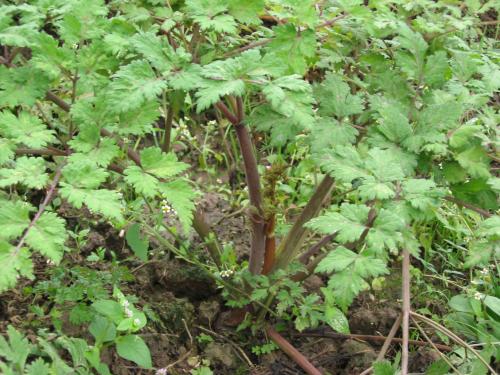
Dong Quai planting methods:
1. Site selection and land preparation
For the seedling bed, a cool, semi-shaded mountain slope is preferable, with loose, fertile sandy loam soil being best; for the cultivation site, choose idle land or second-year fallow land with deep soil. In mid-July, first cut down the shrubs and weeds, spread them on the ground, burn them to clear the land, then plow the soil deeper than 25 cm and let it weather and mature in the sun. Then, before planting, apply 2,500 kg of decomposed farmyard manure per mu during land preparation and plow it into the soil as a base fertilizer. Before sowing, shallow-plow once more and make raised beds 1.3 m wide with 40 cm-wide furrows between beds, and open drainage ditches all around.
2. Transplanting
Generally, transplanting in early to mid-April is the suitable time. If too early, the seedlings are prone to damage from late frost after emergence; if too late, the seedlings have already sprouted, reducing the survival rate. On the finely raked planting site, use stratified seedlings and dig holes in a triangular staggered arrangement at a row spacing of 33 x 27 cm, with holes 20 cm deep. Then select seedlings with a root crown diameter of 0.3-0.4 cm, plant 3 seedlings per hole arranged in a triangular pattern, and after planting, cover with soil while pressing firmly. When the soil has covered half the hole, gently lift the seedlings upward so the root system spreads out, then fill the hole with soil, apply an appropriate amount of burnt soil ash or farmyard manure, and cover with fine soil just past the root crown by 2-3 cm.
3. Thinning and final thinning
When the seedlings are 3 cm tall, carry out the first thinning; half a month later, carry out the second thinning, and when the seedlings are 10 cm tall, carry out final thinning. For hole sowing, keep 2-3 strong seedlings per hole.
4. Cultivation and weeding
Carry out 3-4 times each year. The first time is after the seedlings are fully established, when they are 3 cm tall, combined with thinning and weeding once; the second time is when the seedlings are 6 cm tall, combined with thinning and weeding again. At this time, because the main root has not yet penetrated deep into the soil, shallow cultivation is appropriate; the third time is after final thinning, when it can be appropriately deeper; the fourth time is when the seedlings are 20-25 cm tall, when deep hoeing can be done. After the rows close, no further cultivation and weeding are carried out.
5. Topdressing
During the seedling stage, do not apply too much nitrogen fertilizer, to avoid excessive growth causing early bolting. In the middle and late growth stages, appropriately increase the application of human and livestock manure water, burnt soil ash or compost, etc., at 2,000 kg per mu. If conditions permit, cake fertilizer, superphosphate and farmyard manure can be composted together and applied in furrows between rows, then covered with soil to cover the fertilizer and earthed up, to promote root growth.
6. Drainage and irrigation
In the early growth stage, apart from proper watering during drought, generally control water use. If there is too much rain, drain the ditches promptly, especially in the late growth stage; the field must not accumulate water, otherwise root rot is likely.