Detailed Explanation of Key Techniques for Raising Chinese Pistache (Pistacia chinensis) Bonsai Seedlings
In recent years, influenced by the market and seedling-raising techniques, demand for Chinese pistache (Pistacia chinensis) seedlings has continued to rise. In order to effectively carry out base construction and form a large-scale production and processing industry chain for Chinese pistache as soon as possible, the research, promotion and application of practical techniques such as Chinese pistache seedling cultivation, low-yield forest improvement, and pest and disease control have simultaneously become real problems faced in production. In response to the problems of the high oil content of Chinese pistache seeds, the treatment of the waxy layer on the seed coat, and the low success rate of seedling raising, and combining this with practice, a set of simple and easy-to-implement seedling-raising techniques that save manpower and material resources, achieve a high emergence rate and seedling survival rate, and produce remarkable results has been summarized and is introduced below.
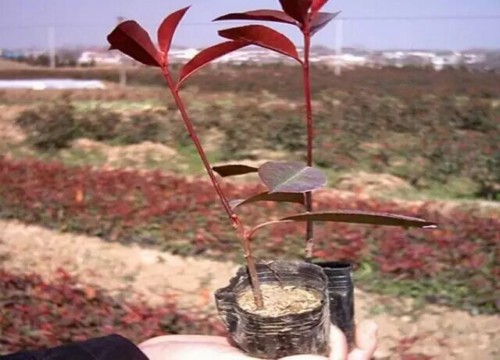
1. Nursery site selection and treatment
To reduce transport and save nursery land, it is advocated to "move the nursery around the afforestation hills," that is, to choose as far as possible a place close to the afforestation site, convenient for transport, with flat terrain, a water source or irrigation conditions, and easy to manage, so as to plant and raise seedlings nearby and take soil nearby.
In the leveled nursery land, divide the seedbeds and paths. The seedbeds are generally 1.0-1.2 m wide, and the bed length is not limited and can be determined according to the terrain. The paths are 40 cm wide. Low beds should be used.
2. Selection of seedling containers
Container materials are required to be light in weight and low in price, with good aeration and water permeability, and good stability and decomposability. Cylindrical plastic film containers with bottoms can be used, 13 cm in diameter and 20 cm high, with a film thickness of 0.02-0.06 mm. Evenly punch 4-6 small holes 0.5 cm in diameter in the middle to facilitate aeration.
3. Preparation, disinfection and bagging of the nutrient substrate
The nutrient substrate can be adapted to local conditions and made from local materials. The main components of the nutrient substrate that can be used are forest soil, turf soil, cultivated soil, raw loess and the like, which are beneficial for water permeability, aeration, and retention of water and fertilizer. Appropriately mix in some vermiculite, perlite, sawdust, bark powder, river sand, wood chips and so on to ensure seedling root growth, respiration, and absorption of nutrients and water. A lightweight substrate can also facilitate lifting seedlings and transport for afforestation. For large-scale promotion and application, mainly use topsoil from the cultivated layer, mixed with a certain amount of decomposed barnyard manure, compost, and chemical fertilizers such as superphosphate, potassium sulfate, and urea. If ordinary soil is selected, it must be disinfected (using a 0.5% potassium permanganate solution, spraying 5 kg per 100 kg of nutrient soil) to reduce infection by miscellaneous soil bacteria, and according to the soil conditions, apply insecticide as well.
The various components of the prepared nutrient substrate must be mixed evenly, and the dryness and wetness must be moderate, so that it does not stick to the hand when squeezed and the soil forms a ball. Before bagging, it must be sieved to ensure the soil is fine and crumbly. When filling the containers with nutrient substrate, it must be compacted, with the standard being that it does not leak when lifted and does not collapse when watered. The nutrient substrate should be filled to about 2 cm below the upper rim of the container to facilitate covering with soil after sowing and watering during seedling cultivation. After the bags are filled, arrange them neatly and tightly along the seedbed, and fill the gaps between bags with fine soil; otherwise it will affect seedling emergence, growth and management.
The management methods and precautions during the seedling stage are introduced below.
Removing the cover: When the emergence rate reaches more than 50%, the film can be gradually uncovered or the mulch removed depending on the temperature. During continuous sunny days with high temperatures, the film can be cut open at irregular intervals for ventilation to prevent seedling scorching; after most seedlings have emerged, gradually cut open all the film; when the seedlings have been fully hardened and emerge uniformly, remove the film or mulch.
Thinning: One week after the seedlings have all emerged, thin out excessive seedlings. Keep 1-2 plants in each container. Promptly fill in seedlings for containers missing plants, and water promptly after thinning and filling in.
Topdressing: When the seedlings are 15 cm tall, begin topdressing. Use foliar spraying with a 0.2%-0.5% urea aqueous solution, spraying 2-3 times in total during the rapid growth period. Topdressing should preferably be carried out in the evening, and fertilization at midday under high temperature must be avoided.
Watering: Water promptly and in appropriate amounts. Immediately after sowing or transplanting, water thoroughly. During the emergence period and seedling growth period, water frequently in multiple moderate amounts to keep the culture substrate moist; during the rapid growth period, water in larger amounts but less frequently, watering again after the substrate has reached a certain degree of dryness.
Weeding: Grasp the principle of "weed early, weed small, weed completely," ensure the nursery land is free of weeds, and when hand weeding, pull out weeds with their roots while the substrate is moist, taking care to prevent loosening the seedling roots.
Leveling the beds: If the substrate in the containers is found to have sunk during the seedling-raising period, it must be filled up promptly to prevent the root system from being exposed. Promptly control pests and diseases.
Preventing sunscald injury: The main manifestation is rot at the root collar of the seedlings caused by sunscald after emergence. You can spray water to lower the temperature, and promptly spray water to cool things down before the ground temperature rises at noon on sunny days; for shading treatment, you can build a shade shed or use a shade net.
Lifting and transporting seedlings: Water once 1 week before lifting seedlings for afforestation. This can both increase the moisture of the soil in the plastic film containers and maintain the compactness of the soil in the plastic film containers so that it does not loosen. Do not crush the seedlings when lifting and transporting them, and ensure the nutrient soil ball remains intact and undamaged. Cut off the root system outside the containers.