Methods for Carving and Shaping Narcissus Bonsai and Key Points for Care and Management
Narcissus has elegant, understated flowers and a subtle, delicate fragrance. It is commonly grown at home in water and blooms around the Spring Festival, and is known as the "Fairy of the Waves." Careful observers will notice that some bulbs in flower markets bear cut marks. This is not because the bulbs rotted and the shop removed the damaged parts, but rather a technique for promoting narcissus blooming and creating narcissus shapes——narcissus carving.
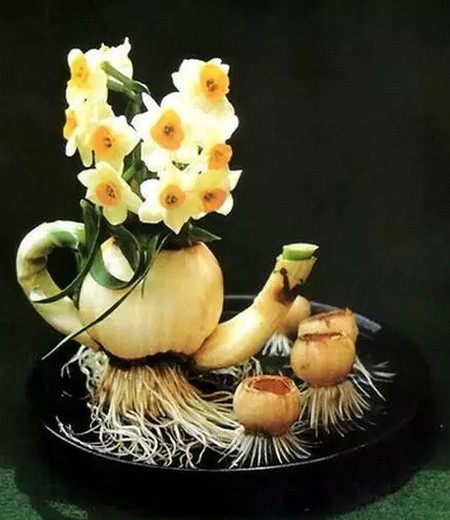
Narcissus carving refers to shaping narcissus through carving, and is an auxiliary craft for enjoying narcissus. Carving works by disrupting the development of cell tissue, causing deformed growth to achieve the shape. Plants have the characteristics of growing toward light (aboveground parts) and growing toward wounds, so by adjusting the light source and the wounded parts, the leaves can be made to grow in the desired direction.
1. Carving Time
It is best when the main sprout has grown about 3 cm out of the bulb and no new roots have emerged at the bottom. If new roots have already grown, thick, upright and white, about 1 cm long, that is also acceptable.
If the main sprout has just emerged from the bulb and you carve then, because the leaves are too short, after paring away the leaf edge the leaf will later take on a sickle shape (curving upward at the top and straight at the bottom), and the shape will be uncoordinated. If the leaves are too long (more than 5 cm), it is very difficult for their curvature to reach the ideal form after carving.
2. Removing Dead Roots and Dead Bulb Skin
Remove the dead roots and soil at the bottom of the bulb, as well as the layer of brown dead bulb skin on the outside of the bulb.
3. Peeling the Bulb Scales
About 1 cm above the roots, make a horizontal cut. Beginners should not cut too deep in one go, to avoid cutting through the leaves and flower stems.
4. Carving the Leaf Bracts
Slowly pick away the scales on both sides of the leaf bud so that the entire leaf bud is exposed. Be patient and meticulous, and be sure not to bruise the leaf bud.
5. Paring the Leaf Edges
Use the middle, index or ring finger of the left hand to push up the flower bud column to be pared, which helps the leaf layers spread apart. Use a carving knife to pare away one third of the leaf edge. Whichever side is cut will curve toward that side.
6. Carving the Flower Stalk
The upper part of the flower bud is the flower bud proper, and the lower part is the flower stalk. When carving the flower stalk, pare it from top to bottom to a depth of about 1/4.
7. Handling the Daughter Bulbs
The small bulbs at the side may be kept or removed depending on the desired shape. The carving method is the same as for the mother bulb.
8. Care After Carving
Soaking in water: The carved bulb should be immediately immersed in water, and the water temperature should be the same as room temperature. Place the carved wound face down, soak for 1 day, then take it out, hold it, and vigorously shake off the glue-like mucus that seeps out. Change to fresh water and soak for another 1 day, then shake off the mucus clean again in the same way. In this way, the wounds on the scales and leaves can heal while maintaining their original color.
Covering with cotton to protect roots: After soaking in water, the narcissus bulb generally needs to be kept lying flat for about 10 days of care (for shapes such as boats and teapots, after carving it should be kept upright with the wound face up). Do not use too much water for water culture; if the water rises above the bulb wound, it easily causes mold and rot, while if it is away from water for a long time, it will dry out. Therefore, cover one end of a thin piece of absorbent cotton over the root disc and let the other end dip into the water. The moist cotton serves to protect the roots and can ensure the normal growth of the narcissus bulb.
Adjusting placement: After about 10 days of care following carving, the roots have grown to 3-5 cm, and the leaves have basically curled in the expected direction. At this point, adjust the placement and manage them separately. Some are still kept lying flat in water, such as the crab shape; some need the root disc away from the water and tilting upward, finally standing the narcissus bulb upright, such as the elephant shape; and some need to be tilted upright so that the uncarved side of the bulb becomes the viewing side, such as the gourd shape.
Correction: Not all bulbs that have been carved and grown in water will grow according to the intended shape, so correction is needed. The objects of correction fall roughly into two categories: one is that the direction or position of flower and leaf growth is inappropriate and needs to be guided and trained; the other is that the initial carving was not done in place, and after a period of care the problems become obvious. No matter which type of problem is being solved, whenever you use the knife, you must be especially careful. After carving and water culture, the leaves and flower stalks of the bulb are very fragile, and they will break at the slightest carelessness. For some carved shapes, once flowers or leaves are missing, there is no way to make up for it.