Detailed Guide to Propagating Daphne odora 'Aureomarginata' by Cuttings
Some gardening enthusiasts use indolebutyric acid to treat gold-edged daphne (Daphne odora 'Aureomarginata') cuttings. After a month or so, although some cuttings can sprout and unfold leaves, they will not survive after a period of time. Even if they are repotted in fresh soil, they will eventually suffer complete failure. There are three main reasons for cutting failure.
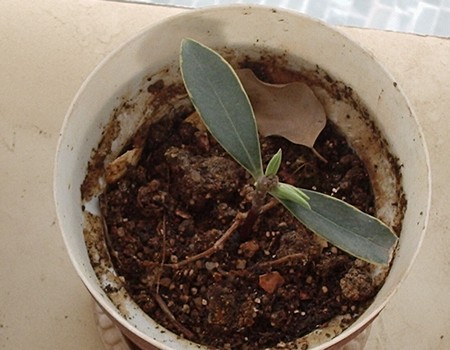
1. Improper cutting time
Gold-edged daphne is neither cold-tolerant nor heat-tolerant, so the season must be well chosen when taking cuttings. The best time for cuttings is spring and autumn, and the best is when new buds are about to sprout in early spring. Cuttings taken in other seasons are not easy to root. When taking cuttings, select branches grown in the previous year, cut them into about 10 cm lengths; it is even better if the lower end has a heel. Leave 2 to 3 leaves at the upper part and cut off the rest. Treatment with exogenous rooting hormones is better. Cultivating in a sand bed requires shading, keeping the sand bed moist but not overly wet, and covering to protect from rain during the rainy season.
2. Improper use of exogenous hormones
Using indolebutyric acid as an exogenous hormone to promote rooting in shrub flower cuttings generally has obvious effects. However, if the concentration of indolebutyric acid is insufficient or the treatment time is too short, cutting failure will result. When using indolebutyric acid, the usual concentration should be 50 ppm, and the treatment time should be 24 hours. To finish treatment in a short time, increase the concentration to 250 ppm and treat for 10 minutes. Note that low concentration requires a longer treatment time, while high concentration requires a shorter treatment time.
3. The "false live" phenomenon
During cutting propagation, if cuttings quickly sprout and grow leaves but do not grow roots, this is the "false live" phenomenon. The sign that a cutting has survived is that it has grown roots. If roots have not yet grown while the cutting consumes its nutrients in sprouting and growing leaves, this is even more unfavorable for eventually forming a seedling. If there are many leaves, air humidity is low, and leaf transpiration is strong, the cutting's water balance will be disrupted and it will dry up.
As we mentioned earlier, gold-edged daphne rarely sets fruit, so it is usually propagated by cuttings. In response to the above phenomenon of gold-edged daphne cutting failure, we will now introduce the specific operation methods.
1. Cultivation season and regions
Gold-edged daphne is always cultivated in spring each year, that is, in March and April. At present, it is only suitable for cultivation in areas south of the Yangtze River in China, such as Jiangxi, Fujian, Guangxi, Guangdong, Zhejiang, Hunan, Sichuan, Yunnan, Taiwan, China, and other provinces.
2. Cutting time
The cutting time for gold-edged daphne should be chosen from late May to mid-June or from late August to early September each year, because the temperature difference between day and night in these two periods is relatively small, which is very suitable for rooting and sprouting.
3. Preparation before cutting
Selection and treatment of cuttings: The selection of cuttings is very important. We should select from 2-3 year old plants, choosing healthy current-year branches free of pests and diseases as cuttings. The selected branches should already be semi-lignified. According to practical experience, the survival rate of cuttings from such branches is very high. After cutting the branches, we should also remove excess leaves, leaving only 5 to 8 leaves, and cut them to about 7 cm. If too long, it not only wastes branches but also affects the ornamental effect after survival. When cutting the branches, we should cut the cutting part into a slanted cross-section to increase their water absorption capacity.
Preparation of the cutting medium: We should choose a medium that is loose, breathable, and well drained. Nutrient soil composed of pine branches and pond mud, or charcoal, is best. Before cutting, put the medium into plastic baskets. Note that it should not be filled too full; leave 3-5 cm at the top. After filling, arrange them well. It is best to lay a layer of support 8-10 cm high on the ground, then place the baskets on top. Next, we can proceed with cutting.
4. Cutting
When cutting, first dip the cuttings in prepared rooting water. The rooting water is prepared at a ratio of 1 gram of rooting powder to 1-2 kg of water. The insertion depth is best at 1/3 of the cutting length. Inserting too deep or too shallow is not conducive to survival. The plant spacing should be 5-7 cm.
5. Management after cutting
After cutting is completed, in order to improve the survival rate, we should preferably spray water once each in the morning and evening every day, with the amount of water being enough to spray the leaves completely. Doing this can maintain the humidity of the cuttings and the culture medium and promote rooting and survival. At other times, let them develop naturally. In this way, after about 30 days, they can root and survive. At this time, we should pull the surviving young seedlings directly out of the culture medium and promptly put them into nutrient pots to facilitate the next management work.
6. Potting
The nutrient soil used for potting is made by stacking and decomposing 25% pine leaves and dry grass, 40% pond mud, and 35% charcoal. We can choose smaller plastic flower pots or nutrient pots. First, put 2/3 nutrient soil into the pot as base soil, then place the young seedling into the pot, and then fill the flower pot with nutrient soil. After potting, we should promptly place them in the greenhouse. Note that for those planted in plastic flower pots, it is best to spread a layer of tall objects on the ground as a base before placing them, and then put the young seedlings on top. The distance between each pot should be controlled at about 8-10 cm. After all the flower pots are placed, we should water once. The amount of water should not be too large; just wet the surface layer of the nutrient soil. In addition, watering the leaves appropriately is also very helpful for their growth. In this way, after about 10 days they can root and survive.