Detailed Explanation of Grafting Methods and Operation Steps for Potted Camellias
Placing a few pots of camellias in a room can make the environment more elegant and add charm to daily life. If potted camellias are styled and planted in a suitable pot to make a bonsai, their ornamental value is even higher. However, camellias are a tree species that is relatively difficult to graft successfully. To improve the grafting survival rate, on the one hand you must master grafting operation techniques, and on the other hand you must use some special grafting methods.
Camellia grafting can improve their disease resistance and increase their yield. To improve the grafting survival rate, grafting must be done during the period of vigorous water and nutrient uptake by the rootstock, generally from May to September. According to experiments, June to July is best, with a grafting survival rate as high as 90%. Below, the editor introduces what camellia grafting methods there are.
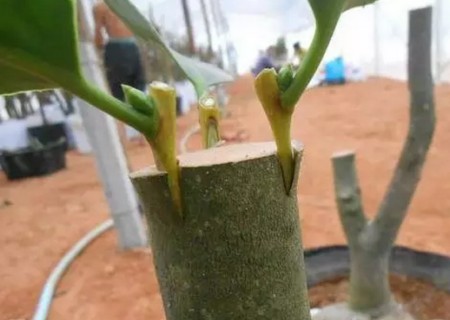
1. Bark-tearing inlay grafting method
At the site to be grafted, make two parallel vertical cuts, reaching deep to the xylem, about 3 cm long, with the width depending on the thickness of the scion, generally 0.3-0.5 cm, then make one horizontal cut, pry open the bark, and make the cut into an "H" shape. Take a section of scion with one leaf and one bud, about 2.5 cm long, and on the side opposite the leaf petiole cut a long strip-shaped flat edge with wood, and use a sharp knife to shave off the bark line on both sides of the flat edge. Insert the scion into the rootstock cut and bind it tightly, exposing only the leaf petiole and axillary bud. Then use a piece of transparent film to wrap and seal the entire grafting site, leaving 3-5 cm of space inside to form a moisture-retaining cover. After the scion survives and sprouts, remove the moisture-retaining cover, gradually cut off the rootstock branches, and promote the scion shoots to grow.
2. Triangular inlay grafting method
Cut off the rootstock at the grafting site, and on one side of the rootstock cut surface use a sharp knife to cut a concave triangular groove, about 2.5 cm long, with the width depending on the thickness of the scion. Take a scion with one leaf and one bud, about 3 cm long, and cut it from below the leaf petiole into a corresponding convex triangle. Insert the scion into the rootstock groove so that both sides fit tightly together, and bind the cut tightly. Then use a plastic bag to cover the scion and grafting site to form a moisture-retaining cover. After the scion bud begins to sprout, gradually loosen it until the moisture-retaining cover is removed.
3. Green shoot grafting method
The so-called green shoot grafting method refers to grafting a semi-lignified scion branch onto a new shoot of a rootstock that has not yet become semi-lignified, generally using the cleft grafting method. After grafting, use two layers of plastic bags to cover the scion and grafting site, and then put a kraft paper bag over the outside to shade strong light. After survival, gradually remove the paper bag and plastic bags.
In this grafting method, since both the rootstock and the scion are young shoots, the cambium is thick, healing is fast, and the survival rate is high. It is the main method for camellia grafting propagation or for cultivating one camellia tree with multiple varieties.
How to manage after grafting?
1. Trunk cutting
After grafting, observe the healing condition promptly within 20-30 days. For well-healed plants, use a small saw to cut off 1/2-2/3 of the originally retained main trunk of the rootstock at 2-3 cm from the scion, and lower it. Generally, do not cut off the main trunk immediately, because the scion does not yet have the ability to absorb nutrients. Keep part of the main trunk to continue absorbing water and nutrients to supply the scion's growth. After 70 days, the scion's axillary buds begin to sprout and grow; at this time, the main trunk can be completely cut off.
2. Loosening the binding
When the scion's axillary buds grow out, the originally sealed wrapping film can be untied. After about another 20 days, cut the tightly tied binding strip so that it can grow and develop normally.
3. Removing sprouts
In high-rootstock grafting, there are many sprouting branches on the rootstock and they grow quickly, so they must be removed promptly, otherwise they will affect the growth of the scion. Remove sprouts until the scion's growth becomes dominant.
4. Shaping
After the graft survives, it should be shaped appropriately. According to the needs of the camellia tree shape and branch positions, use rope to tie and shape it in a fixed direction.
The principle of graft survival:
The cambium is a very thin layer of meristematic tissue cells between the phloem and the xylem. During the growth period with suitable temperature, it can continuously carry out cell division, forming phloem outward and xylem inward. The cambium plays a crucial role in the process of graft survival. No matter what grafting method is used, the cambium of the rootstock and the scion must be brought into contact with each other. The larger and tighter the contact surface, the more callus tissue both sides form, and the higher the grafting survival rate.
But sometimes, in grafting practice, even if the cutting technique is relatively poor and the gap between the rootstock and the scion is relatively large, as long as a large amount of callus tissue can be guaranteed to form and fill the gap, the graft can still survive. Therefore, the key to graft survival is whether the rootstock and scion can grow enough callus tissue.