Plum blossom budding method illustrated, detailed steps of the grafting method
Budding is a method in which a single bud is cut from a branch, with or without a little wood, inserted into a cut in the rootstock, and then tied so that the two knit closely together and heal. Budding should be carried out during the slow-growth period, because at this time the cambium cells are still very active and the tissues of the bud are already well developed.
Potted plum blossoms are mainly propagated by grafting, commonly using cleft grafting and budding. The rootstock used is wild peach, mountain peach or apricot. The old trunk bark of apricot is red; when grafting red plum, the bark colors harmonize. Budding is carried out in August-September, generally using the "T"-shaped method.
The specific steps of the budding process are as follows:
1. First make a horizontal cut 1-1.5 cm above the bud on the scion, then make a flat cut from 1 cm below the bud forward and downward, and gently peel off the wood inside the bark layer of the cut bud (in recent years, budding with a little wood attached has been used), and hold it in the mouth.
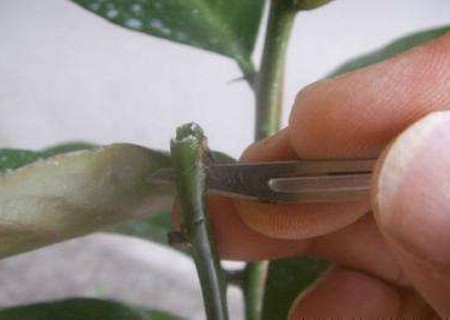
2. Make a horizontal cut on the rootstock 5 cm from the soil surface, then make a cut downward from the center of the cut, forming a "T" shape, then gently peel open the bark and insert the prepared scion into the bark at the "T"-shaped opening.
3. The bud must fit snugly, with its upper end closely joined to the upper end of the "T"-shaped opening on the rootstock, and finally tie it well with plastic film strips or polyester adhesive tape. Check for survival after one week; if the petiole falls off at a touch and the bud point is green and plump, it means it has survived.
4. The following spring, cut off the top of the rootstock 5-6 cm above the graft union; the scion will sprout quickly. After that, take care to remove rootstock shoots; when repotting or planting in a pot, plant it somewhat deeper so that the graft union is as low as possible, and tie and train it according to its growth to form an elegant shape.
The plum blossom's fragrance comes from the bitter cold; from this poem it can be seen that the plum blossom is a particularly cold-tolerant plant, and it also shows the tenacious vitality of the plum blossom. But no matter how tenacious a living thing is, if handled improperly, it will also die; no living thing can fully adapt to any environment. Therefore, grafting plum blossoms is also a very complex technical job.
The following are the key points of plum blossom budding technique:
1. Selection of rootstock for budding
Use current-year peach or apricot seedlings, or new shoots of the current year, choosing branches 0.3 to 0.4 cm in diameter.
2. Selection and handling of the bud
More than ten days before grafting, first pinch off the growing tips of healthy branches on the mother tree to force bud development; when grafting, choose plump buds from the middle and upper parts.
3. Grafting process
From mid-June to early July on the Gregorian calendar, use T-shaped budding, making the opening 5 to 15 cm above the ground (for new shoots on large trees, 5 to 10 cm). Note that there must be 3-4 leaves below the opening. When cutting the bud piece, be sure to keep the petiole and keep the bud piece as intact as possible. If it is seriously bruised or the bud core is damaged, do not use it; it is recommended to take another one. You can hold the removed bud piece in your mouth; it does not hurt to moisten it with a little saliva. Pry open the bark of the rootstock, insert the bud into the opening, and wrap it tightly with plastic film; the tightness should be such that it does not strangle the bark or let water in.
3. Aftercare
5 to 10 days after grafting, the petiole of the bud will fall off by itself, and after about 10 days you can confidently untie it. Observe whether the bud is fresh green and alive (if it has turned black and died, you can graft again lower down); if there is no obvious necrosis, wait another 3 to 4 days and cut the rootstock 1 cm above the graft union. Do not remove the few leaves below the bud; after that, observe once every two or three days and promptly rub off shoots sprouting from the rootstock, otherwise the bud is very likely to be starved out. More than ten days after cutting the rootstock, the bud will sprout.
This method has an extremely high survival rate and vigorous growth. Of the few I grafted, the tallest has already grown to 35 cm. You might as well give it a try.