Detailed Explanation of the Key Operation Points of the Cleft Grafting Technique for Pear Trees
Among fruit trees, the pear tree is a species that is relatively easy to graft, and most grafting methods readily succeed. In summer, it is best to use the three bud grafting methods: “patch budding”, “chip budding” and “T”-shaped budding; in spring, it is best to use the two scion grafting methods: “single-bud side grafting” and “cleft grafting”.
The period for top grafting and variety change is usually chosen in March-April of spring and August-September of autumn. In spring, scion grafting is mainly used, while in summer and autumn, bud grafting is mainly used. The main grafting methods include bark grafting, cleft grafting, cut grafting, bud grafting and bark side grafting; bark side grafting is mainly used for grafting onto old branches.
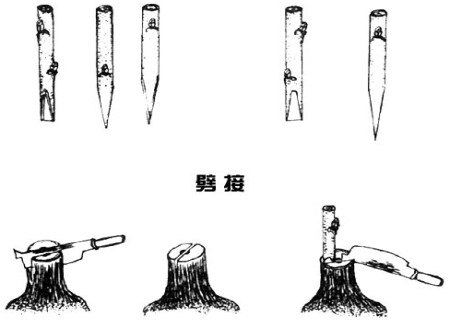
For the other branches besides the scaffold branches, according to the principle of “leave more lateral slanting branches on strong trees and more upward-growing branches on weak trees”, after short pruning, cut grafting and cleft grafting are carried out at the base, and they are later trained into fruiting branch groups.
Cleft grafting technique for pear trees:
It can also be used for thinner rootstocks, and is very suitable for top grafting of fruit trees.
1. Cutting the scion
The scion is cut into a wedge shape, with 2 symmetrical cut faces, 3-5 cm long. The outer side of the scion should be slightly thicker than the inner side. If the rootstock is too thick and the clamping force is too great, the inner and outer thickness can be made uniform or the inner side slightly thicker, to prevent crushing the joint surface. The cut faces of the scion are required to be flat and smooth; rough and uneven cut faces are not easy to fit closely together. When cutting the scion, hold the scion firmly with the left hand, and with the right hand push the knife in at an angle to cut into the scion. The pushing force must be even and consistent from front to back, and the direction of pushing the knife must be kept consistent with the direction of the cut.
If the force is uneven and the push is not consistent from front to back, the cut face will be uneven, and if the direction deviates upward midway, the cut face will not be straight. If one cut does not come out flat, one or two more cuts can be made to bring the cut face up to standard.
2. Cutting the rootstock
Cut or saw off the rootstock at the grafting site. The position of the cut is very important; the surface of the remaining stump must be smooth with straight grain, and there must be no scars within at least 6 cm above and below, otherwise the cleft will not be straight and the xylem will split to one side. After the grafting site is chosen and cut off, use a cleft knife to make 1 vertical split down the center of the rootstock, making the cleft 3-4 cm deep.
3. Inserting the scion
Use the wedge part of the cleft knife to pry open the cleft in the rootstock, gently insert the scion into the rootstock so that the thick side of the scion faces outward and the thin side faces inward, then gently withdraw the cleft knife.
When inserting, special attention must be paid to aligning the cambium of the rootstock with the cambium of the scion. Generally, the bark of the rootstock is often thicker than the bark of the scion, so the outer surface of the scion should be slightly further in than the outer surface of the rootstock, so that the cambiums can align with each other.
The xylem can also be used as the standard, aligning the xylem surfaces of the rootstock and scion, and the cambiums will then also be aligned. When inserting the scion, the cut face should not be inserted entirely; about 0.5 cm of the cut face should be left exposed.
In this way, the contact area between the cambiums of the scion and rootstock is larger, and it is also beneficial to the formation and healing of meristematic tissue. For thicker rootstocks, 2 scions can be inserted, one on each side.
4. Tying: just tie tightly with plastic strips.