Illustrated guide to the bark grafting technique for bonsai: the steps are easy to understand at a glance
Bark grafting is carried out when the phloem of the rootstock peels easily; the rootstock should preferably be somewhat thicker than the scion. The scion should be cut longer to increase the contact surface. Its advantages are a high survival rate; its disadvantages are that grafting is slow, and after the graft takes, the new shoots need to be supported and tied to prevent breakage. For mulberry, it is best to insert the cut surface of the scion facing outward into the bark layer of the rootstock (after the cambium of mulberry separates from the rootstock bark, more parenchyma cells remain on the phloem), while the cut surface of scions of other tree species generally faces inward.
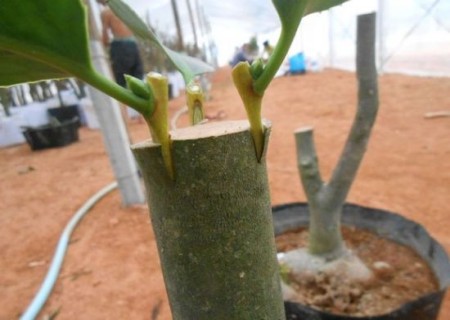
Through several years of practice and comparative experiments on several methods of branch grafting, the author believes that bark grafting has the highest survival rate, but bark grafting requires that the rootstock's bark must slip. Below is an illustrated guide to the operating steps of bark grafting for bonsai:
1. Choose the plant variety and rootstock you want to graft
In order to graft successfully, you must cut a scion (a small piece, for use in grafting) from a healthy, disease-free plant variety (source tree) and a suitable growing tree (rootstock). The scion should have gone through three dormant periods, or should not be sprouting. A branch about 0.3 m long has three to five buds. The rootstock should be straight and smooth, and the diameter of the vertical branch should be 2.5-5 cm. Once the bark has begun to slip (in spring, when the bark peels easily), bark grafting should be carried out. This grafting method is usually used when the rootstock is too large for branch grafting.
2. Saw off the rootstock
Use a sharp saw to cut straight down at a fork of one of the several branches that have grown out, and do not split the bark or wood of the branch. Be sure to leave a nearby sprouting branch to keep nutrients moving up the tree.
3. Prepare the scion
Cut the scion to about 12.5 cm long, while keeping about 5 buds on each scion. Starting from around 7.5 cm from the base of the scion, make a slanted cut toward the base.
4. Prepare the rootstock
Place each scion against the rootstock so that about 0.3 cm of the cut surface of the scion is exposed above the rootstock. With a sharp knife, cut the outline of each scion on the rootstock. Move the scion and complete the work of cutting the bark so that each scion fits tightly into its space.
5. Insert the scions
Place each scion on the rootstock, paying special attention to ensuring that the green layers of the two are accurately aligned. Once in place, to keep them connected to the tree, hammer two wire nails into each scion.
6. Seal the graft
Pour grafting wax or an asphalt-water emulsion over the grafted area to seal all cut surfaces and prevent drying and the entry of bacteria. Check the seal again the next day to make sure there are no holes that would leave the surface exposed.
7. Care for the graft
Remove all buds growing below the graft. Once one scion grows better than the others, prune away the others that are not growing successfully. Two summers after grafting, remove all branches and buds except the strong scions.