Bonsai branch grafting method illustrated: detailed steps you can master at a glance
Grafting propagation of nursery stock refers to joining the branch or bud of one plant onto another plant so that the two joined parts become one complete plant. The branch or bud that is grafted on is called the scion, and the plant that receives the graft is called the rootstock. Grafting is divided into two main categories: branch grafting and bud grafting. Branch grafting uses a branch as the scion, while bud grafting uses a bud as the scion.
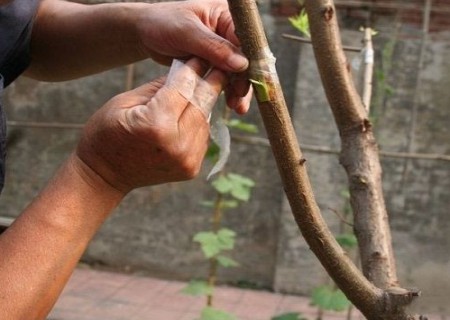
Branch grafting is a grafting method that uses a plant branch as the scion. Branch grafting is generally carried out in spring when the sap begins to flow and the bark has not yet separated, or when the rootstock bark has separated but the scion has not yet sprouted (that is, around the time from Awakening of Insects to Grain Rain). Commonly used grafting techniques include cut grafting, cleft grafting, bark insertion grafting, and tongue grafting.
I. The best time for branch grafting
Branch grafting is generally carried out during the dormant period of nursery stock, mostly in spring and winter, but spring is the best season. After spring grafting, the temperature gradually rises, which is favorable for healing, and the scion can sprout and grow after grafting.
1. Spring branch grafting: Spring grafting is generally best from after March 20 to around April 10. At this time, the sap of the rootstock and scion has already begun to flow, cell division is active, the graft union heals quickly, and the grafting survival rate is high. Tree species that sprout and break dormancy relatively late, such as persimmon grafted onto date plum and walnut grafting, should be done a little later, better after April 20, that is, most suitable around the period from Grain Rain to Start of Summer.
2. Summer branch grafting: Summer is more suitable for grafting evergreen trees. For example, Chinese juniper, Taiwan juniper, and golden-spotted juniper have a relatively high grafting survival rate when grafted in June.
3. Winter branch grafting: In winter, both the rootstock and scion are in a dormant state, and the metabolic activity of the cell tissues is very weak. After grafting, the key to survival lies in the quality of heeling in, and the rootstock and scion must not lose too much water. Winter branch grafting is carried out indoors by making use of the idle winter time; after grafting, the plants are moved into a cellar for heeling in, and in spring they are planted in the field. During the heeling-in and transplanting process, because the graft union has not yet healed, disturbing the union affects survival. Well-grafted dormant seedlings can also be placed in a greenhouse for care so that they heal and sprout earlier. The advantage of winter grafting is that it uses the dormant period of the trees, does not consider the seasonality of growth, allows ample time, and can be carried out throughout the entire winter. It can make full use of the idle winter period for production and improve production efficiency.
II. Branch grafting process/methods
1. Choose the plant variety and rootstock you want to graft
In order to graft successfully, you must cut a scion (a small piece, for grafting use) from a healthy, disease-free plant variety (source tree) and a suitable growing tree (rootstock). The branch grafting method can only be used when the rootstock and scion are the same diameter, and the diameter must be between 0.6-1.3 cm. Grafting must be started only after the threat of severe cold has passed, but it must also be done before the bark of the trunk begins to slip (becomes easy to peel off). The scion must be in the dormant period (not sprouted), and should be a small branch 0.3 m long with three to five buds on it.
2. Prepare the scion
Remove the end of the scion. On the base of the scion, cut off the end at an angle.
3. Prepare the rootstock
Choose a branch that matches the scion you have prepared and make a slanted cut. The two must be joined together.
4. Cut a tongue-shaped notch
Cut a tongue-shaped wedge notch on the cut surfaces of the rootstock and scion so that they match in such a way that they can hook onto each other.
5. Use the scion
Place the scion at a slightly offset position on the rootstock, and slide it downward so that the two overlap. Make sure the green layers under the bark of both are aligned, otherwise the graft will not succeed.
6. Secure the scion
Wrap elastic rubber material around the rootstock to hold the bud in the proper position. Grafting tape works very well. If a different material is used, make sure to remove it within one month.
7. Care for the grafted branch
Remove everything growing below the grafted branch, except that small leaves may be left, until the grafted branch can successfully draw the nutrients transported to the tree.