Illustrated guide to the hole-drilling grafting technique for bonsai, detailed steps you can master at a glance
Bonsai often have various defects or shortcomings. Some have decent root flare, but are tall and straight with too few branches. Turning such raw material into a higher-grade bonsai is indeed quite difficult. Actually, long, straight trunks can be bent and shaped by compressing the dragon into a small form, and the lack of branches can be remedied by grafting to add branches. Using the thread-through method to add branches and roots is both simple and practical. The grafting tool is just a hole-drilling tool: choose the spot where a branch is needed, drill a hole and thread the scion through, and once the scion has thickened enough to fill the hole, simply cut the branch off at the entry point.
The hole-drilling grafting method is also called the traceless grafting method. It is commonly used for adding branches in bonsai making, but relatively few people use it for grafting camellias. We normally use this grafting technique to make camellia bonsai and have achieved certain results. We now introduce this technique in detail to flower enthusiasts. If you also want to graft camellia bonsai, you might as well try this method.
Because the grafting process of the hole-drilling method is rather tedious, it is not suitable for large-scale grafting and is only suitable for camellia or bonsai enthusiasts to enjoy. Below we use one of our grafting cases to illustrate.
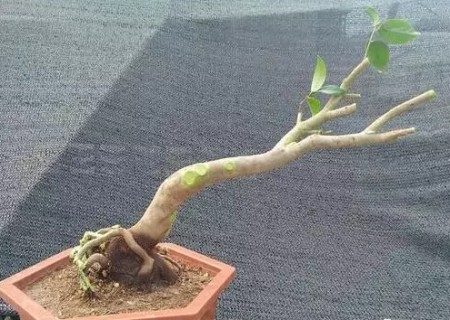
This is a Liexiang bought from the market. First raise the roots, prune, then pot it up for care. Apply healing agent to the pruning cuts to help them heal.
After about a month of care, the branches and trunk begin to sprout, and at this point grafting can be considered.
Selection of scions. Since the grafting time is still the flowering season, the branches chosen are one-year-old spring shoots. The branches should be as thick and strong as possible.
Each scion generally only needs one bud and one leaf. The leaf is generally kept at only about half its length, and the length of the scion can be determined by the thickness of the rootstock branch. Generally leave about 5 mm above the bud, and about 2 cm at the lower end.
After the scions are prepared, start drilling. The drilling tool can be a hand drill or one you modify yourself like mine. The drilling depth is generally about 2 cm; the depth is determined by the thickness of the rootstock. Manual drilling is rather troublesome, because the wood shavings are not easy to extract, which takes some time.
When drilling, be careful not to break the bark, keep the edge of the hole as neat as possible, and hollow out the wood shavings as much as possible. Also note that you should try not to drill all the way through the rootstock branch.
Use the drill bit to measure the depth directly, then determine the length of the lower end of the scion according to the depth.
The length of the peeled lower end of the scion should not exceed the drilling depth; it can be about 2 mm shorter.
After measuring, first make a ring cut on the scion, then peel the bark. The bud point above the peeled area should be no less than 5 mm away. But do not leave it too long either; leaving at most 1 cm is enough.
The diameter of the hole and the scion do not necessarily match exactly. Make the scion a little thicker than the hole if possible, so that we can trim the scion appropriately to make it fit tightly into the hole. The most important thing is that the bark layer of the scion and the bark layer of the rootstock must be closely joined together with no gap left.
For this bonsai material we grafted three scions, and the grafting positions were also chosen with consideration. The plan is to prune the surplus rootstock branches after the grafts have taken.
After grafting, be sure to apply healing glue to the graft site and the top of the scion. This helps the wound heal and also protects the scion from water loss. Wait until the healing glue dries the next day, then bag each scion to keep it moist.
After several months of care the scions have taken. Remove the plastic bags, and after a further period the surplus rootstock branches can be sawn off.
Inspection showed that two of the three scions had taken, so when pruning we boldly removed all the branches. Due to apical dominance, the upper scion sprouted first, while the lower scion sprouted more slowly.
When sawing off the rootstock above the graft, be as careful as possible not to injure the scion; generally leave a length of about 3 mm. All cuts should be coated with healing agent to prevent the cuts from dehydrating and to promote the growth of callus tissue.
From the close-up view we can see that the graft site has only a slight bulge, and the effect is basically the same as a naturally grown branch.
Drilling and threading through is the grafting technique with the highest success rate. It is even higher than the success rate of approach grafting. Drilling and threading through means drilling a hole in the trunk (branch) where a branch needs to be added, then threading a slender scion with its leaves removed through the hole and fixing it in place. As the rootstock and scion grow, the two merge into one, completing the grafting process.
Throughout the entire grafting process, the scion and the mother plant are not separated. Only after the graft has succeeded are the scion and the mother plant separated. It is precisely because of this that the success rate of thread grafting is so high. Failure in thread grafting is often caused by separating the scion from the mother plant too early. When thread grafting, you must wait until the scion and the hole have completely fused before cutting the scion off from the mother plant.