How do you prune exposed roots for bonsai? A detailed guide to the method
We often come across bizarre old trees in wild mountain forests; some are jagged and craggy, some are graceful and elegant, some are ancient and vigorous, and some are majestic and imposing. In short, trees of every type stand in nature with their own postures, becoming part of nature. For ordinary people, perhaps the charm of these “odd” trees is not apparent, but in the hands of bonsai artists, they may be a carefully crafted bonsai masterpiece, a natural work of art.
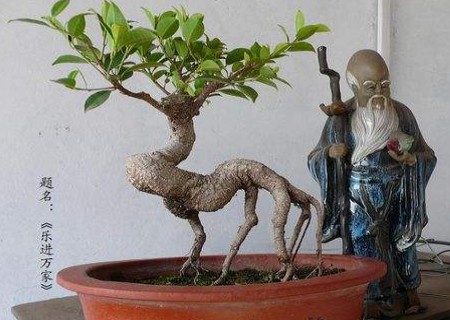
To present these “strange” old trees to the world with the unique elegance of bonsai requires no small amount of hard work from the artists. For example, when making exposed-root pruning for bonsai, it is hard to know how much effort the artists must put in before these “monsters” can bring people the enjoyment of beauty in a brand-new posture. Below, the editor draws on the experience of master artists to explain the pruning method for exposing the roots of tree bonsai.
1. Trunk chopping
After the plant has been grown in the ground for 2-3 years, the sapling is then of a suitable size, its basal roots have basically formed, and it has a certain ability to tolerate pruning. We can then dig it out and shorten its trunk according to our creative needs.
2. Root pruning
Root pruning is the key step in exposed-root pruning for bonsai. At this time we will find that the main root may have grown too long, and even some lateral roots have grown very thick. In this case, in order to promote strong growth of fibrous roots, we need to prune the main root and the overly thick lateral roots.
3. Styling
After trunk chopping and root pruning, we need to plant it in the ground again for 2-3 years. During this second round of ground cultivation, we can carry out styling. Once it has grown into shape while being pruned, we can pot it and transplant it.
4. Pot in a deep pot
Before potting, we need to carry out another round of branch and trunk pruning so that the branches and trunk, like the root system, show variation in thickness; this is also done to make potting easier. The first potting should use a somewhat larger and deeper pot, as this is more conducive to the tree's recovery and the spreading of its roots, and it also looks fuller overall. At this point it can be clearly seen that the roots exposed on the pot surface have already become relatively thick.
5. Switch to a shallow pot
After 2-3 years of care and management in the deep pot, you will find that not only have the roots become thicker and more prominently exposed, but the branches and trunk of the whole tree bonsai have also become sturdy. At this point we need to repot it again. This time, the original deep pot is replaced with a shallow pot.
6. Management
After two rounds of pruning and potting, we will not need to repot it again in the short term. The next work is mainly routine care and management. In addition to keeping up with water and fertilizer, our main work is the tree shape. Since styling has already been carried out before, the later branch and tree shaping only needs partial adjustment, not drastic measures. The later shaping is mainly pruning and perfecting the details.
The above is the pruning method for exposing the roots of tree bonsai, for everyone's reference only; the specific results still need to be tested, corrected and consolidated in practice.