Detailed Explanation of Impatiens Cutting Methods and Steps
A while ago, the potted impatiens was pecked and broken by a mischievous chicken. I had originally planned to throw it away, but at first glance, the broken branch was still quite sturdy. So I decided to use it for cuttings. Unexpectedly, after 1 week, the lower end of the branch actually grew roots about 2 cm long. It was truly an unexpected success!
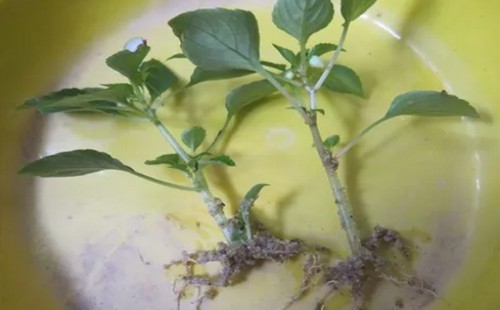
It can be seen that impatiens stem cuttings can survive. Since impatiens can be propagated by cuttings, why not try cuttings when we usually propagate impatiens seedlings? Below, based on my own practice, I will now share the impatiens cutting method with everyone.
1. Choosing a pot
The flower pot used for impatiens cuttings can be chosen according to your own preference, but the pot is required to have good permeability so that excess water can drain out smoothly after watering. However, as a pot for cuttings, we can use a seedling plug tray to assist, with a diameter of about 10 cm being suitable.
2. Preparing the soil
The substrate used for impatiens cuttings should be fertile, loose, breathable and permeable. Vermiculite, crushed wood shavings and peat soil can be mixed in a ratio of 3:3:4, stirred evenly, disinfected and sterilized, and then used as a seedling substrate. Then pour it into the seedling plug tray.
3. Cuttings
Cuttings naturally cannot do without the main character —— the cuttings themselves, and the branches used to make cuttings must grow sturdy enough so that survival is more likely. First, cut healthy and sturdy branches from the mother plant, and at the same time make sure the branches have more than 3 nodes. This is the key to ensuring sprouting and leaf growth after rooting.
4. Inserting the cuttings
Be careful during the cutting process. Gently insert the prepared cuttings into the moist seedling substrate. As much as possible, do not cause secondary damage to the cuttings, otherwise survival will be affected. You can use a tool to first poke holes of suitable size in the culture soil, then gently insert the cuttings into them, and press the soil firmly with a little force.
5. Watering
After completing the cuttings, water promptly to keep the soil at a certain humidity. Then spray with a diluted chlorothalonil solution, usually once every half an hour. This can ensure the leaves have a certain humidity, but the amount of spraying also needs to be controlled, and water should not drip from the leaves. If all goes well, rooting can appear in about a week to two weeks, and then they will survive.
6. Pinching
When the rooted cuttings sprout and grow to a height of about 10 cm, we need to carry out the first pinching. This mainly means removing the growing point at the top, keeping only 2-3 nodes, to encourage the plant to produce more side branches. By using this method multiple times, the plant can grow fuller. After about 10 weeks, a crown width of 30-50 cm can be formed, and the potted plant is basically set in shape.