The Best Time and Methods for Grafting Osmanthus: A Detailed Guide
Osmanthus can be propagated by sowing seeds, cuttings, grafting, layering and other methods, but potted osmanthus is mostly propagated by grafting to raise young plants, and the grafting methods can be divided into two types: side grafting and approach grafting. For a tree species like osmanthus, if it is grown as a potted plant, propagation by sowing seeds and other means is also feasible, but whether in terms of growth or propagation methods, it is difficult to achieve the growth results we expect. So grafting is generally used for propagation.
But grafting cannot be done in just any season, so when should potted osmanthus be grafted? And what are the grafting methods? Today, the editor will share with you the grafting time and methods for osmanthus.
I. Grafting Time
For individual growers, if osmanthus is grown as a potted plant, grafting is a relatively suitable means of propagation. The grafting time is best during March to April each spring. So if we want to graft osmanthus, we must choose the timing accurately.
II. Grafting Methods
As the editor said above, osmanthus grafting can use two methods: side grafting and approach grafting. Side grafting mainly involves properly trimming the rootstock before grafting, while approach grafting mainly involves first getting the rootstock established in a flower pot and then grafting. If the approach grafting method is used, it can also be done in June to July each summer.
1. First, select a good osmanthus tree in the pot to serve as the rootstock, then cut the osmanthus tree back at an appropriate position, taking care to ensure the flat cut is smooth. At the same time, use a tool to carve a U-shaped groove at the cut on the rootstock for inserting the scion, with a length of about 2.5 cm, a width almost the same as the size of the scion, and a depth half that of the scion.
2. Prepare the scion according to the grafting requirements. The scion generally needs to retain 3 buds, while also keeping 2 half-leaves; the lower end of the scion is cut into an arc shape at a 45-degree angle; peel off half of the outer bark on the lower part of the scion.
3. Insert the prepared scion into the U-shaped groove on the rootstock, making sure the scion fully contacts the U-shaped groove, so as to ensure the scion is properly embedded in the U-shaped groove. Therefore, when making the U-shaped groove and the scion, we must measure the sizes well to avoid leaving a large gap after inserting the scion into the U-shaped groove, which would affect the survival of the graft.
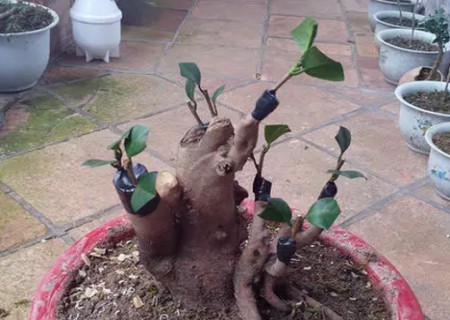
4. You can cultivate different numbers of grafted seedlings according to your own styling needs for the osmanthus stump potted plant or bonsai, but the number does not lie in being many, but in being refined; everything is based on the beautiful styling of the potted plant or bonsai as the reference.
5. After completing the insertion of the scion, we also need to wrap the grafted part with insulating tape to stabilize it, and at the same time it can also make the scion and rootstock contact more tightly, improving the survival rate to a certain extent.
6. If the temperature at the time of grafting is still relatively low, we can also use a transparent plastic bag to cover the entire grafted part. On one hand, this can reduce water evaporation and achieve the purpose of moisture retention, and on the other hand, it can also play a role in keeping warm and protecting against cold.
This is the growth condition of the young shoots after successful grafting, and overall it looks quite good. We can see that this potted plant has already been properly pinched and bud-removed on each new shoot, mainly to encourage it to sprout more side branches, making the plant appear more “full-feathered” later on.