How to propagate Zamioculcas zamiifolia (ZZ plant) tubers? A few practical methods to teach you
The ZZ plant not only grows neat stems and leaves, but its leaves are also glossy and plump, and it stays evergreen all year round, so whether for greening and beautifying the environment or as a potted ornamental, its effect is often very good. In fact, the ZZ plant is also a plant that grows underground tubers and has the characteristics of fleshy roots, so it is relatively drought-tolerant and afraid of water. Since the ZZ plant is a tuberous plant, it can naturally use tubers to breed small potted seedlings, so how do you propagate ZZ plant tubers?
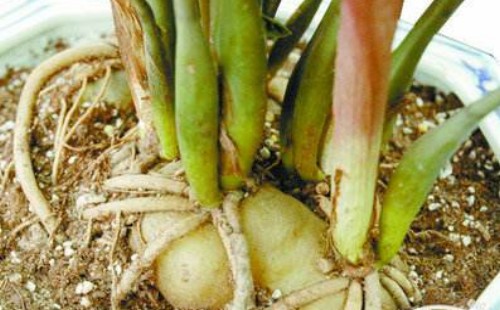
Since the tubers of the ZZ plant carry latent buds, we can divide the entire tuber of the plant and then use the parts separately to propagate ZZ plant seedlings. But for ZZ plant tubers cut into pieces, each tuber is generally required to have 2-3 latent buds, because if you want ZZ plant seedlings to grow from the tubers, they need to emerge through these latent buds.
After cutting the entire large tuber of the ZZ plant into several small pieces with latent buds, we still cannot rush to use them to breed seedlings. This is because the process of cutting the large piece into small pieces leaves large cut surfaces, and we usually need to wait until the wounded surfaces coagulate and dry before proceeding, which can prevent pathogens from invading the tubers and damaging the growing tissue. To speed up the drying of the wounds and promote the healing of the cut surfaces, we can evenly apply a layer of plant ash on the cut surfaces, then set them aside to air for a while.
After the wounded surfaces of the tubers coagulate and dry, we then place them into moist fine sand for cultivation. However, the thickness of the soil we cover them with should not be too thick, that is, they should not be buried too deep in the sand, otherwise the germination of latent buds will be inhibited to a certain extent. Also, it is generally better to cultivate them in moist fine sand, and not by burying them in dry sand and then watering, because if the wounded surfaces of the tubers are exposed to too much moisture, it may still cause wound infection, which may ultimately lead to rot in the tubers.
After burying the cultivated tubers in the sandy soil, the thickness of the covering sandy soil is generally best kept at 1-2 cm. During this period, pay attention to controlling the temperature and keep it stable at 25°C, which is more suitable. Also avoid direct sunlight on the sandy soil surface, and do a good job of spraying water to maintain moisture. If all goes well, in less than 1 month the tubers will take root and sprout, and when the root system has spread out more and the seedlings have grown to a certain height, we can then choose the right time to transplant them into pots.