How to propagate plum blossoms by air layering? Detailed methods and steps
Plum blossoms not only come in many varieties but also vary in flower color, yet they usually all give off a pleasant delicate fragrance. Because plum blossoms are beautiful in bloom, have a striking fragrance, and have sturdy, vigorous branches, they are very suitable for growing as potted plants and can even be shaped into fine bonsai specimens for appreciation. For most plum blossom varieties, young plants can often be raised through sowing, cuttings, layering, and other means.
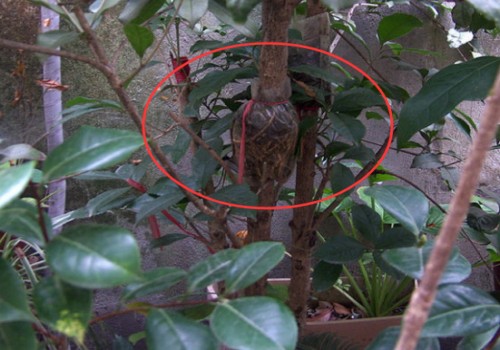
However, as far as propagation methods go, layering has the characteristics of a high survival rate, high propagation efficiency, and fast plant formation, and air layering in particular makes it very easy to obtain robust young plants for potted growing. So how are plum blossoms propagated by air layering? Below, the editor will share with you the air layering propagation method for plum blossoms.
I. Air layering time
To propagate plum blossoms by air layering, we first need to choose the best time to do it. Because plum blossom varieties differ, the most suitable propagation time also varies slightly; some may be earlier and some may be later. Generally, air layering can be done throughout the entire growing season of plum blossoms, but to increase the success rate, it is usually most suitable to do it from February to May each year.
II. Selecting branches
After determining the best propagation time for plum blossoms, we also need to select suitable branches from the mother plant for air layering. Generally, robust 1-2 year old branches are chosen for layering. Note that the ones we choose must be robust and undamaged, and branches with a better appearance, smoother and more symmetrical growth, are even better. Although these factors will not greatly affect the success rate of layering, they can affect the growth condition of the layered plant to a certain extent. Of course, we can also choose branches that are relatively likely to ruin the beauty of the plant's shape for air layering.
III. Layering process
After the preparatory work is done, we need to carry out the necessary treatment on the selected branch. Original First, make 2-3 cuts at a suitable position below the selected branch, and be careful to control the force so the wounds are not too deep, especially so as not to damage the woody part of the branch, otherwise it will affect the branch's rooting.
Next, use plastic film to wrap moist prepared growing medium, which can be a mixture of peat soil and moss or another relatively loose and breathable substrate. Then wrap the soil portion around the cut position on the branch, and wind and secure the plastic film around it. Be careful to seal the plastic film well, as this can serve to retain moisture.
IV. Cultivation and management
About 1 month after carrying out air layering propagation, if all goes well, the plum blossom branch used for layering will take root. After rooting, we can cut a relatively deep slit in the branch below the layered propagation site, about half the depth of the branch. Then cultivate it for another week, and after a week, we cut off the other half of the branch that has no slit, then remove the plastic film and transplant it into a pot.
Layering propagation of plum blossoms is mostly carried out in spring, and after autumn arrives, the layered plant can be allowed to grow independently as a plant for transplanting into a pot. The air layering method for plum blossoms is mostly used for cultivating large plants. If operated according to the above method, it can generally be made to bloom by the following spring. By then, we can fully appreciate its blooming elegance and feel its striking delicate fragrance.