How are tamarisk trunk-on-rock bonsai made and collected?
The making of tamarisk trunk-on-rock bonsai is basically the same as that of other trunk-on-rock bonsai. Tang Qing'an, a provincial Zhongzhou bonsai art master and provincial bonsai art master, says that in making tamarisk trunk-on-rock bonsai, attention should be paid to aspects such as choosing the stone, choosing the pot, choosing the seedling and styling.
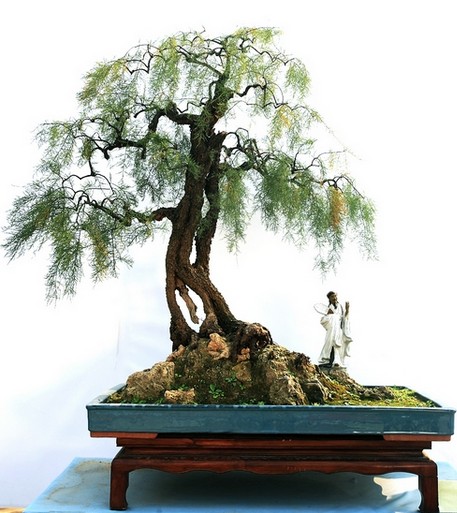
In choosing the stone, you should choose stones with a hard texture. Softer stones are easily split apart by the tree trunk, so soft stones such as water-absorbing stone and wheat-straw stone should not be used. For hard stones, Ying stone from Yingde, Guangdong, is the first choice; next, Anhui Lingbi stone, Shandong Feixian stone, Henan Taihang stone and so on can be chosen. In terms of shape, stones with features such as being slender and tall, mountain-shaped, or unusually steep are best. If the stone itself is already highly ornamental, the effect will be even better once it is combined with the tree trunk. Shallow bonsai pots, glazed pots, purple clay pots and porcelain pots can all be used to make tamarisk trunk-on-rock bonsai. But no matter what kind of pot is chosen, it must have drainage holes. Collectors can also choose a pot they like and drill holes in it to make one. The sizes of the pot and the stone should be in appropriate proportion, avoiding a large pot with a small stone or a large stone with a small pot.
After choosing the stone and pot, you should observe repeatedly and select the stone's best viewing face, as well as the best position for the stone in the pot. When bonding and fixing the stone and the pot, wash the stone and pot clean and cement them firmly in place. Tang Qing'an says that when bonding the stone and the pot, collectors should pay special attention to keeping the bonded surface below the pot surface, and must not let cement or other debris show above the pot surface. After it is built, collectors should water it every day for maintenance, and in winter they should also protect it from freezing. Generally, after four or five days, collectors can begin the trunk-on-rock work.
The first step in attaching the tree to the stone is to cut a groove. Collectors should find the best branching point for the seedling on the stone on the viewing face, as well as the best position on the lower part of the stone for entering the soil, and then design a route between the two points. The route should not be too straight; it is better if it is slightly curved, and the first choice is one that can wrap around the stone. When cutting the groove, you should also take into account the thickness of the seedling; the groove cut should preferably be able to hold the seedling.
For making a trunk-on-rock tree, choose a one-year-old seedling with a trunk diameter of no more than 1 cm, to make the work easier. When attaching it to the stone, work from bottom to top, fitting the seedling into the groove and fixing it with wire. At this point, the making of the tamarisk trunk-on-rock bonsai is basically complete. The next stage, making the bonsai tree, is where bonsai art is truly expressed. The earlier part is more a matter of crafting technique. In this stage, collectors should, according to their concept, skillfully create bonsai in different styles such as cascade style, slanting-trunk style, curved-trunk style, natural style and pine-imitating style. Collectors must have a certain amount of bonsai-making knowledge and artistic accomplishment.