How to make an exquisite water-and-land bonsai from discarded floor tiles
A brief rundown of the making process: first prepare the materials, discarded floor tiles and several pieces of turtle-pattern stone in various sizes.
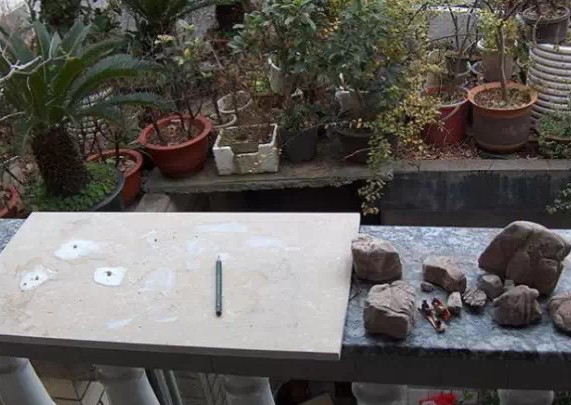
Then work out the concept and layout. Once the layout is done, the next step is the mason's work: glue the turtle-pattern stones one by one onto the marked positions on the marble slab:
This is how it looks after gluing is complete. This time four pot feet were glued to the bottom of the marble slab:
Once the cement slurry dries, you can plant the plants. Plum blossom is my favorite, so this time I again chose two plum blossoms with flower buds.
Speaking of why floor tiles are used instead of pots, it is actually a move born of necessity, because finished pots generally used for making water-and-land bonsai are expensive and only suit professionals. We amateurs can only "gaze at the pots and sigh." I had always wanted to find this kind of substitute.
By chance I saw some sample floor tiles, and my eyes lit up at once. Inspiration struck. Aren't these great material for making pots?
This kind of sample tile is made by the manufacturer by splitting a whole floor tile in two, and since mechanical processing is used, the craftsmanship is very refined. The four edges are also chamfered. Hehe, just what I wanted. I quickly bought a few and took them home. The price was a clearance price, cheap. The subsequent design approach and making method are the same as in my previously posted thread on making them from marble.
Since this kind of floor tile has no pot rim, my initial approach was to use cement mortar to enclose the part intended for soil, then plant the plants, and after a period of time, once the plants had settled into the pot, remove the enclosure rim. Later I improved it by directly applying wet clay along the edge of the pot where the soil goes, which is more convenient.
In addition, besides being used directly as a substitute for a pot, we can also use old discarded floor tiles from home and place them on the pot surface to create a dry pot with a sense of water, which is quite distinctive and works very well.
Use old discarded floor tiles from home, find a suitable shape, then glue several pieces of Yingde stone to both sides of the tile with cement slurry, forming a winding and layered shoreline, as in the photo below, and then lay it on the soil surface in the middle of the pot. And I must say, the ornamental effect exceeded my imagination.
Of course, we can also make it even simpler: glue fewer stones or none at all, directly lay the cut and processed floor tile on the pot surface, then add a few figurines on both sides, and the effect is quite good too. Please see the photos below:
In summary, beauty is everywhere in our daily lives, and we also love beautiful things; it is just that some beauty needs us to discover, create and perfect it. I hope this article can serve as a modest spur to induce others to come forward with valuable contributions and give everyone some inspiration. Thank you, everyone!
The above is thanks to the inspired work of netizen Huang Shun.