Detailed Explanation of How to Make a Wall-Mounted Bonsai and Its Steps
A wall-mounted bonsai is a bonsai style laid out according to vertical requirements. It can either be hung up or embedded in a wall, and it often plays a very good role in decorating and beautifying the environment. It can be described as a vivid three-dimensional painting. To improve its ornamental value and artistry, wall-mounted bonsai generally use marble or a ceramic plate as the backboard, and the backboard can either have a frame or have no frame. After the backboard is selected, stones can be glued onto it, and trees and other plants can be planted on it, so the three-dimensional effect is very strong, like a living picture.
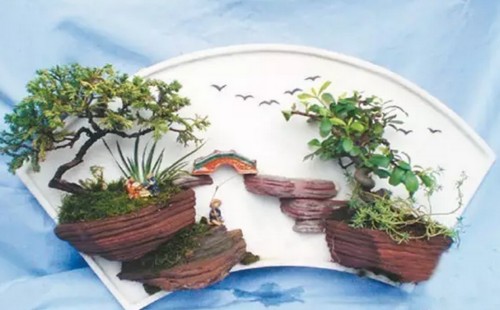
However, wall-mounted bonsai are generally divided into two types: tree and landscape. The tree-type wall-mounted bonsai focuses on expressing the image of the bonsai tree, while the landscape-type wall-mounted bonsai integrates rocks and trees, and even some decorative ornaments, into one to form a landscape relief bonsai, which is not only rich in content but also full of dynamism. But the choice of backboard is often relatively broad, generally using round, oval, rectangular, or even fan-shaped forms, with rich and varied styles. Below, the editor will share with everyone how to make a wall-mounted bonsai.
1. How to make a wall-mounted tree bonsai
For a wall-mounted tree bonsai, the size is often not suitable to be too large, because this kind of bonsai mainly displays the graceful image of the tree, so when making it, the selected flower pot should first be cut in half vertically. Then use strong adhesive to firmly glue the remaining half of the flower pot to the backboard, and finally process and shape the bonsai tree planted in the pot. In this process, regarding the use of the backboard, the problem of firmly hanging it must first be solved. Several small holes can be drilled in it and copper hooks can be used to hang it up.
Of course, if you do not want to use a half-wall flower pot, you can also paste processed stones onto the backboard, but at the same time leave some cavities so that trees and other green plants can be planted in them. You can also drill a round hole in the stone slab and firmly glue the half-wall flower pot below the round hole on the back side of the stone slab. After removing the soil from the bonsai tree, pass its root system from the front of the round hole to the back, and then plant it into the half-wall pot.
This method is mainly to improve the ornamental effect and make the bonsai appear more magical and distinctive. The intuitive feeling is that from the front, only the tree can be seen and the flower pot cannot be seen, which is very magical and has extremely high ornamental value. We can even add artistic inscriptions on the stone slab, making the whole bonsai look full of poetic charm and full of dynamism. Of course, if we can choose tree species that are easier to shape, it will often achieve an even better effect.
2. How to make a wall-mounted landscape bonsai
Wall-mounted landscape bonsai generally use marble as the backboard, then process the stone materials, create the original design and firmly paste them onto the backboard, and then pair them with trees, flowers, and grass, which can better reflect a poetic and vivid landscape painting scene. The stones available for selection can be relatively hard stone materials such as Yingde stone and stalactite stone. Of course, stone materials such as sand-accumulated stone and sea-mother stone, which are easier to process and shape, can also be used.
In the process of making a wall-mounted landscape bonsai, the processing and shaping of the stone materials is generally carried out on the front side, while the back side is directly cut into a flat surface so that it can be firmly pasted onto the backboard. Moreover, the stone materials used cannot be too thick, because although thicker stone materials give a stronger three-dimensional effect, the overall look is not so beautiful. As the saying goes, "going beyond the limit is as bad as falling short," so the thickness must be moderate. More importantly, if the stone is too thick, it will also bring certain difficulty to the pasting work, and at least it will not stick so firmly.
At the same time, in the process of creating the scenery, the perspective effect must be handled well. Generally, the effect of "near mountains large and clear, distant mountains small and blurry" needs to be achieved. That is, the stones used to create the foreground should be somewhat larger than the stones used to create the distant view, and the textures of the stones used for the near mountains should be clearly visible, while the textures of the stones used for the distant mountains can be blurry, giving people a hazy beauty. Several cavities should be reserved in the nearby stones so that plants can be planted. The outer walls of the stones can be covered with moss to add greenery. Finally, a small number of accessories should be added to enhance the charm and artistic conception of the bonsai.