How to care for and manage a Clivia miniata after root rot so it can recover
Root rot in Clivia miniata is mainly caused by overwatering, high temperatures, overly concentrated fertilizer or raw manure, and in some cases by infection from pathogen-bearing growing media. Whether a Clivia miniata can survive after root rot depends mainly on whether the root axis is in good shape, whether the leaves have separated from the root axis, and the condition of the new leaves in the center.
When the hot summer arrives, a Clivia miniata can easily develop root rot if you are even slightly careless with water control, and it is a great pity to lose one. Do not lose heart; with treatment it can come back from the dead. Below I will describe the root rot treatment process I went through myself.
Tools/Materials:
Clivia miniata (with root rot), coarse river sand or sphagnum moss, potassium permanganate, plant ash (ash from burned paper, grass, or wood)
Method/Steps:
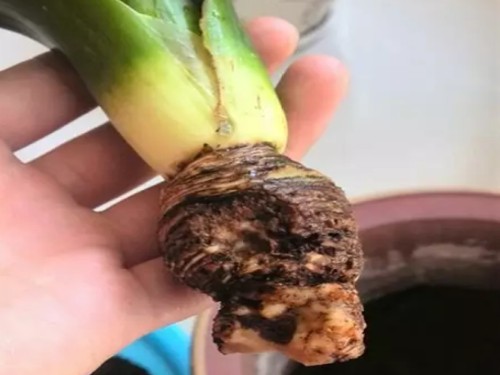
1. Symptoms of root rot: the bottom leaves dry and turn yellow, the other leaves turn yellow, and the plant lacks vitality. The photo below shows the symptoms of root rot.
2. Take the Clivia miniata with root rot out of the pot, remove the rotten root parts, and clean them out thoroughly to prevent further rotting. There is also a small offset. Postscript: this small offset has also survived and grown up.
3. Soak it in a 1/1000 potassium permanganate solution for 30 minutes to disinfect the rotten roots. The Clivia miniata looks even more lifeless.
4. After disinfection, drain the water and apply plant ash to the affected area (the rotten root area).
5. Control water and air-dry for 1 day. Do not let direct sunlight hit the leaves; it is best to cover the leaves with newspaper.
6. After air-drying, plant the Clivia miniata in coarse river sand or sphagnum moss. I planted mine in sphagnum moss, and after 15-50 days it grew plump, white new roots.
Care of Clivia miniata after root rot:
1. Treating the root rot
Remove the rotten roots: take the Clivia miniata with root rot out of the pot, gently shake off the soil, then rinse the roots clean with water, and use scissors to clean away the rotten root system. If any leaves are yellowing or limp, it is best to cut off those damaged leaves as well.
Disinfection: place the cleaned roots in a 0.1% potassium permanganate solution and soak for 5 minutes, then dip them in a little sulfur powder, plant ash, or carbendazim, and air-dry them in a cool place (about 2 days is enough).
2. Treating the potting soil
Commercial nutrient soil has poor air permeability, and the soil is either too raw or too decomposed. If the soil contains incompletely decomposed components, long-term watering and fertilizing in the pot will generate heat and easily cause root rot. Or if homemade flower soil is rather sticky, has high water content that does not evaporate easily, and has poor air permeability, bacteria can invade the plant through the wounds and cause root rot. Therefore, choosing the flower soil before planting is very important.
For the pot used to grow Clivia miniata, if the air permeability is poor, consider switching to a porcelain pot or a coarse ceramic pot.
3. Potting up after treating the root rot
Replant the disinfected roots, and you can add some river sand to encourage rooting. Raise the plant's temperature appropriately, keeping it at 22-30°C, and after two months new roots will grow; then transplant it again into nutrient potting soil. After planting, control watering and do not water unless the soil is dry, to avoid root rot again. Just place it in a cool, ventilated spot.
4. Adjusting water and fertilizer
Do not water Clivia miniata too much; water in moderation. Overwatering makes the nutrient soil hold too much water, reduces air permeability, and prevents the roots from getting enough oxygen, causing root rot. When watering, also be careful not to pour water into the center of the Clivia miniata, so that water does not run down the stem to the roots and cause waterlogging. Watering is usually once every 2 weeks, along with fertilizing.
Precautions:
1. Thorough disinfection
This thorough disinfection refers not only to disinfecting the roots of the Clivia miniata, but also to disinfecting the soil used when repotting, so that the root system does not continue to rot.
2. Control of temperature and moisture
After treating root rot in Clivia miniata, the temperature of the potting environment should preferably be kept at 20-25°C, and ventilation must be good. In addition, water less; if the potting soil is too wet, it is not only unfavorable for rooting but also risks rotting again.
Also note that after root rot treatment, the pot is best placed in a spot with indirect light, avoiding direct sunlight, because at this time the Clivia miniata is very fragile. Think about it: its roots have all been cut away, so of course it should be treated gently!
3. Control your hands
Some flower enthusiasts think that since the Clivia miniata's roots rotted, even though it has already been treated and repotted, they should check the roots from time to time to see whether they are still rotting. In fact, this practice is not only meaningless, but also increases the chance of the Clivia miniata being infected by bacteria.