Detailed Guide to the Methods and Steps for Making Rose Bonsai
Roses have long enjoyed the reputation of being the “queen of flowers,” with their brilliant and colorful blooms and graceful bearing. Besides being grown in pots, planted in the ground for ornamental viewing, and used as cut flowers, they can also be made into bonsai. The roots and trunks of roses are vigorous and quaintly aged. In early spring, the whole tree is covered with new buds and tender leaves, either red or green, fresh and pleasant, giving a sense of vitality; from late spring to autumn, the branches are full of flowers with a fragrant scent. Even in winter, their vigorous and upright branches are quite worth admiring. Moreover, they are rich in resources and their materials are easy to obtain, making them a bonsai material with great development prospects. A finely crafted and vividly shaped rose bonsai is a highly expressive work of art.
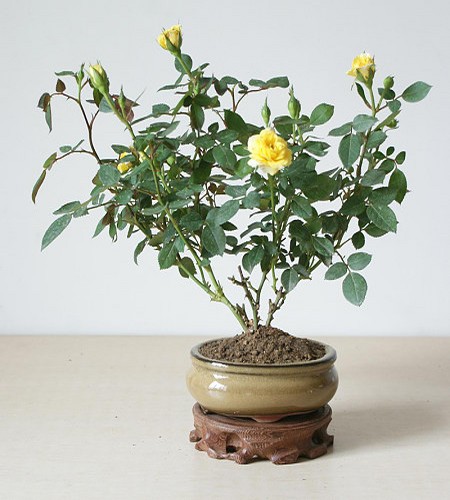
To make a large rose bonsai, the key is to master the following points:
1. Collecting stumps: From spring each year, go to hillsides and ditch edges to dig up Rosa multiflora stumps with unusual shapes and naturally tapering tips. After the stumps are collected, cut the roots and trunks into place as much as possible, and plant them in plain sandy soil mixed with a little sawdust. Either pot planting or ground planting will do. Cover the whole stump with a plastic bag. After new buds grow 3cm-5cm, choose a rainy day to remove the plastic bag, then spray water on the trunks and leaves every morning and evening to ensure survival. Fertilizing can begin in August, once every half month, with cake fertilizer water being best. For those whose branches transition naturally, prune in the spring of the second year and strengthen management. When the new branches of that year grow to a certain thickness, grafting can begin. Individual ones that need trunk thickening can continue to be grown on.
2. Grafting: For rose bonsai grafting, bud grafting is preferable. Its characteristics are simple operation and a long grafting period. Bud grafting can be carried out from May to September, with a high survival rate, and those that fail to survive grafting can be re-grafted at the original site. According to personal preference, choose the flower color and variety of rose to graft. However, based on my own practical experience, miniature roses have the characteristics of small plants, delicate little flowers, a large number of flowers, and a long flowering period, making them the first choice for grafting. Miniature rose varieties with similar flower shapes can be selected for grafting.
Rose grafting is not difficult, but to achieve a relatively high survival rate, three links must be mastered:
First, selecting buds. The grafted buds must be taken from robust branches, and the best time is when they are about to begin sprouting. It is best to cut off the flowers, apply fertilizer, and grow them on for a week, then take buds for grafting when the buds begin to swell.
Second, removing buds. For common roses, use the bark-peeling bud removal method. Miniature rose branches are thin, and it is not easy to remove buds by traditional methods. First cut the bud-bearing branch into lengths of nearly 2cm, respectively make slanted cuts from the middle section of the back of the bud toward both ends, then peel open the bark layer from the lower end of the bud and slowly separate the bark layer from the xylem. Be very careful to protect the vascular bundles within the bud piece. After the bud is removed, according to the height of the rootstock cut, trim both ends of the bud piece flat, gently place it into the rootstock cut, and press it tightly against the rootstock xylem. Wrap it tightly with plastic strips, exposing the bud eye.
Third, maintaining moisture. After grafting and wrapping are completed, if conditions permit, the grafted rose bonsai can be placed in a plastic greenhouse for care, or the method of covering individual branches with plastic bags can be used. In this way, it can be directly placed in the natural environment for care without harm. After 7-10 days, the plastic bag can be removed, the binding loosened, and supplementary grafting can be done depending on survival.
Material selection. The rose is a deciduous shrub of the genus Rosa in the family Rosaceae. It has many varieties and brilliant, rich flower colors, including white, pink, red, yellow, purple, orange, as well as pale green, bicolor, and many others. There are also many variations in flower type and flower size. Roses used for making bonsai should have bright flowers, bloom easily, compact plant shape, short internodes, not-too-large leaves, strong habits, strong sprouting ability, and tolerance to pruning. Flower color and flower type can be chosen according to personal preference. Its propagation method is mainly cuttings. Cuttings can be taken in May after flowers fade using softwood cuttings from current-year growth, or in October in combination with pruning using hardwood cuttings.
Those old rose stumps eliminated in landscaping that have grown for many years and have quaint, unusual forms can also be used to make bonsai. They are generally transplanted in winter and spring. In the south, because of high air humidity, they can also be transplanted in summer and autumn. First plant them in clay pots or in the ground to “nurse the material.” Because roses have well-developed main roots and few lateral roots, before planting, shorten the overly long main roots and retain as many lateral roots and fibrous roots as possible. Planting should be deep, preferably burying all the roots in the soil to ensure survival. After planting, keep the soil moist but not waterlogged. After survival, remove new buds and tender branches not needed for shaping, and strengthen water and fertilizer management to promote robust branch growth.
One can also use old stumps of Rosa multiflora (commonly known as “cimei”), Rosa banksiae, and other plants of the genus Rosa that have grown for many years and have twisted, varied roots and trunks as rootstock, and use varieties such as ‘Medallion’, ‘Fei Shan’, ‘Yellow Peace’, ‘Cocktail’, and ‘Caiyun’ that bloom easily and grow vigorously, or miniature roses with small leaves and delicate flowers as scions, joining the two into one by grafting for making bonsai. Bud grafting is usually used from June to September, and cleft grafting is used during the dormant period. According to different local climatic characteristics and specific conditions, tender shoot cleft grafting or side grafting can also be used. When grafting, pay attention to the height and direction of the buds. Sometimes several rose varieties with different flower colors and flower types can be grafted onto one old Rosa multiflora or rose stump. When they bloom, flowers of different colors vie with one another in beauty, which is very lovely.
Shaping. Rose bonsai mainly includes three types: old-stump rose bonsai, miniature rose bonsai, and combined-style rose bonsai. Their shapes mainly include single-trunk style, one-root double-trunk style, curved-trunk style, slanting-trunk style, waterside style, cliff-hanging style, exposed-root style, dead-trunk style, stone-attached style, forest style, water-and-land style, large-tree style, and other different forms. According to shaping needs, raise the roots above the soil surface so that they hang and expose their claws, giving an aged and vigorous look. Root raising should be done gradually, not too much at once, so as to avoid the stump sending out new buds and dying. Because rose branches are strongly upright and the leaves are relatively large, the crown generally uses a natural shape. The shaping method is mainly pruning, supplemented by pulling, so that the branches are reasonably arranged and well graded in height. Because their branches are relatively brittle and easy to break, and the bark is also easy to tear, do not bend or wire them.
Plant several robust roses together in a suitably sized rectangular or oval flower pot to make a “combined planting rose bonsai” or “water-and-land style rose bonsai.” When planting, pay attention to the matching of flower colors among the rose plants and the coordination of flowers, stems, and leaves among the plants, achieving harmony between upright and slanting, movement and stillness, skill and simplicity, concealment and exposure. Finally, add decorative stones, trees, or other flowers and plants, and moss to give it a poetic and picturesque quality.
The finished rose bonsai can have moss spread on the pot surface, small grass planted, and some unusual stones or other accessories placed to make it more vivid.
Potting steps
1. Dig out the roses buried in the seedling bed and grown in small pots, and prune them appropriately, cutting off branches not needed for shaping.
2. Choose a rectangular white marble shallow pot. Because the flower pot is relatively shallow, water evaporates quickly and will not cause water accumulation, so there is no need for drainage holes at the bottom of the pot.
3. Move the rose into the white marble shallow pot. When planting, pay attention to the position of the plant in the pot so that it is harmonious and natural.
4. Cut off overly long roots, then arrange stones around the soil to create a slope base to add a wild charm.
5. The completed rose bonsai can be buried together with the flower pot in a seedling bed, sand bed, or a larger clay pot for care, to facilitate management.
6. After flowering, dig the flower pot out of the seedling bed, wipe away the soil on the pot, pair it with a suitable stand, and decorate it with bonsai ornaments such as boats and figures to make it more vivid and interesting.