How to make a horned holly (Ilex cornuta) bonsai? Detailed method explained
Horned holly, also known as Chinese holly (Ilex cornuta) or "bird's no-roost," belongs to the Aquifoliaceae family. Its single leaves are alternate, hard and leathery, with spiny teeth along the edges, and it stays green all year round. It likes light and tolerates slight shade, is not hardy against severe cold, grows slowly, has a well-developed root system, strong sprouting ability, tolerates pruning, is dioecious, and bears spherical drupes that are bright red and gorgeous in autumn and winter, making it an excellent bonsai material for foliage, flowers and fruit.
Horned holly has luxuriant branches and leaves with unusual leaf shapes, and especially after autumn it is covered with bright, beautiful red fruit, making it a flower and plant variety prized for both its foliage and its fruit. So how do you make a horned holly bonsai? Follow the editor below to learn how to make a horned holly bonsai!
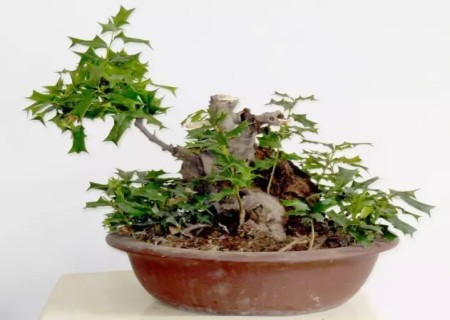
1. Obtaining material
The main sources of horned holly bonsai material are: sowing, cuttings, air layering, and collecting from the wild. Because horned holly grows slowly, thick, old, twisted trunks with beautiful roots and good branching generally have to be collected from the wild. Horned holly is distributed across the provinces of the middle and lower reaches of the Yangtze River, generally growing beside mountain streams and brooks at lower altitudes; trunks that have been cut by people and trampled by livestock are better. It can be collected in any season, with early spring being best and severe winter or intense summer heat being worst. When collecting, examine the trunk carefully and choose better trunks to dig up; do not dig up every trunk you see, and even less should you cut or dig at random.
Horned holly has few fibrous roots, so it is not easy to keep soil around them. When collecting, protect the fine roots as much as possible, and leave the large roots a little longer to help retain water. Trunks collected when the weather is dry and windy need shade and moisture retention, and during transport try not to bruise the roots or bark.
2. Making the bonsai
After the collected trunk is sawed and cut to the right size, plant it as soon as possible. The cut surfaces should be trimmed flat and smeared with clean yellow clay or a growth hormone. After smearing the larger cuts on the upper part of the trunk with yellow clay, wrap them with black plastic film to help the wounds heal.
For initial planting, it can be grown in the ground or directly in a pot. When potting, an earthenware pot is better, though a purple clay pot or cement pot can also be used. Plant it in loose, breathable soil such as leaf mold or garden soil.
After watering thoroughly, cover the whole pot with a white plastic bag and tie it tightly, then place it in a semi-shaded spot for care, checking the pot soil's moisture frequently and keeping it moist.
After the trunk sprouts, choose a rainy day or a humid, overcast day to open the plastic bag and let it gradually adapt; on sunny days and in dry weather, spray water on the trunk to retain moisture, and provide some shade as needed.
After the horned holly trunk has survived, do not rush to thin out the branches; more branches and leaves mean more water evaporation, which can promote root growth. Once it enters the normal care stage, place it in full sun to strengthen the trunk's adaptability and gradually make the new leaves smaller. After autumn begins, thin out excess branches and apply light fertilizer to ensure the plant overwinters strong.
Wiring is done in the second or third year, choosing spring. When wiring, the hard spines on the leaves prick the hands, so you can cut off all the leaves on the plant before wiring; cutting the leaves can also encourage more branching. When cutting leaves, leave one section of leaf stalk to prevent damaging the leaf buds and affecting their sprouting. When wiring, the wire must not damage the leaf buds. Once the branches have set their shape, remove the metal wire promptly. When removing the metal wire, use wire cutters to cut it in sections, then use needle-nose pliers to take it off.
Notes:
1. Horned holly is best potted and planted after autumn or before sprouting in spring. When digging up seedlings, be sure to protect the lateral roots and fibrous roots; with only a taproot it is difficult to survive. It is best to transplant with a soil ball, and at the same time thin the branches and leaves appropriately to reduce water loss.
2. The pot soil should be fertile, loose, well-aerated, slightly acidic, neutral or calcareous soil. Leaf mold or matured garden soil is commonly used, mixed with an appropriate amount of sand.
3. Horned holly likes full sunlight, a warm climate and well-drained, acidic, fertile soil. It is less cold-hardy and grows slowly, so it needs more phosphorus fertilizer to produce dense, brightly colored fruit.
4. Horned holly is not hardy against severe cold. When plants overwintering outdoors in winter face temperatures below zero degrees, frost protection measures must be taken.