How to make an Elaeagnus bonsai? A complete analysis of the production techniques
The Elaeagnus tree shape is natural, and its red fruits hang downward. Besides being used for clump planting on lawns, at forest edges, and on the outer perimeter of tree groups to make natural-form hedges, we can also make it into a bonsai for appreciation. However, potted Elaeagnus generally does not bear fruit easily, which is related to the selected variety and the length of cultivation time. Although Elaeagnus does not easily bear fruit, it can bloom, and very beautifully. Is making it into a bonsai not precisely for appreciation? It is exactly the beauty of Elaeagnus with flowers covering the branches that makes people passionate about admiring it.
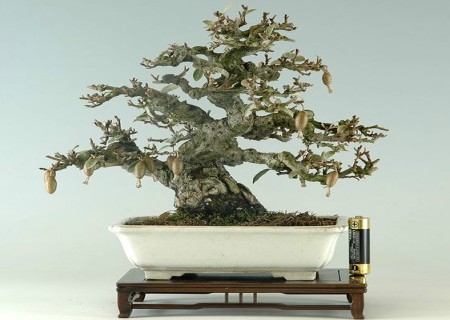
Below, the editor will introduce the production techniques for Elaeagnus bonsai, hoping to be of help and inspiration to friends who like Elaeagnus bonsai.
1. Material collection process
To make an Elaeagnus bonsai, we can obtain material in two ways: artificial propagation and collecting from the wild. Artificial propagation is mainly done through sowing and cuttings, but this process is relatively long. Since we can collect from the wild, why not use ready-made material? Moreover, wild old Elaeagnus stumps have an antique form and sturdy roots and stems, making them the best material for making bonsai.
The collection of old Elaeagnus stumps is usually carried out in late winter or early spring. When collecting, cut off excessively long main roots, and be careful not to damage the lateral roots and fibrous roots. In addition, the branches and trunk should also undergo a deep pruning, keeping only the branches that can be shaped.
2. Stock cultivation process
After handling the old stump, we first plant it in the ground for cultivation. When planting, be careful to firm the soil and pile the soil as high as possible. After planting, water thoroughly once, and at the same time cover the branches and trunk with some dry weeds. Spray water 2-3 times a day to keep the soil around the plant moist. Especially in summer, shade measures must be taken well. I believe that after careful stock cultivation, it will surely be lush with branches and leaves the next year, and then it can be carefully potted and shaped.
3. Potting process
The potting process for Elaeagnus requires three steps: choosing a pot, preparing soil, and transplanting. Let us look at these three steps in detail below.
1) Choosing a pot: Before potting, we must choose the best pot for the Elaeagnus. According to the growth characteristics of Elaeagnus, it is suitable to choose a glazed ceramic pot or a purple clay ceramic pot. Of course, the shape of the pot depends on the old Elaeagnus stump; generally, an oval or rectangular pot is preferable. It is best to choose light yellow for the color, because if the Elaeagnus fruits are red and set off by the green leaves, the Elaeagnus bonsai made this way will look more pleasing to the eye.
2) Preparing soil: After choosing the pot, it is time to make the bonsai soil. Actually, Elaeagnus is relatively tolerant of poor soil and is not very strict about soil requirements. Usually, we can mix garden soil + river pond soil + sand soil or rice husk ash in a certain proportion and mix evenly. Of course, we can also use humus soil alone for cultivation.
3) Transplanting and cultivation: The potting time for Elaeagnus is usually completed before the plant buds in spring from March to April each year. Of course, it is not limited to this time period; in fact, autumn also works, but potting in spring makes it easier to survive. Before planting the Elaeagnus, we need to trim the roots of the collected Elaeagnus, and at the same time firm the other roots with soil. When planting, the bottom of the pot cannot be lined with soil like other plants when potting. Potting Elaeagnus requires leaving the bottom of the pot empty. After planting the plant, water thoroughly once, and at the same time place it in a cool place for care, avoiding sunlight exposure. Only after half a month can it be exposed to sunlight.
4. Shaping process
After the old Elaeagnus stump is cultivated well, it needs a period of careful care and management. When the root system has regrown thick and strong and the newly sprouted branches have become firm, shaping can be carried out.
1) First, we need to process the entire tree body, which can be done by combining wiring and pruning. Metal wire or palm fiber can be used for wiring. Of course, the whole process needs to be carried out before flowering; simply wire the main branches and trunk, and small branches can be handled by pruning.
2) After simple processing, we can shape it in detail. The shaping styles that can be used include formal upright style, slanting style, curved trunk style, etc. The bonsai made this way has more elegance and appears more antique, vigorous, and powerful.
5. Maintenance process
In addition to choosing an ideal placement location, the maintenance and management of Elaeagnus is nothing more than water and fertilizer management, pruning, and repotting. A normally growing Elaeagnus bonsai should be placed in a place with abundant sunlight and good ventilation, such as a balcony. Proper shading in summer is enough, and in winter it can also be placed outdoors, because Elaeagnus itself is relatively cold-tolerant.
For water and fertilizer management, in addition to following the watering methods for normal plant management, organic fertilizer can be applied once a month in spring, and phosphorus-potassium fertilizer can be applied once every half a month in autumn. Afterward, pruning can be carried out appropriately according to the plant's growth. Repotting can be done once every 3-4 years, preferably in early spring or after autumn.
In addition, daily pest and disease protection work should also be done well.