Detailed guide to the method of making rockery bonsai, teaching you step by step
A rock-and-stone bonsai is a three-dimensional painting. Through the author's artistic processing and the magical technique of moving heaven and shrinking earth, the beauty of nature is reproduced within a tiny pot in the form of mountain bodies, plants and figurines arranged into a scene. And the rockery is the main subject of a rock-and-stone bonsai; only after the making of the rockery is completed can a complete rock-and-stone bonsai be assembled.
In today's home decoration and arrangement, rockery is the choice of many people; rockery stone is a miniature of the landscapes people love. Some people display indoor potted rockery to embellish their homes, and some make rockery in home courtyards for decorative arrangement. So what exactly is the method of making a rockery? Let us learn about it below:
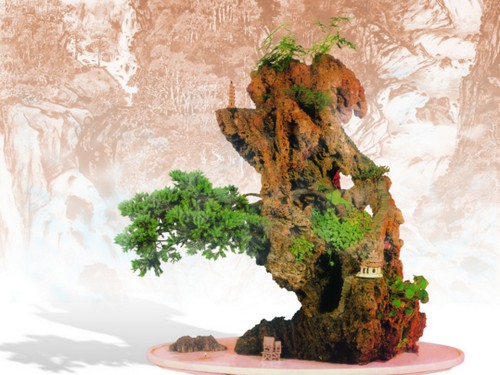
To make a rockery, you need to prepare the following tools and materials: saw, chisel, pliers, hammer, panel, brush, etc.; shallow-mouthed pot, mountain stone, cement, sand, etc.
The process of making a rockery:
1. Concept and design: Before making a rockery, you must have a well-thought-out plan. You must decide what type of bonsai you are making and what kind of bonsai shape it will be, otherwise you will not know where to start. According to your concept, initially arrange the shape of the mountain body in a sand tray. Note: the height and size of the rockery must be in harmonious proportion to the size of the shallow-mouthed pot.
2. Bonding and cementing the rockery: To cement the mountain body, the first step is to mix the cement slurry well. Note that the slurry should be mixed as it is used, and also pay attention to its consistency. The second step is stone processing: use tools such as a hammer, chisel and saw to work the mountain stone that needs to be cemented, creating textures and relatively unusual shapes. The third step is bonding the mountain body: apply cement slurry with a panel to both surfaces of the mountain stones that need to be bonded, so that the stones fit together as one. When bonding, pay attention to trying to make the joints of the mountain stones show no trace of breakage, and also be careful to clean off excess slurry from the joints.
3. Maintaining the rockery: After the mountain body is completed, it must not be touched or moved immediately. It should be watered and cured for two to three days before the mountain body becomes basically firm.
The shapes of rock-and-stone bonsai can be roughly divided into five types: independent style, offset-weight style, open-close style, scattered style and overlapping style. Making one can be divided into the following steps:
(1) Choosing the pot. Great attention is paid to how the pot and stand set each other off. Pots generally include purple clay pots, porcelain dishes, marble trays, stalactite “cloud trays”, trays and so on. The shallow trays commonly used for rock-and-stone bonsai are mostly rectangular or oval, with four feet underneath and a rim that protrudes outward and is multi-faceted to enhance decoration; they are white or light blue and can show the water surface. At present, white hard plastic shallow trays and white cement terrazzo trays are sold on the market, are inexpensive, and can also be chosen. As for the stands for displaying the pots, local materials can be used to create stands rich in local characteristics.
(2) Layout within the pot. A rock-and-stone bonsai is a highly generalized processed work of art, and must be carefully combined, meticulously weighed and reasonably laid out. Therefore, when combining and shaping it, several principles must be followed.
1. Originate from nature and create an artistic conception.
2. Have a clear primary and secondary, with the parts looking toward one another.
3. Have clear layers, with contrast and foil.
4. Suit both the empty and the solid, seeming hidden and yet appearing.
5. Be rich in variation, yet unified and coordinated.
(3) Stone processing
1. Sawing and cutting: According to the drawing already made, determine the position and size of the main body. Then use a small saw to slowly saw the bottom flat. Next, choose the side with clear texture and many holes as the front, and process it according to the envisioned effect. Soft stone can be sawed with a hacksaw, while hard stone must be sawed with an electric emery saw blade.
2. Carving: Carving must start from the big picture. Use tools such as a hammer and chisel to carve out the general outline of the mountain peak, then carry out fine processing. Remember: when processing, try to keep the [original] state.
3. Cementing: Cementing can play a role in perfecting the work. Its key points are: ① The stone quality, texture, color and momentum of several pieces of stone material should all be similar. ② In order not to affect the water absorption of the stone peak, they should be joined horizontally in layers, and must not be joined vertically.
(4) Adding small scenic accents. Small scenic accents are meant to achieve the artistic effect of many stars surrounding the moon. Its methods include:
1. The method of adding moss is: scrape off the green moss growing on the outer walls of flower pots in a shade shed or greenhouse with a knife, gently rub it into pieces, then dip a brush in the crushed moss and sow it into the cracks and holes of the mountain peak. Next, place it in a shaded place and spray water frequently; the green moss will soon cover the stone peak.
2. The method of planting trees is: following the requirement of “ten-foot mountain, one-foot tree”, choose suitable tree species and plant them according to the growth laws of nature. In stone crevices, it is suitable to plant species with exposed roots, curved trunks and an exquisite tree form, and plants with fine branches, small leaves and shallow roots. For large bonsai, small Japanese white pine, crown of thorns, etc. can be planted. For small and medium bonsai, some fine-leaved evergreen herbaceous plants of the Crassulaceae family are often used to replace trees.
3. The method of placing figurines is: follow the shape and take advantage of the situation, go with nature, cleverly combine with the terrain, whether beside a mountain, by water, near a cave or in midair, and coordinate with the natural scenery in the bonsai to express the artistic conception of the landscape. You can refer to the positions of landscape buildings and facilities in Chinese painting theory when placing them. Note: for the size of the figurines, you should grasp the perspective principles of near large and far small, low large and high small. As for quantity, decide it according to the specific circumstances of the bonsai theme, artistic conception, specifications and so on.
A rock-and-stone bonsai can also have two rockeries appearing in one pot at the same time, one as the host mountain and the other as the guest mountain. (The host mountain is relatively tall and large, while the guest mountain is relatively low and small.) At this time, one bonsai requires making two rockeries.