How to make an Australian pine bonsai? Detailed method tutorial
Australian pine (Norfolk Island pine, Araucaria heterophylla) is one of the world's three major ornamental trees, known for being very easy to care for. Its bonsai features exposed hanging roots and claws, gnarled and vigorous trunks, and lush foliage, making it deeply loved by people. Australian pine stays verdant all year round and can also be made into lovely bonsai; it is a plant that many people keep at home. Australian pine is a precious indoor decorative plant and can be placed in the living room, study, office, storefront, and so on.
Australian pine has good ornamental value; making it into a bonsai and placing it in the living room or study can not only add vitality to the home but also deepen its cultural charm. Today, the editor will introduce to everyone the method for making an Australian pine bonsai.
1. Propagation
Australian pine is usually propagated by sowing and cuttings. Seedlings grown from seed are firm and strong, with vigorous growth, and are suitable for mass propagation. Generally, in July-August, freshly collected seeds are first scarified to promote germination, and then the treated seeds are sown in a sand bed, covered with fine sand about 1.5-2 cm, and planted immediately after germination. When taking cuttings, if the main axis or a leggy branch is chosen as the cutting, it easily causes the plant's crown shape to be irregular, and it can only grow horizontally, affecting ornamental value. Cut the tip 2-3 nodes of a healthy branch that roots easily as the cutting, remove some leaves, soak it in clean water overnight, and then insert it into a sand bed with coarse sand or vermiculite as the substrate; it will root after about 3 months.
2. Choosing a pot
In terms of choosing a pot, because Australian pine has relatively lush branches and leaves, a slightly larger flower pot should be chosen. Potted cultivation mostly uses small seedlings, and a suitable flower pot should be chosen according to the size of the seedling.
3. Soil mix
Australian pine is suitable for slightly acidic sandy loam that drains well and is rich in humus. When potting, a substrate mixed from garden soil, leaf mold, and peat moss is best.
3. Making
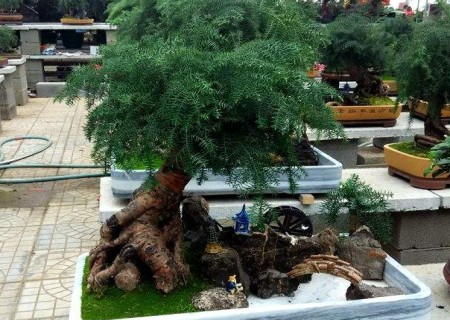
When making the bonsai, first place the Australian pine at the left one-third position of the pot. At the same time, the right two-thirds position can be arranged with water, rockeries, and ornamental stones. After placing the Australian pine into the pot, the plant should be held upright, then soil should be added, and the soil should be pressed firm with fingers. The soil surface in the pot should be 2-3 cm lower than the pot rim.
After the plant is planted, some moss can be laid on the soil surface, which can serve to beautify, retain moisture, and prevent drying. At the same time, some small plants such as dwarf lilyturf, saxifrage, and pennywort can be planted below the Australian pine as accents. By May, these small plants will bloom with lovely flowers one after another, making the whole bonsai full of vitality. The pool between the plants on both sides can be connected with an accessory porcelain bridge, and paired with a porcelain fisherman and porcelain pavilion, making the whole bonsai lifelike.
4. Watering
From spring to autumn, water more, but avoid water accumulation in the pot. During high temperature and dryness, spray water on the potted plant and the nearby ground to lower the temperature and increase humidity. Water promptly; do not wait until the soil is dry before watering. After late autumn, gradually reduce watering to enhance its cold resistance. In the overwintering season, give a certain amount of light, and the potting soil should not be too dry; on clear days, water should also be sprayed to increase humidity.
5. Topdressing
During the growing season, apply fertilizer once every 2 weeks, preferably a compound fertilizer containing nitrogen and potassium. Insufficient fertilizer supply easily makes the branches and leaves turn yellow. During the growing season, apply fertilizer once every 2 weeks or add a little nutrient solution, which can keep the branches and leaves evergreen.
6. Pruning
Under normal circumstances, there is no need to prune the branches; let them grow naturally.
7. Rotating the pot
During growth, to prevent the trunk from leaning to one side, it is advisable to rotate the pot once every half month so the plant receives light evenly.