A Detailed Guide to Apricot Tree Grafting Techniques: Methods, Steps and Precautions
In recent years, with the advancement of the apricot hot-air drying room project in the three prefectures of southern Xinjiang, the enthusiasm of the people of southern Xinjiang for growing apricot trees has been rising higher and higher. The villagers of Suyitika Village, who have grown apricot trees for many years, are also seizing this opportunity to vigorously develop the apricot industry, but the villagers are now in urgent need of apricot tree grafting techniques. They want to know what precautions and taboos there are in grafting. Zhang Ping, a researcher at the Institute of Agricultural Product Storage and Processing of the Academy of Agricultural Sciences, told our editor that because apricot trees are highly adaptable and have low requirements for cultivation conditions, but to increase yields, grafting with superior varieties is indispensable.
[Selection for Grafting]
For grafting, select a mature apricot tree with pure variety, excellent quality and robust growth as the mother tree for collecting scions. Grafting can be carried out in spring from when the sap begins to flow until before flowering and leafing out, but the optimal period is from when the rootstock buds begin to swell until before flowering. Grafting too early will affect the survival rate of top grafting.
[Grafting Methods]
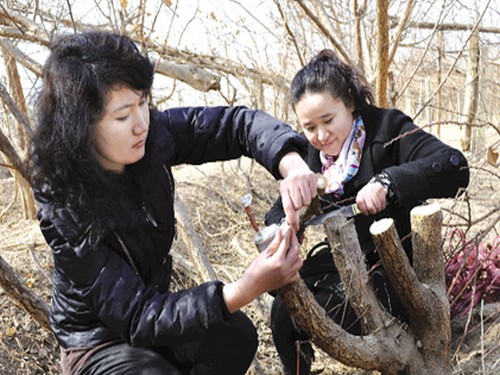
The bark insertion graft is suitable for thicker rootstocks. The specific steps are: choose a smooth part of the branch on the rootstock, saw off the rootstock, and use a knife to shave off the burrs at the saw cut. According to the thickness of the rootstock, select 2 to 4 points for inserting scions, then on the rootstock bark, cut a small slit downward from each insertion point with a knife, half the thickness of the bark deep, and shorter in length than the cut surface of the scion. After taking out the scion and soaking it, cut a 3 cm to 5 cm bevel at the lower end of the scion, shave a little bark off each of the two edges of the cut surface, and cut a small bevel at the lower part on the opposite side of the cut surface. Finally, select and keep 2 to 3 buds above the long cut surface and cut off the scion. Use a smooth bamboo skewer to insert at the scion point between the phloem and the xylem, gently insert it downward along the small slit cut on the outside of the bark, pull out the bamboo skewer, press the cut surface of the scion tightly against the xylem of the rootstock, and insert it along the gap until only about 0.5 cm of the cut surface is exposed, which is beneficial for the healing of the rootstock and scion. When inserting the scion, tilt the upper end of the scion slightly outward so that the lower end of the cut surface is always inserted tightly against the xylem of the rootstock, preventing the lower part of the scion from penetrating into the bark of the rootstock. After insertion, bind the scion and rootstock tightly with plastic strips, seal the rootstock wound tightly with wet mud or plastic, then put on a plastic bag, which should extend 3 cm to 5 cm above the scion.
The cleft graft is often used for top grafting of young trees and large trees. Select a smooth part of the bark and saw off the rootstock, then split the rootstock down the middle with a cleft grafting knife to a depth of 3 cm to 4 cm. At the lower end of the scion, cut a bevel on each side, with the two edges of the bevels being slightly thinner on one side and slightly thicker on the other, forming a flat wedge shape, and keep 2 to 4 buds on the scion. Open the cleft of the rootstock, insert the scion gently with the thinner side facing inward and the thicker side facing outward, to a depth such that about 0.5 cm of the upper part of the scion's cut surface is exposed.
"After grafting, management should be strengthened, otherwise the effect will be affected. After grafting, water immediately, and apply fertilizer together with irrigation, with nitrogen fertilizer as the main fertilizer. Check the survival situation 10 to 20 days after grafting, and replant immediately if not survived." Zhang Ping emphasized.
In addition, in order to improve the survival rate of apricot tree grafting, the following technical points should be mastered during the grafting process.
[Cultivating Rootstock]
Seedlings used for grafting must be watered, weeded and disbudded in time to cultivate a dominant trunk. Generally, rootstock seedlings used for grafting are required to have a ground diameter of 2.5-3 cm. Seedlings propagated from seeds can be grafted in the 2nd year; seedlings planted in the field can be grafted in the 2nd year after planting.
[Storing Scions]
Apricot scions are generally collected from current-year branches, requiring the mother plant to be robust, free of pests and diseases, and with relatively plump buds. Collect scions before the buds swell, and after collecting the branches, store them in a cool sand pit or vegetable cellar. The size of the sand pit depends on the number and length of the branches; place one layer of branches and one layer of sand, and when it reaches 20 cm from the ground, cover it level with wet sand. Storage in a vegetable kiln is simpler; just bury one layer of branches and one layer of wet sand directly. The storage time should be at least one week. In summer, scions can be grafted as soon as they are collected.
[Grafting Period]
The choice of grafting period is directly related to the survival rate of grafting. Under different temperature conditions, cells grow at different speeds, so the wound healing speed also differs, thereby affecting the survival rate of grafting and the growth of seedlings after survival. If the time is too early, the temperature is relatively low, the cambium cells of the rootstock have just begun to swell, the callus tissue grows slowly, and the grafting wound is not easy to heal; if grafted in high-temperature summer weather, the temperature inside the bag is too high or water is lost too much, which will also affect the activity of the cambium cells of the rootstock. In the Hoxud area, the suitable time for branch grafting is March 25 to April 10; grafting from March 5 to April 1 must use bags, while grafting in April does not need bags. The bud grafting period can be carried out from mid-July to early September. Bud grafting requires the cambium of the scion to be in an active growth state, the bud and rootstock to be easy to separate from the bark, and it is easy to survive after grafting.
[Grafting Operation]
The quality of grafting technique is shown in the smoothness of the cut surface of the graft union and the speed of grafting. If the cut surface is not smooth or the cambium layers of the rootstock and scion are not aligned, the cambium layers of the rootstock and scion cannot contact closely, and the wound healing speed will slow down or fail to heal. Even if it heals, it will affect the growth of the scion, causing situations such as late sprouting, weak growth and easy splitting. When grafting, the scion surface should be trimmed flat, the cambium layers of the rootstock and scion at the grafting site should be aligned, and the plastic strips should be tied tightly and wrapped tightly to ensure a firm union. To increase the speed of grafting, it is required to have a sharp knife, fast bud cutting, fast rootstock cutting and fast binding, so as to reduce the time the bud and rootstock are exposed to the air, avoid air-drying of the cut surface or oxidation of the cambium, reduce water evaporation, and keep a film of water on the wound surface, which promotes the formation of callus tissue. In spring, cleft grafting and tongue grafting are often used, and for bud grafting, "T"-shaped budding is often used.
[Post-Grafting Management]
1. After apricot tree grafting, water in time to ensure the supply of water to the scion.
2. According to the growth speed of the trunk, loosen the binding in time to ensure nutrient supply to the apricot tree.
3. Remove sprouts and suckers at any time to avoid excessive loss of nutrients and affect the growth of grafted seedlings.
4. For new branches growing from the scion, when they reach about 20 cm in length, take measures to secure the branches to prevent them from being broken by wind.
5. Cut off overly dense and slender small branches to facilitate ventilation and light penetration of the tree body. Cultivate a good tree shape, which is beneficial for the apricot tree to bear fruit.