How to grow Persian buttercups? A detailed explanation of the planting method with examples
These past few days, although spring has arrived, the cold of the late spring chill has seeped to the bone… Looking at the buds of Persian buttercups ready to burst open everywhere, I am full of anticipation… so many. Everyone who has seen my photos asks me: your Persian buttercups are so lush, what pot are you using? How do you fertilize?
I use a 1-gallon pot, one claw, put in after sprouting, the medium is: peat, fine river sand, vermiculite, perlite. Almost no fertilizing in the early stage. Only in early February, basically once every half month I sprayed and watered with Bivan; in early March when there were flower buds, I sprayed Bikaihua on the leaves to promote bud differentiation!
At this point, I want to share my experience of growing Persian buttercups for the first time. Before coming into contact with it, I was completely unfamiliar with it. It all started from a flower friend's introduction - the flowers are beautiful - so I group-bought claws in 12 colors together with a few friends in the group. I don't remember the exact price, but it should not have been more than 3 yuan per claw…
March 13, Persian buttercup planting:
Sprouting was carried out during the October National Day holiday, when the temperature was around 25°C. First soak in diluted potassium permanganate for one hour, then fish them out and put them on paper towels to dry for about 12 hours.
Next, soak again for about half an hour, fish out and dry for about 8 hours. Because I planned to use sphagnum moss for sprouting, the sphagnum moss was also soaked in potassium permanganate for the same purpose, disinfection… I forgot to take photos here. I prepared a cup and soaked one claw at a time like this, basically as shown below.
Then, place the claws on drained but still moist sphagnum moss, and begin sprouting at room temperature… This is the state after 10 days, basically all have sprouted roots and small buds…
Here, I want to tell impatient friends that the differentiation period of claws is different. Just like my 12, some are long and some are short… The short ones took about 7 days to show roots and small buds. The slow ones took 20 days to appear…
But fortunately, all of them grew roots and sprouted.
When the basic root system and small buds look vigorous, it is time for planting out… As mentioned earlier, I use a 1-gallon pot, one claw, the medium is: peat, fine river sand, vermiculite, perlite…… The photo below shows the state 25 days after planting out. A few have sprouted leaves, some are still playing hide-and-seek…
Just like this, because they are mainly grown outdoors, I only moved them into the sunroom during the few days when it was several degrees below zero. The rest endured wind and rain on the terrace…… Just like this, slowly tending, slowly waiting, looking forward to the moment of blooming~ The above, if there is anything inappropriate, flower friends are welcome to criticize. There will be a follow-up article on Persian buttercup blooming-period management. I hope we can make progress together, just for the most beautiful scenery in our hearts!
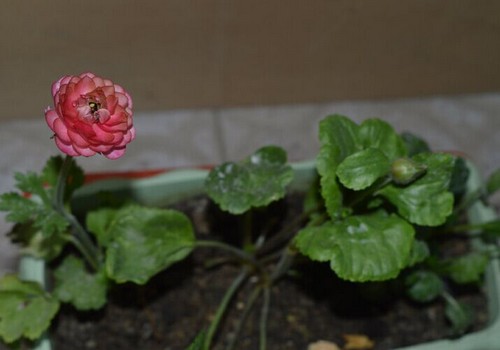
By early April, the temperature was moderate, with continuous fine rain, and the fertilizer given generously in the early stage paid off at this time. The flowers were in full bloom, cluster after cluster, clump after clump. Delicate yet strong, independent and upright… Because it was exactly the blooming period of Persian buttercups, and since it had been granted the title of "peony of the foreign lands," it lived up to this name, blooming without affectation, giving my terrace its most beautiful scene. At this time, the Persian buttercups were truly beautiful!!!
Persian buttercups are flowers that love fertilizer. A thin fertilizer can be applied once every week. I generally alternate between rice water and Huaduoduo. During the blooming period, the demand for water is also relatively high, so watering once every 2-3 days is fine. The symptoms of water shortage are easy to judge: the leaves and flower buds droop and hang down, and the pot feels very light when picked up. Then, you need to water. Watering until thoroughly soaked is best!
Try to widen the spacing between pots to provide ventilation. Avoid leggy growth and poor ventilation. Yellow leaves and diseased or damaged leaves should also be removed promptly!
The management during the blooming period, in summary, is: frequent but thin fertilizing, timely watering, timely removal of diseased and yellow leaves, and paying attention to observing pests……
During Qingming, the rain falls thick and fast. After several consecutive days of rain, today I deliberately got up early to tend the blooming Persian buttercups while taking advantage of the rain and dew. Looking at the petals fallen after the rain, this saying truly fits: "The prosperity of a whole room cannot escape the desolation after the rain." But it is precisely this desolate beauty that carries a tender ache of cherishing the fragrance and pitying the jade.
Holding a cluster of flowers in hand, keeping a feeling in mind, wishing to spend a period of youthful years. Sighing at the rings of time, yet also enjoying the growth brought by time. Life is like a flower, and a flower is like life. Truly, when flowers bloom and can be picked, one should pick them; do not wait until there are no flowers and break off empty branches……
Persian buttercups are usually propagated by bulbs, and their fleshy-root nature makes them extremely prone to root rot. Persian buttercup bulbs are dried during storage. If they absorb water quickly during sprouting, most bulbs will rot. At the same time, if the temperature is too high when the bulbs absorb water, they will also rot. Only low-temperature water absorption is safest, so they must slowly absorb water below 5°C. At this time, you can make use of the powerful and versatile refrigerator for cold storage. If planting in mid-to-late November, they do not need to be put in the refrigerator.
How do you root them? First, prepare a transparent plastic container (a cut mineral water bottle is fine, good for observing the situation inside), and some large-particle perlite or sand. Spread 1-2 cm thick perlite (or sand) on the bottom of the container, place the Persian buttercup claws face down on the perlite, then spread another layer of perlite on top until the Persian buttercups are completely covered and no outside light is visible. Finally, use a spray bottle to spray water from above, wetting the perlite and Persian buttercups. Do not let the accumulated water at the bottom of the container soak the Persian buttercup claws. Generally after 7 days the root system is full, and once small fibrous roots have grown, they can be dug out and taken out for temporary planting. Put sand in a pot, bury the Persian buttercup bulbs with the claws facing down. Bury until just covering the top of the bulb, water thoroughly, and wait until they sprout and grow roots before transplanting into a pot. During this sprouting period, do not water; let them slowly absorb moisture from the soil until they swell, otherwise they are prone to rotting. During this period, do not expose them to direct sunlight.
A flower pot with an 18 cm diameter can hold 3-5 fibrous roots (small claws). Do not cover with too thick a layer of soil when planting. After planting, place in a well-ventilated semi-shaded area, keep the pot soil moist, and do not overwater to prevent root rot.
Do you think it is quite troublesome? Dou Ma also became more and more timid the more she looked it up, but the bulbs have already been bought, and everything is too late (laugh-cry)…… Ah, what a painful realization…… Just treat it as a challenge to yourself!