How to grow potted blue-eyed daisies? Detailed growing guide
Since I, Lanyao, started growing flowers, a very close flower-loving friend recommended blue-eyed daisies to me, saying they are a flower variety well worth growing. Yes, blue-eyed daisies are indeed very endearing, with fresh-looking flowers and a long bloom period. However, blue-eyed daisies are a relatively easy flower to grow, so today let's talk about how to grow blue-eyed daisies.
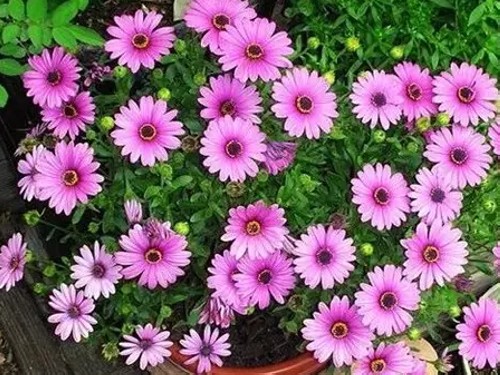
[Sowing method]
Blue-eyed daisies can be propagated by cuttings or by seed. For sowing, autumn sowing is generally done in September, or spring sowing can be done in March. The germination temperature for blue-eyed daisy seeds is between 18°C and 20°C. Many flower lovers encounter the situation where blue-eyed daisy seeds do not germinate. Apart from the reasons of seed freshness and plumpness, most cases are due to not shelling the seeds.
1. Seed treatment
The seed coat of blue-eyed daisies is hard and thick. Shelling and soaking before sowing can greatly improve the germination rate and speed up germination. If sown directly, the germination rate of blue-eyed daisies is very, very low, and they may even fail to germinate entirely.
Use a small knife to peel it open from the pointed end. Be careful not to damage the embryo inside; just peel the embryo out.
2. Seedling soil
For the sowing soil, peat plus perlite can be mixed evenly in a certain ratio. The moisture level should be such that it forms a ball when squeezed in the hand and falls apart when the hand is opened. When filling the soil, press the lower soil slightly firmer to prevent the soil ball from loosening later when transplanting seedlings.
3. Germination
Use a paper towel for germination. Spray the paper towel wet, place it on a small plate, cover the outside with a plastic bag to retain moisture, and place it in a cool place to germinate. To prevent mold, you can use low-concentration potassium permanganate water.
4. Sowing
Once the seeds show white, they can be sown. Gently take out the seeds and sow them into a seedling tray. First make a small hole in the middle of the seedling tray, then put the seed in, gently cover with fine soil, then cover with a thin layer of vermiculite, and mist to retain moisture. For small pots, try to keep one seedling per pot to make transplanting easier.
[Seedling stage management]
After the blue-eyed daisy sprouts emerge from the soil, give them light to prevent leggy growth. Maintain good ventilation. The soil must not be too wet; controlling it to alternate between dry and wet helps the root development of the seedlings. A good root system is the guarantee of strong seedlings.
After the seedlings grow 2 pairs of true leaves, you can apply a relatively dilute water-soluble fertilizer once a week, gradually increasing the concentration. Seedlings are fairly drought-tolerant; do not water unless dry. The timing for transplanting seedlings into pots can be decided according to the size of the seedling cell tray you use. Generally, one plant per pot with a diameter of 20 cm is enough for final planting.
If you prefer a shorter plant, you can start spraying chlormequat when it grows to 8 cm tall to control plant height. Blue-eyed daisies have very good branching and a large number of flowers. If you are not satisfied with the plant shape, you can combine pinching to control the plant shape.
Generally, 2 months after emergence, begin reducing the amount of nitrogen fertilizer applied and gradually switch to phosphorus and potassium fertilizers. After flower buds appear, continue applying phosphorus fertilizer. After flowering, reduce the amount of fertilizer or stop fertilizing.
[Flowering stage management]
From sowing to flowering, blue-eyed daisies generally need more than 3 months. Later they gradually enter the full bloom stage, when water demand increases. At this time, you cannot wait until the soil is completely dry before watering; generally, water once the soil surface is dry, keeping the soil moist. The flowering period of blue-eyed daisies is very long, reaching as long as 2 months.
5. Pest and disease control for blue-eyed daisies
Blue-eyed daisies are prone to aphids and whiteflies. If spring-sown, they need frequent spraying for prevention. Seedlings sown in autumn should also be sprayed with insect-prevention pesticide once every 15-20 days after early spring.
[Summer care management]
Blue-eyed daisies are not tolerant of severe heat. In summer, they should be placed in a bright, indirectly lit, ventilated place for care, avoiding direct sun exposure. They can be placed on a north balcony for care. Summer temperatures are very high, and blue-eyed daisies will stop growing. At this time, do not fertilize to avoid fertilizer damage. Watering should be done thoroughly in one go.
Blue-eyed daisies are relatively easy to grow from seed or cuttings. If flower lovers obtain plants from sowing, cutting propagation is recommended. I feel that the branches cut off from pinching can be stuck in spring or autumn and the survival rate is quite high.
Usually, one of my blue-eyed daisy plants is pinched twice during the growing period and planted in a 1-gallon green pot. For planting in this kind of pot, I plan to repot after two years. With sufficient base fertilizer (since the flower count is large, whatever is available can be used), basically there is no need to give it special attention. If sunlight and water are sufficient, from a toothpick-sized seedling to flowering takes at most two months.
Blue-eyed daisies like sun and like heavy fertilizer and heavy water. So if you want enough flowers for long-term viewing, make sure fertilizer, water, and sunlight are sufficient. One flower can stay open for three or four days. After the flowers fade, promptly remove the spent flowers to avoid wasting nutrients. At the end of summer, I will pinch again, not too hard, because after a spring and summer the branch shape is relatively large and more spread out, and the flower count has also decreased somewhat. After pinching and topdressing, another autumn is full of abundant blooms!