How to Grow and Care for Potted Scarlet Sage
Scarlet sage belongs to the Lamiaceae family and is a perennial herbaceous plant, but as a flowering plant it is only cultivated as an annual or biennial. Plant height varies by variety, mostly between 30-80. The stem of scarlet sage is four-angled and green in color. The leaves are mostly triangular, with serrated edges. The flowers are borne in spikes, with a red corolla. The flowering period is July-October. Scarlet sage prefers a warm, humid climate and a sunny environment. The suitable temperature for growth is 20-25°C; below 15°C the leaves will turn yellow and wither.
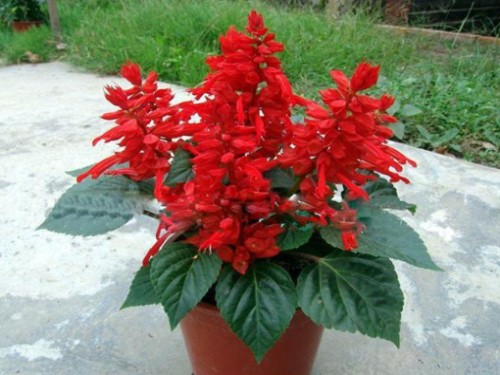
Scarlet sage is planted at a spacing of about 40 cm, and prefers fertile, loose soil rich in humus or sandy soil. During the peak growing season, apply phosphorus-containing liquid fertilizer 1 to 2 times to promote abundant flowering. Scarlet sage normally dislikes heavy watering; otherwise it is prone to yellowing and leaf drop, resulting in large but sparse plants with few flowers. During the growing period, pinch back regularly to control plant height and branching, promoting long, plump flower spikes and uniform blooming.
Plants sown in spring bloom profusely from September to October; old plants overwintered in a greenhouse also bloom from May to June, but not as abundantly as in summer and autumn. In the heat of summer, although the branches and leaves grow vigorously, flowers are sparse. Scarlet sage blooms relatively late. If seeds are to be harvested, sow in early March in a greenhouse or hotbed to slightly advance the flowering period and help the seeds set well. Scarlet sage seeds drop easily, or often fail to mature fully due to autumn coolness. It is therefore common to move potted plants into a greenhouse to overwinter, then take new cuttings for propagation the following year, as they root very easily. In a hotbed above 15°C, cuttings can be taken at any time; cuttings root in about 10 to 20 days and can be potted up after 30 days. Cutting-grown plants bloom faster than seed-grown plants, and plant height is easier to control. Late cuttings produce short plants with weaker growth, but this has little effect on flowering; they still bloom profusely and are even easier to arrange. For seed collection purposes, seed-grown plants are best. For scarlet sage used for National Day displays, take cuttings in early July; since the weather is hot at this time, pay attention to shading, and in rainy periods take care to shelter from rain and drain excess water.
When scarlet sage seedlings have 3 to 4 pairs of true leaves, pinch them back so that each plant has at least 4 side branches, and move them to the flower bed when color has already appeared at the branch tips. If phosphate fertilizer is applied before flowering, blooming is even better. The calyx of scarlet sage fades over time but does not drop; when used for ornamental display, spent flowers must be removed promptly to keep the blooms abundant and the colors vivid.
[Seed Collection]
When the seeds of scarlet sage are ripe, gently cut off the flowering branches. At this point the seeds have not yet turned black, but this does not affect germination. Spread them in the sun to dry, and the seeds will turn black; then they can be stored.
[Soil]
Prefers loose, well-drained soil. For potting soil, mix sandy soil, leaf mold and manure soil, with a soil-to-fertilizer ratio of 7:3.
[Propagation]
If potted flowers are wanted for display in May, sow in mid-August of the previous year. Seedlings generally emerge in about 10 days, can be transplanted once in early October, can be potted in late November and grown indoors, and can be moved outdoors for cultivation in late April of the following year.
[Planting Out]
After careful soil preparation, in mid-May carry out the first pinching, transplanting and planting out of healthy seedlings over 10 cm tall. Planting out should be done on a cloudy day or in the evening. When transplanting seedlings, keep the soil around the roots. After planting out, water promptly, and avoid flooding irrigation that may wash the seedlings over.
[Pot Cultivation]
In late April, when the seedlings have grown 2 pairs of true leaves and are about 3 cm tall, move them into small pots, 3-5 seedlings per pot. After potting, water thoroughly and place in a shaded spot to recover for about 5 days, then gradually increase light, and spray diluted liquid fertilizer once at the end of the month. From early to mid-May, when the seedlings have grown 3 pairs of true leaves, carry out the first pinching, and at the same time set up a shade frame outdoors (taking care to protect against wind). Choose a cloudy day or the afternoon to gradually move the scarlet sage seedlings out of the greenhouse, harden them under the shade frame, and spray diluted liquid fertilizer once every half month. In early June, carry out the second transplanting; move the seedlings in batches into small pots, 1 seedling per pot, and water thoroughly after transplanting. At this point the side branches have grown 3-4 pairs of leaves, so carry out the second pinching and spray potassium dihydrogen phosphate once. In late June, when the growing scarlet sage plants cover the small pots, pot them up for final planting in pots 20 cm in diameter. Pots must not be placed too densely, and fertilizer and water management should be strengthened. After the third pinching in early July, they bloom profusely from mid-July to early August. If blooming is wanted for "National Day" (October 1), carry out the final heading back in mid-August (the 4th pinching), and by mid-September you will have plump, sturdy scarlet sage potted plants with abundant, vividly colored flowers.
[Light]
Prefers a sunny, humid environment and tolerates partial shade. If sunlight is insufficient, the flowers are small and dull in color.
[Temperature]
Prefers warmth and is not cold-tolerant; it dislikes frost damage and hot, dry climates. The most suitable growing temperature is 20-25°C. Below 15°C the leaves turn yellow or drop; above 30°C the flowers and leaves are small.
[Watering]
Dislikes heavy watering; too much water easily turns new shoots yellow. For flower bed plantings, water once every 7-10 days. During the peak growing season, increase watering frequency. For potted plants, water according to soil moisture as needed, preferably around 10 a.m. and 5 p.m.
[Fertilizing]
Prefers heavy feeding. For garden flower bed plantings, apply leaf mold fertilizer as a base fertilizer. During the peak growing season, apply dilute decomposed liquid fertilizer once every 10-15 days, or during the growing period apply ammonium sulfate diluted 1500 times to improve leaf color, with better results. For potted plants, apply fully decomposed liquid fertilizer as a top dressing once a week. At the seedling stage, spray 1‰ urea once a week, and two weeks before flowering apply 1‰ potassium dihydrogen phosphate as a foliar top dressing. After spraying liquid fertilizer, rinse the plants with clean water, and water once more with clean water on the morning of the day after fertilizing. If spraying urea or potassium dihydrogen phosphate, it must be done in the early morning, at dusk, or on a cloudy day.
[Pest and Disease Control]
At the seedling stage it is prone to little leaf disease; when applying foliar fertilizer, add 0.2%-0.3% boric acid and zinc sulfate solution to control it. In the hot summer climate, red spider mites, aphids and whiteflies are prone to occur; spray 1500-times dimethoate for control.