A Detailed Guide to Growing Strawberries from Seed: The Whole Process from Sowing to Seedling Emergence
Many friends have bought strawberry seeds, partly to beautify their homes, and partly to taste the joy of a “harvest”: to help first-time growers master the basic techniques, here is some relevant knowledge for you! At the same time, you are also welcome to share your own thoughts and experiences with everyone!
Setting up a home fruit and vegetable garden is not difficult. If you live in a villa, or on the ground floor or top floor, and have a home with a small garden, then of course that is best. If not, it does not matter either; as long as you have a balcony or a windowsill with good light, you can still enjoy the pleasures of home gardening. For containers, you can use special growing boxes, flower pots, or discarded plastic boxes, washbasins and so on.
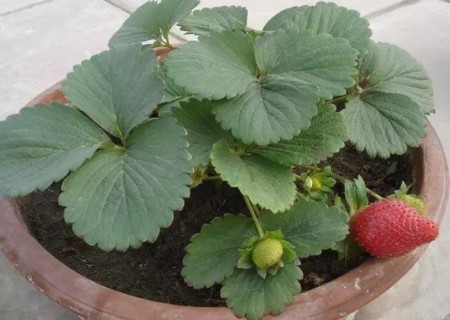
Pot-grown strawberries are a newly bred variety, especially suitable for ornamental cultivation indoors. From the perspective of visual beauty, strawberry leaves are deep green and the fruit is bright red; if they can be planted in plain, natural ceramic pots or clay pots, they will complement each other beautifully. The following is the method for growing potted strawberry seeds:
I. Sowing method
1. Washing the seeds
First pour the seeds into warm water at 60-70°C and soak and wash them, stirring constantly, until the water temperature drops to about 25°C, then stop.
2. Soaking the seeds
Continue soaking for 2-3 hours, then scoop them out and rub them with your hands until the seed coats are clean and glossy. Then rinse them clean with clear water and cover them with several layers of wet gauze.
3. Germination treatment
Place them under conditions of 25-30°C to germinate. Three times a day (morning, noon and evening), moisten the gauze with warm water to keep the seeds in a humid environment. Once 60-70% of the seeds have sprouted white, they can be sown.
4. Sowing process
Strawberry seeds are rather small, so sowing must be done carefully. It is best to fill a flower pot with sieved fine sandy loam mixed with some finer humus soil, and sow in the pot. After scattering the seeds, immediately spread the prepared covering soil evenly over the surface of the pot. A covering thickness of 0.3-0.5 cm is appropriate, and shade it with a straw mat, removing it once the seedlings have emerged uniformly.
II. Seedling-raising process
1. Watering
During the seedling stage, flooding irrigation is not suitable; sprinkler irrigation can be used to meet the water supply. After the seedlings grow to 6 true leaves, small-flow flooding irrigation can be used to prevent seedling damage from silt.
2. Weeding
During the small seedling stage, weeds should be pulled out frequently and promptly; if you are growing strawberries with weeds around, do not expect them to grow well.
3. Thinning and filling in seedlings
Once the small seedlings have grown 3-5 true leaves, they can be transplanted, thinning where dense and filling in where sparse.
4. Topdressing
When the small seedlings have grown to 6 true leaves, the first topdressing can be carried out; it is best to apply water-soluble fertilizer or urea. Applying Fu-Macro Element Water-Soluble Fertilizer is recommended.
5. Care
The main diseases of strawberry seedlings are damping-off and seedling blight; simply applying a fungicide is enough. Once the seedlings grow to 3 leaves and 1 heart, they can be transplanted into pots. Friends growing them in courtyards generally broadcast the fertilizer and apply it along with water; friends growing them in pots can dissolve water-soluble fertilizer or urea in water to make a dilute fertilizer and spray it on. For the first topdressing, the amount should be small. After that, topdress once every 20-30 days; as the seedlings grow larger, the amount of fertilizer can be increased appropriately.
III. Potting and transplanting
At a temperature of 25°C, seedlings can begin to emerge 15 days after sowing. When the seedlings have grown 2 true leaves, divide them into pots; when they have 4-5 leaves, they can be transplanted.
1. Choosing flower pots
Generally round pots are preferred, with a diameter of 25-32 cm and a height of 20-25 cm, planting 3 plants per pot.
2. Preparing the substrate
Mix peat soil with fully fermented cow manure and castor bean cake organic fertilizer evenly, spray with hymexazol to sterilize, and put it into trays for later use.
3. Transplanting time
After the seedlings have grown for 3-4 months, they can be lifted and transplanted; the transplanting time is best from late July to mid-August, and they will bear fruit the following spring.
4. Transplanting process
After completing the above preparatory work, you can transplant. Transplant the cleaned strawberry seedlings into seedling trays filled with substrate, water them thoroughly, and then spray with Pulike fungicide.
5. Fertilizer and water management
Strawberries can bloom and bear fruit multiple times and consume a lot of nutrients, so nutrient supplementation should be strengthened. Organic fertilizer, soybean cake, castor bean cake, sesame oil residue and so on can be used, added to water for full decomposition and fermentation, and composted into liquid fertilizer water. Generally topdress once a week. Water once each morning and evening. When watering, the water should first be warmed in the sun before use; never directly irrigate with well water or tap water.
Precautions:
1. Strawberry seeds are rather small, so sowing must be done carefully. It is best to use seedling soil plus seedling trays, or seedling blocks plus a seedling box. Friends who really do not have the conditions can fill a flower pot with sieved fine sandy loam mixed with some finer humus soil and sow in the pot.
2. Before sowing, spray thoroughly with water to wet the seedling substrate. Friends using pots directly can make the pot soil height 1 cm below the upper rim of the flower pot, then evenly broadcast the seeds, and after broadcasting cover with about 0.1 cm of sieved fine soil, or do not cover with soil at all; as long as your seedling substrate is sufficiently loose and soft, cover the pot with plastic film to keep the soil moist.