A Detailed Guide to Planting Lily Bulbs
The lily is a world-famous flower that has been loved from ancient times to the present. For many people, the impression of the lily still stops at it being a type of ornamental flower, little knowing that the lily also has high dietary-therapy and medicinal value. All kinds of health-preserving dishes make use of the lily, and as a traditional Chinese medicinal herb, the lily's medicinal value is also very high.
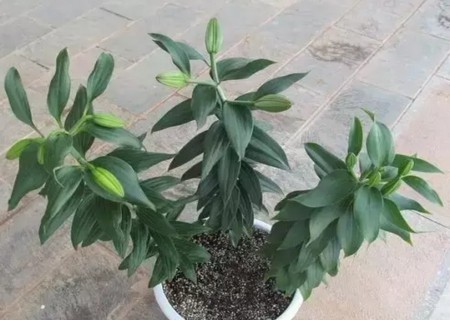
1. What to Do When You Receive Lily Bulbs
First, understand the basic situation. The three varieties are: Siberia 16-18 with white flowers, Tiber 14-16 with pink flowers, and Mumen (also called Concordia) 16-18 with yellow flowers. The size of lily bulbs is calculated by circumference; generally bulbs come mostly in three sizes, 14-16, 16-18 and 18-20. The larger the bulb, the more flowers it will produce. The bulbs have already sprouted, with sprouts about 3 cm long.
2. When to Plant Lilies
February to April each year is the best planting time. Planting in other seasons carries a much higher probability of death, infertility, and bud abortion than planting in February to April.
3. The Process of Planting Lily Bulbs
Trim the roots at the base of the bulb: trim away the poor roots beneath the bulb, cutting off any rotten or bad roots! Note that you should only trim the bad roots!
Disinfect the bulbs: rinse the trimmed bulbs with water, then place them in an 800-1000 times dilution of carbendazim solution to soak and disinfect for half an hour.
Flower pot: the example uses an AC300-sized flower pot, with an inner diameter of 24 cm.
Bottom of the flower pot: to ensure drainage, place a layer of broken-up plastic foam at the bottom of the pot; everyone should have this stuff at home. Broken tiles or tree bark can also be used.
Filling with soil: put soil into the flower pot, about 10 cm is enough. Choose soft, acidic soil; the soil used in the example is a seedling substrate.
Placing the bulbs: if conditions allow, add 5-10 g of compound fertilizer to the bottom soil and mix it in well, so that the bulbs. In the example no fertilizer was added. Place the disinfected bulbs into the flower pot, noting that the bottoms of the three bulbs face each other, set at a slant of about 60 degrees.
Covering with soil: add soil to the pot to cover the bulbs. To let the bulbs sprout smoothly, let the tips of the sprouts stick out about 0.5 cm above the soil surface. Remember not to fill the soil all the way to the rim of the pot; as the plants grow taller, we will need to add more soil later, to ensure the lilies grow more stem roots. This point is crucial in the process of potting lilies.
Watering: after planting, water thoroughly. Place in a cool spot to promote growth and root development.
4. Starting Care
The lily is a perennial herbaceous plant, native to Asia, and its habit is to prefer a warm, humid environment with plenty of light, and it must have nutrient-rich soil. The lily is very beautiful when in bloom. Consider aspects such as light, soil and water.
1. Light management
During flower bud development, sufficient light is especially needed. For potted lily production in summer, use a shade net with 50%-70% shading; for autumn, winter and spring production, shade the lilies while they are rooting to lower the soil temperature, then promptly remove the shade net afterward to ensure sufficient light.
2. Temperature management
The optimum is 0°C-13°C; too low will prolong the growth period, and above 15°C will affect product quality, so pay attention to shading and ventilation. After the stem roots have grown, the temperature can be gradually raised, with the daytime temperature controlled at 20°C-25°C; the nighttime temperature requirements differ depending on the type of lily.
3. Water management
During the growth period of potted lilies, the potting soil should be kept moist at all times, but avoid excessive wetness, otherwise root growth will be affected. Watering should preferably be done in the morning, and you should frequently check whether the flower pot has standing water; if there is standing water, deal with it promptly.
4. Fertilizing
For potted lilies, start applying a small amount of fertilizer 3-4 weeks after planting (lilies dislike heavy fertilizer), combining soil application and foliar application. In the early stage, you can supplement more nitrogen fertilizer, applying 1% urea + 0.5% monopotassium phosphate + 0.05% borax aqueous solution to the soil 2-3 times; after budding, apply 0.3% potassium nitrate + 0.1% monopotassium phosphate aqueous solution to the foliage 1-2 times; when lily leaves show iron-deficiency symptoms and turn yellow, apply 0.5% ferrous sulfate solution to the soil once.
5. Repotting
Potted lilies must be repotted once a year, with fresh potting soil and base fertilizer. In addition, during the growth period the pot should be turned once a week, otherwise the plant tends to grow lopsided, affecting its appearance.
6. Pest and disease control
Common diseases of potted lilies include leaf blight, gray mold, root rot, bulb rot and Phytophthora blight. The main pest of potted lilies is aphids. Control methods: 1) Clear weeds in and around the pot; 2) Spray with an 800-1000 times dilution of 40% dimethoate emulsifiable concentrate or a 2000-4000 times dilution of 2.5% deltamethrin.
Several aspects to note when choosing potted lilies:
First, look at the flower buds: how many buds there are. The more buds, the longer the flowering period. As for bud size, generally choose buds 3 to 5 cm that are just about to show color.
Second, look at the leaves: the leaves should be emerald green. Be careful if the leaves are yellow or the lower leaves turn yellow; yellow lower leaves may mean a growth retardant was used, and the leaves will drop off completely.
Third, look at the stems: choose thick, sturdy ones with uniform plants.