The correct method and steps for repotting bonsai
The process of renewing the potting soil and replanting a potted plant in its pot is called repotting. According to the needs of the styling, either a deep pot is swapped for a shallow one, or the planting position or posture of the tree is changed, while carrying out the necessary work to make the bonsai more beautiful and of higher ornamental value. Some potted flowers and trees suffer from pests and diseases that are difficult to cure and eliminate with medication, and these also need repotting. Repotting bonsai is a skill that every bonsai enthusiast must master. Many beginners may not know how to start and practice, so today we will learn about repotting.
(1) The purpose of repotting
① Renew the potting soil and promote plant growth and development. After a bonsai plant has grown for a certain number of years, its roots fill the entire pot and form an aged root ball, while the nutrients in the potting soil are exhausted and the soil becomes compacted. At this point, the potting soil must be renewed by repotting to promote root growth, so as to ensure the plant's nutrient supply and avoid the plant weakening and dying. As a young bonsai plant grows larger year by year, when the original pot is too small and affects above-ground growth, it needs to be repotted into a larger pot with new soil added, to expand the root nutrient area. In addition, when pests or diseases occur in the plant's root system, repotting is also necessary to control the damage.
② Improve the ornamental value of the bonsai. When a bonsai is used for display and exhibition, the original clay pot must be changed to a purple clay pot, colored pottery pot or other high-grade pot to improve its ornamental value. In addition, according to the needs of the styling, sometimes a deep pot needs to be swapped for a shallow one, or the planting position or posture of the plant needs to be changed, and repotting is also required at such times.
(2) Repotting interval
The repotting interval should be determined according to the tree species, tree age, bonsai size and growth condition.
① Tree species: Flowering and fruiting bonsai consume more nutrients, so it is best to repot them once a year; pines and cypresses grow slowly and need less fertilizer, so they can be repotted once every 3-4 years. Generally, broadleaf trees can be repotted once every 2 years.
② Tree age: Young trees grow quickly, so they should be repotted once every 1-2 years; formed adult trees can be repotted once every 2-3 years; old trees can be repotted once every 3-5 years.
③ Size: Small bonsai have a small soil volume, so it is suitable to repot them once every 1-2 years; medium bonsai can be repotted once every 2-3 years; large bonsai have a large soil volume, so they can be repotted once every 3-5 years.
④ Growth condition: Generally speaking, when the roots have filled the entire pot, with roots extending out from the drainage holes or growing upward from the edges, repotting is needed.
(3) Repotting time
Repotting is generally best done before spring bud break, but climates differ from region to region, so it should be adapted to local conditions and handled flexibly. The suitable repotting period also differs among different plant types. For example, plum blossom should be repotted after the flowers fall, together with branch pruning, while Buddha-belly bamboo is best repotted in May or September. If repotting is merely moving a small pot into a large one without breaking the soil ball, it can be done in any season.
(4) Repotting method
1. Preparatory work before repotting
Step 1: For a tree bonsai that has been decided for repotting, its potting soil should be allowed to dry out completely, to facilitate the repotting work.
Step 2: Each person should prepare a pair of scissors, a garden trowel, a piece of bamboo, and the necessary watering tools.
Step 3: Prepare the cultivation soil, pot, padding pieces and other materials needed for repotting.
Step 4: Do a good job of grouping the students.
2. Specific operation practice before repotting
Demonstrate the whole process of repotting
Step 1: Removing from the pot. Generally, do not water before repotting; let the potting soil dry slightly, first remove part of the soil around the inside of the pot, then turn the pot upside down, pat the bottom of the pot with your hand, or tap the rim lightly, so that the plant comes out of the pot with its roots and soil. For grafted tree stumps, operate carefully when removing from the pot, to avoid the scion separating from the rootstock. When removing from the pot, you can pat around the pot with your palm, then hold the pot of the tree stump with your hand, and use the fingers of the other hand to push inward from the drainage hole. If the pot has an inward-curling rim, hollow out the soil around the rim. For tree stumps that are difficult to remove, you can also turn the pot upside down and suspend it, then tap gently downward along the rim. As shown in Figure 1.
Step 2: Remove old soil and trim roots. After removing from the pot, use a bamboo stick to pick away the upper surface soil, the surrounding soil and the bottom soil; the amount of soil removed is generally 1/3-1/2 of the original potting soil. While removing soil, the root system should be pruned, cutting away dead roots, rotten roots, diseased roots and overly dense roots, and shortening overly long roots. After removing from the pot, whether changing to a pot one size larger or still using the original pot, part of the old soil should be removed. As for how much soil to remove, generally speaking, when moving from a small pot to a large pot, remove a little less; when there are few roots, remove a little less; when changing the soil in the original pot, remove more, but it must not exceed 12 of the original potting soil. As shown in Figure 2.
Figure 2 - Removing old soil
Step 3: Root pruning. After removing the old soil, the roots can be shortened or thinned according to their development. For example, the downward-extending main roots of black pine, serissa and golden larch produce a ring of roots at the bottom of the pot each year, and this ring of roots should be cut away. For boxwood, Buddhist pine and others whose main roots extend downward more noticeably, it is enough to cut away part of the old roots around the sides. When pruning roots, the root system should also be checked once, and dead roots, diseased roots, overly dense roots and overly long roots should all be pruned. Figure 3 shows the approximate position of the cutting line.
When planting, a suitable new pot can be chosen, or the original pot can still be used. For a formed tree-stump bonsai, it should be planted in the original pot, not changed into a larger pot, in order to control its growth and maintain the original tree shape. The plant can be planted in its original posture and position, or appropriately adjusted. If making a raised-root style bonsai, more bottom soil should be placed in the pot so that the tree roots are exposed above the pot rim. The other technical requirements for planting are the same as for potting.
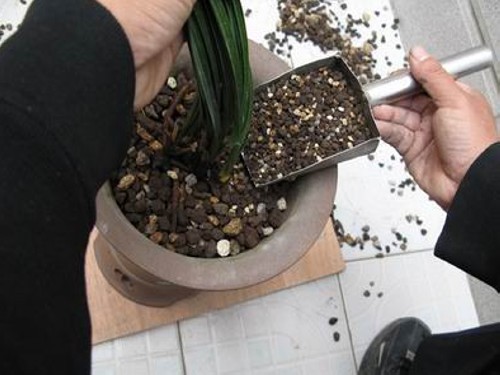
Step 4: Potting. After choosing a suitable pot, first place broken pot pieces or plastic mesh at the bottom of the pot to facilitate drainage and water permeability. If using a large or deep pot, add more broken pot pieces; for miniature or shallow pots, a piece of plastic mesh can be laid down. Then add a layer of coarse-grained soil, plant the tree stump in, add new cultivation soil around it, and press the potting soil lightly with your hand as you add it (Figure 4), or use a wooden stick to firm the soil, the purpose being to make the new soil and old soil closely combined, and by no means leave gaps. Add potting soil to 2-3 cm below the pot rim, commonly called leaving a "water mouth".
Figure 3 - Approximate position of the cutting line when pruning roots
Figure 4 - Method of adding soil when potting
Step 5: Watering. The first watering after potting must be thorough; afterward, do not water until the soil is dry. During watering, the potting soil sometimes sinks; it should be filled level in time, but do not press or stir the potting soil with your hands, otherwise the potting soil will become compacted after drying. For small or shallow pots, the immersion method can be used. After thorough watering, it is best to place the bonsai in a shaded shed for a dozen days or so, and once the bonsai's growth vigor has recovered, place it in the sunlight.