Wild Gymnadenia conopsea (palm orchid) price per gram, main producing areas, best harvest time, plus cultivation
Gymnadenia conopsea, also called palm orchid, is a plant named for its palm-shaped appearance, mainly used as medicine. So how much does palm orchid cost per gram? Where are its main producing areas? When is the best time to harvest it?
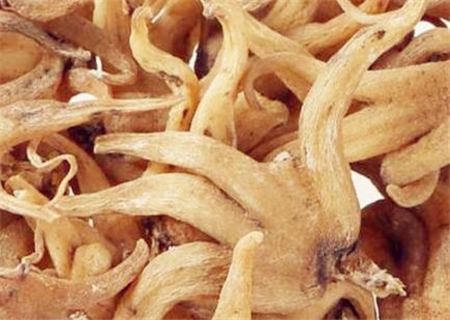
How much does wild Gymnadenia conopsea (palm orchid) cost per gram? Palm orchid is a wild resource, and because market supply has long been scarce, the price for standard goods from Sichuan has remained stable at 500-550 yuan.
Distribution of producing areas
It grows in alpine grasslands or in moist, fertile spots at forest edges. It is distributed in Tibet and other places.
Cultivation techniques
Site selection and land preparation
Palm orchid has strict soil requirements. A sandy loam or loam with a pH of 4.5-5.8, rich in humus, and convenient for drainage and irrigation is best, and continuous cropping should be avoided. Generally, forest land is used for growing the plant. If farmland is used, the previous crop should preferably be a grass-family crop, and after harvest the land must lie fallow for one year before planting. After selecting the site, plow 1-2 times before the ground freezes, to a depth of 20 cm. In the following spring when the ground thaws, plow again and apply 4000 kg of farmyard manure per mu, mix it evenly with the soil, and thereafter plow once every 1-2 months. About 1 month before planting or sowing, break up the soil clods, remove debris, and prepare the land into beds. The bed surface is 1-1.5 m wide, slightly arched, the bed height is 25-30 cm, and the work path between beds is 50-100 cm wide. The direction depends on the terrain, slope aspect, shed type, and so on, and should follow the principles of reasonable light exposure, high land utilization, beneficial drought prevention and drainage, and convenient field operations.
For growing the plant on flat land, a due-south bed direction is mostly used; for growing it on mountain land, depending on the mountain trend and slope, beds may be made crosswise to the slope, along the slope, or at a certain angle.
Propagation methods
(1) Raising seedlings From July to August, after collecting seeds, they can be sown while fresh, and after undergoing an after-ripening process in the soil, the seeds can sprout in the following spring. Alternatively, the seeds can be stratified in sand to promote germination. The method is to choose a sunny, high, dry place and dig a pit 15-20 cm deep, with its length and width depending on the amount of seed. Spread a layer of small stones on the bottom of the pit, and on top of that spread a layer of sieved fine sand. Rub the fruit skin off fresh seeds, or soak dried seeds in clean water for 2 hours and then take them out, mix them evenly with an equal volume of moist fine sand, put them into the pit, cover with fine sand 5-6 cm, then cover with a layer of soil, and on top of that cover with a layer of weeds to help maintain moisture. Cover tightly on rainy days to prevent rainwater from flowing in and causing the seeds to rot. Check and turn them once every half month; if moisture is insufficient, spray water appropriately; if humidity is too high, sieve out the seeds and dry the sand. Through natural temperature changes, the seeds can complete the after-ripening process of the embryo, and when they crack in early to mid-November, winter sowing can be carried out. Spring sowing is also possible, around the Spring Equinox before the seeds begin to sprout. The sowing method is to sow in rows on the prepared bed surface at a row spacing of 5 cm and a plant spacing of 3 cm, cover with 2 cm of soil, and then cover with 3-5 cm of straw to help retain moisture. If seeds of palm orchid that have already cracked after sand storage are soaked in a 0.1 ml/L① ABT rooting powder solution, the root weight of palm orchid can be significantly increased.
(2) Transplanting seedlings Transplant after 2-3 years, generally from the end of October to early to mid-November. If planting in spring, it should be done before the seedlings begin to sprout. When transplanting, select strong seedlings with milky white roots, no pests or diseases, plump buds, full sap, and long roots, and transplant them separately by three grades: large, medium, and small. Before planting, they may be properly trimmed, removing excess fibrous roots, taking care not to tear the root skin, and soaking the roots for 10 minutes in a 100-200 times dilution of zineb or in a 1:1:140 Bordeaux mixture, taking care not to soak the buds. When transplanting, make rows across the bed, with a row spacing of 25-30 cm and a plant spacing of 8-13 cm. Plant flat or slanted. In flat planting, the roots are parallel to the bed base; in slanted planting, the rhizome heads face upward and the roots form a 30-45 degree angle with the bed base. In slanted planting, the roots are covered with deeper soil, which helps prevent drought. After opening the furrows, arrange the roots well, first press the roots down with soil and cover them completely, then level the bed surface. The covering depth depends on seedling size, generally 4-6 cm, and then cover the bed surface with straw to help preserve soil moisture.
Field management
(1) Winter management
From late October to early November, when the stems and leaves of palm orchid that has grown for more than 1 year wither, the withered leaves should be promptly removed from the ground and deeply buried or burned. Before the ground freezes, depending on the condition of the bed surface, water thoroughly for overwintering and add straw covering on the bed surface.
(2) Building sheds for shade
After the seedlings emerge, sheds should be built in time for shade. There are two types of sheds: low sheds and high sheds. For a low shed, the front eave posts are 90-120 cm high, and the rear eave posts are 70-90 cm high; wooden posts and cement posts can be used, set separately on both sides of the bed. Fix horizontal rods along the bed direction on the posts; bamboo poles are mostly used, and tightly stretched wire can also be used. Cover the top with reed curtains 1.8-1.2 m wide so that rainwater cannot fall directly onto the bed surface. Before the rainy season arrives, cover with a second layer of reed curtains. The shed should be flat and level, avoiding unevenness. A high shed covers the entire growing area, with a shed height of 1.8-1.2 m, using cement poles as posts and bamboo poles to build a crisscrossing frame, covered with reed curtains, with a light transmittance of 25%-30%.
(3) Weeding and loosening the soil
Before the palm orchid emerges, or when the soil is compacted, soil humidity is too high, or there are many weeds on the bed surface, weeding and loosening the soil should be carried out in time to keep the soil loose and reduce weed damage, but the loosening should be shallow and the frequency should not be too many.
(4) Drainage and irrigation After sowing or transplanting, if drought occurs, irrigate by sprinkling or seepage irrigation as appropriate. If there is too much rain, dig drainage ditches well and promptly drain away accumulated water.
(5) Topdressing
Generally, no topdressing is needed in the year of sowing or transplanting. Before the seedlings emerge in the following spring, remove the straw covering the bed surface, spread a layer of decomposed farmyard manure, add a small amount of superphosphate, mix it evenly with the soil by loosening the soil, and water promptly if the soil is dry. During the growing period, from June to August, foliar topdressing can be carried out with a 2% superphosphate solution or a 1% potassium dihydrogen phosphate solution.
(6) Earthing up and removing buds
If the roots become loose because the soil cover is too shallow or because they are shaken by wind, earth up in time. For plants near the front edge of the bed or the edge of the growing area, due to phototropism, the stems and leaves grow outward, and in summer when temperatures are high and rain is plentiful, this can easily cause diseases such as leaf spot and phytophthora blight, so the outward-growing plants should be pushed and pressed back into the bed and earthed up and compacted so that they grow inward. After palm orchid has grown for 3 years, it can flower and set seed every year, and for plots not grown for seed, the flower buds should be removed in time.
Harvesting and processing
Palm orchid can be harvested from September to October when the stems and leaves wither after growing for 5-6 years, that is, 3-4 years after transplanting. At harvest, first dismantle the shed, then starting from one end of the bed, dig out the roots row by row with a two-toothed hoe, shake off the soil, remove all stems and leaves, and grade by size. Wash the roots clean, cut off fibrous roots and lateral roots, and sun-dry or oven-dry them to obtain sun-dried ginseng. Select large roots with good shape, full sap, and no damage, rinse them clean in clean water, scrape off dirt from scars, pinch off fibrous roots and adventitious roots, steam in boiling water for 3-4 hours, take them out and sun-dry them, or dry them in a drying room at 60 degrees C, to obtain red ginseng.