How much does a daylily seedling cost per plant? Cultivation methods explained
Daylily is also called golden needle vegetable, among other names. Because it is both a vegetable and a medicinal herb, and because it is highly adaptable and relatively easy to grow, many growers want to cultivate it. So how much does a daylily seedling cost per plant? How do you grow it?
1. How much does a daylily seedling cost per plant?
The price of daylily seedlings varies, differing according to seedling quality, specification, place of origin and market conditions, but under normal circumstances daylily seedlings cost about 0.05-0.1 yuan per plant. In addition, daylily tolerates poor soil and drought, is not demanding about soil, and can be cultivated on field edges or hillsides. It also adapts to a wide range of light conditions and can be intercropped with taller crops. The aboveground part is not cold-tolerant, while the underground part tolerates low temperatures of -10 degrees C. It dislikes overly wet or waterlogged soil. The propagation methods commonly used in production include division propagation, cutting propagation and seed propagation.
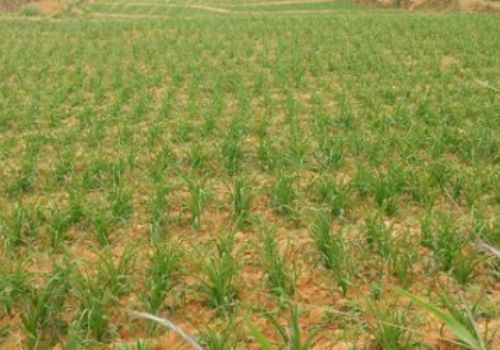
2. How do you grow daylily?
1. Propagation methods
Division propagation is the most commonly used method for daylily. One way is to dig up the entire mother clump and replant the divisions; another is to dig out part of the plants from one side of the mother clump as seedlings, leaving the rest to continue growing, but when digging and dividing seedlings you should damage the roots as little as possible. For cutting propagation, after the daylily harvest is complete, select from the upper-middle part of the flower scape those with fresh green bracts and obvious growth points below the bracts, cut about 15 cm above and below the growth point, and insert them flat into the soil in a slight arc; roots and shoots will form after about 1 week. For the sowing method, daylily can be hand-pollinated to obtain seeds. When sowing, use fertile garden soil as the seedbed, soak the seeds in warm water at 25 degrees C for 48 hours, cover with 2 cm of soil after sowing, and seedlings usually emerge in 1 week; after emergence, gradually lower the greenhouse temperature so the plants adapt to the outside climate.
2. Reasonable close planting
Close planting of daylily can bring out population advantages. Wide-and-narrow row cultivation is mostly used, with wide rows 60-75 cm * narrow rows 30-45 cm, hill spacing 9-15 cm, 2-3 plants per hill, and about 3000-5000 plants per mu.
3. Appropriate deep planting
The root mass of daylily grows from around the shortened stem and has the characteristic of one layer per year, with the rooting position moving upward year by year from bottom to top. Therefore, appropriate deep planting helps the plants survive and grow vigorously, and the suitable planting depth is 10-15 cm.
4. Cultivation and earthing up
During the growth period, daylily should be cultivated 3-4 times according to growth and soil compaction. Usually the first cultivation is done when the seedlings are just emerging, and the 2nd to 4th are done during the bolting stage together with earthing up.
5. Fertilization management
Daylily requires sufficient base fertilizer, early application of seedling fertilizer, heavy application of scape fertilizer, and supplementary application of bud fertilizer. The base fertilizer is applied when the aboveground part of the daylily stops growing, that is, after the autumn seedlings wither from frost, or at planting time, mainly with organic fertilizer: 2000 kg of high-quality farmyard manure per mu and 50 kg of superphosphate per mu. Seedling fertilizer can promote early and rapid leaf growth and should be applied as early as possible, when the daylily begins to sprout: 10 kg of superphosphate per mu and 2 kg of potassium sulfate per mu. Scape fertilizer should be applied when the flower scape begins to emerge, when the daylily needs more nutrients: 15 kg of urea per mu, 10 kg of superphosphate per mu and 5 kg of potassium sulfate per mu. Bud fertilizer should be applied within 7-10 days after picking begins, with 5 kg of urea per mu; during the picking period, spray the leaves every 7 days with 0.2% monopotassium phosphate, 0.4% urea and 1-2% superphosphate aqueous solution.
Summary: The above is the relevant introduction to daylily seedling prices and cultivation methods. Note that the above daylily seedling prices are for reference only, and the specific price should be based on the actual price. I hope it is helpful to those who need it!
How is daylily grown? Cultivation techniques for daylily
Daylily is a vegetable that many people like. So how is daylily grown? Below is an introduction to daylily cultivation techniques.
1. Site selection: Daylily likes warmth and is highly adaptable, but the aboveground part withers when exposed to frost; it has a well-developed root system and strong drought tolerance, and grows well on hillside land; it is not demanding about soil and can be planted in sandy soil, clay soil, flat land and mountainous land. However, red-yellow soil is *** good.
2. Deep plowing and land preparation: Daylily is a perennial crop, so when plowing the land you should pay attention to deep plowing. Deep plowing of the soil is good for root growth, with a plowing depth of 20-30 cm, then leveling, building ridges, digging channels and making beds. For convenience in later daily management, bed width should preferably be 1-1.5 m; bed length is unrestricted, with convenience as the principle.
3. Propagation: (1) Seed propagation: This is a method for rapidly producing seedlings, but daylily seeds have a low germination rate, so the seeds must first be soaked to promote germination, and they can only be planted out 1 year after sowing. (2) Division propagation: Select vigorous, disease-free clumps, and from after the flower buds are harvested until before the autumn seedlings sprout, dig out 1/4 to 1/3 of the tillers of the clump as seedlings, cut them from the shortened stem together with the roots, trim off aged roots and tuberous fleshy roots, and shorten the long fleshy roots before planting. (3) Slice propagation: From late August to early October, take old daylily plants, cut off the green leaves, leave 5-7 cm of root system, evenly cut into 2-5 slices with a small knife, then soak in 800-**** times carbendazim or thiophanate-methyl for 20-30 min, and then plant. (4) Bud division propagation: Countless latent buds are arranged on both sides of the daylily rhizome, with main buds and lateral buds borne at the top. Artificially destroying the apical dominance promotes lateral bud germination, and the bud division method can be used to increase the propagation rate. (5) Tissue culture propagation: To achieve the goals of speed, good quality, low cost and high efficiency, factory-style tissue culture seedling technology can also be used.
4. Growth stages: Daylily is divided into 7 growth stages: from February to mid-to-upper March is the sprouting stage, from mid-March to late May is the leaf-spreading stage, from late May to mid-June is the bolting stage, from mid-June to early July is the bud-forming and flowering stage, from early July to early August is the post-harvest withered-leaf stage, from early August to before the first autumn frost is the autumn leaf-spreading stage, and from after frost to January of the following year is the dormancy stage.
5. Timely transplanting and reasonable close planting: Transplanting can be done from after the flower buds are harvested until before the spring seedlings emerge the following year, and division transplanting right after the flower buds are harvested is *** best, as winter seedlings can develop that year, new roots can grow, nutrients can accumulate, and the following year the plants can bolt and produce. For paddy fields and vegetable garden soil with high soil fertility, plant 16000 hills per mu. For sloping land and poor soil, plant 2000 hills per mu. The planting method of alternating wide and narrow rows is preferable. After transplanting, water promptly to settle the roots, and cover the hills with plant ash. After the plants survive, apply 100-200 kg of human manure and urine per mu diluted with water around the hills as a root-setting fertilizer.
6. Scientific fertilization and watering: Reasonable drainage and irrigation. There is a lot of rain in spring, so the daylily field should be cleared of ditches and drained promptly to prevent waterlogging. In the high-temperature and drought season of July-August, water should be diverted in time for drought relief, keeping the soil moist, prolonging the harvest period and increasing yield. Drought relief by diverting water should preferably be done in the morning and evening, with quick irrigation and quick drainage, and flooding irrigation must not be used. Daylily likes fertilizer very much and tolerates it, especially needing relatively large amounts of nitrogen, phosphorus and potassium. Fertilization should be carried out in separate applications during the spring seedling sprouting stage, the bolting and flowering stage, and the winter seedling development stage. At the beginning of bolting, spray flower-strengthening agent to enhance the plant's drought resistance and disease resistance, extend leaf function, promote thick and strong flower buds, reduce the shedding of young buds and increase yield.
7. Harvesting: The *** optimum harvest time is when the buds are formed and enclosed by the bracts, that is, when the flower buds are plump and unopened, golden yellow in the middle, green at both ends, with a dark tip, and the pointed tip is about to open but not yet open. The picking time for daylily is extremely strict; too early or too late is bad. Too early and they are green buds with low sugar content, light fresh weight and poor color, resulting in poor product color and low yield; too late and the buds are overripe, with split tips and loose bracts, and the juice easily flows out, giving poor product quality that is not easy to store. The harvest season is generally from June to the end of August. The suitable harvest time is 1-2 h before the buds just split open, when daylily yield is high and quality is good. The *** best picking time is 13:00-14:00. The harvested buds should be steamed promptly to prevent them from splitting open and blooming.
The above is an introduction to some daylily cultivation techniques. Those growing daylily can refer to these cultivation techniques and plant reasonably according to actual growing conditions.
Daylily cultivation techniques: How to grow daylily
Daylily is a vegetable that tolerates both high and low temperatures, and is generally more common in summer each year. In recent years, as people's understanding of daylily has deepened, sales have also increased. Many people want to grow it; to achieve high yield, the main thing is still to master the cultivation techniques.
Daylily cultivation techniques
1. Choose good seedlings. Daylily seedlings are generally obtained by digging out 1/3 of the old roots from old daylily fields that have grown for many years, or by using seedlings from cut-block bud division propagation as planting stock. If old roots are used as seedlings, the buds should be separated, shaken clean and “graded”, that is, remove the main root and
rotten roots from the middle below the rhizome, leaving a layer of branch roots above, each with a single bud.
2. Planting time. Daylily can be planted except during the vigorous seedling stage and the picking period. Generally spring and autumn are preferable, with spring planting after the Qingming period, after the soil thaws.
3. Planting pattern. Use wide-and-narrow row planting, with 2 rows per bed, wide row spacing 1.3 m and narrow row spacing 0.6 m. After planting, tread firm, with seedlings exposed 1 cm above the ground surface, and rewater to help the seedlings recover.
(1) Single-row hill planting method. Hill spacing 0.5 m, each hill forming an equilateral triangle with a side length of 0.2 m, planting three plants at each corner, 1400 hills per mu, and 4200 seedlings per mu.
(2) Single-row double-plant method. Plant spacing 0.4 m, 2 plants per hill, 3500 seedlings per mu. 4. Plant appropriately shallowly to enter the full-production period earlier. The depth of planting daylily is closely related to whether it reaches full production early or late. If planted shallowly, division is fast, and the full-production period is reached 1-2 years earlier. Based on several years of practice, a planting depth of 20 cm is suitable.
How to grow daylily
1. Reasonable close planting: Close planting of daylily can bring out population advantages, increase the number of tillers, bolts and flower buds, and achieve the goal of increasing yield. Generally, wide-and-narrow row cultivation is mostly used, with wide rows 60-75 cm, narrow rows 30-45 cm, hill spacing 9-15 cm, 2-3 plants per hill, planting 45000-75000 plants per hectare, reaching 1.5 million-2.25 million plants per hectare in the full-production period.
2. Appropriate deep planting: The root mass of daylily grows from around the shortened stem and has the characteristic of one layer per year, with the rooting position moving upward year by year from bottom to top. Therefore, appropriate deep planting helps the plants survive and grow vigorously, and the suitable planting depth is 10-15 cm. After planting, water to settle the roots, and before the autumn seedlings emerge, keep the soil moist regularly to favor the growth of new seedlings.
3. Cultivation and earthing up: Daylily has a fleshy root system and needs a fertile, loose soil environment to favor the growth and development of the root mass. During the growth period, according to growth and soil compaction, cultivate 3-4 times. The first is done when the seedlings are just emerging, and the 2nd to 4th are done during the bolting stage together with earthing up.
Daylily fertilization techniques
1. Seedling fertilizer. Seedling fertilizer is mainly used for emergence and leaf growth, promoting early and rapid leaf growth; seedling fertilizer should be applied early rather than late, and should be applied when daylily begins to sprout: 150 kg/hm2 of superphosphate and 75 kg/hm2 of potassium sulfate.
2. Bud fertilizer. Bud fertilizer can prevent daylily from nutrient deficiency and premature aging, increase the bud-setting rate, prolong the picking period and increase yield; it should be applied within 7-10 days after picking begins, with 75 kg/hm2 of urea. At the same time, during the picking period, spray the leaves every 7 days or so with 0.2% monopotassium phosphate plus 0.4% urea plus 1%-2% superphosphate (filtered) aqueous solution, and additionally spray once after 17:00 with 15-20 mg/kg gibberellin, which has an obvious effect on strengthening buds and preventing bud shedding.
Daylily pest control
1. Leaf blight. Leaf blight generally harms the leaves of the plant, initially appearing as white round spots, which later gradually dry up; if it is too humid, black mold-like matter forms. The specific treatment is to spray chlorothalonil on the leaf surface, with the same number of applications and frequency as above.
2. Anthracnose. The part harmed by anthracnose is also mainly the leaves; the leaf tips change from dark green to dark yellow and produce small black spots. The leaves may even die. The specific control method is to spray 1:1:100 Bordeaux mixture at the beginning, or chlorothalonil solution, for timely control.
3. Red spider mite. When red spider mites harm daylily, they suck sap on the leaf surface, causing gray spots, and in severe cases can also cause the plant to die. You can spray with 73% propargite 2000 times solution.
When growing daylily, you need to do a good job of site selection. Daylily does not tolerate waterlogging, so drainage work must be done well. In the later stage of cultivation, management of fertilizer and water also needs to be strengthened. Daylily is susceptible to pest attack, so pest and disease prevention work must be comprehensive. Only by doing these well will daylily grow well and yield high.