How to grow a plum blossom bonsai? Detailed care methods and precautions
How to grow a plum blossom bonsai: potting and planting
For the pot, mix 3 parts leaf mold, 3 parts garden soil, 2 parts river sand and 2 parts rotted barnyard manure evenly; a slightly acidic soil with loose topsoil and slightly sticky subsoil is best. Generally, first plant the plum blossom in a clay pot, and when the plant is about to bloom and be viewed, slip it into an elegant, attractive pot, such as a porcelain pot or a purple clay pot.
How to grow a plum blossom bonsai: fertilizer and water management
After the flowers fade each spring, repot once, remove old roots, add new soil and apply an appropriate amount of rotted soybean cake as a base fertilizer. From late spring to early summer, as new leaves gradually unfold, apply a diluted liquid fertilizer once every 10-15 days. During "water withholding" or after new shoots stop growing (June-July), appropriately control the frequency and concentration of fertilizing, which can help promote flower bud differentiation. During the bud-setting period in autumn, stop applying nitrogen fertilizer and increase a small amount of quick-acting phosphorus fertilizer. From late winter to early spring, when the plum blossom buds begin to grow noticeably and before they show color, apply a diluted phosphorus-potassium liquid fertilizer once every 5 days to promote flowering and improve flower quality. After leaf drop in winter, stop fertilizing and protect the plant from freezing to overwinter.
During the growing season, keep the potting soil moist and on the dry side, and follow the principle of "water when dry, stop when wet" when watering. In spring and autumn, water once every other day; in winter, water thoroughly only after the soil has dried out. Be careful that no water accumulates in the pot during the rainy season. In summer, water once every afternoon, but in June-July, carry out "water withholding" on the plum blossom 2-3 times, that is, reduce watering, and when the plum blossom leaves curl slightly and the branches appear slightly wilted, resume watering to promote normal flower bud differentiation.
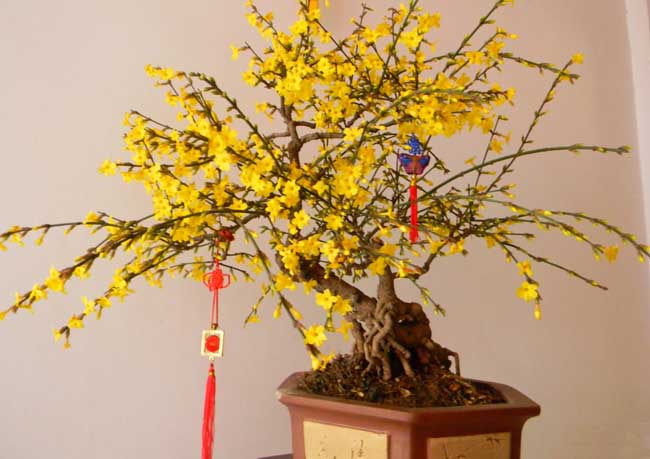
Material selection and cultivation
It is fairly common and quick to produce results by taking old root stumps of wild wintersweet from mountainous areas and cultivating them in the ground to make old wintersweet stumps. The method is: select old stumps that have sprouted repeatedly after being cut for many years, dig them out, take care to protect the root system, and prune the branches. Choose a location with moderate light, loose soil and good drainage for "rootstock conditioning," and after they survive, move them into pots for cultivation. If it is an old stump of Gouying wintersweet, you can choose Chimonanthus praecox var. concolor for grafting, and after it survives, it can be shaped and processed as needed.
Potting process
1. Pot selection: Wintersweet is suitable for purple clay ceramic pots, and glazed ceramic pots can also be used. Generally, seedling wintersweet mostly uses round pots, square pots, hexagonal pots, etc.; old wintersweet stumps can use medium-deep horse trough pots or begonia pots, and cascade styles mostly use tall cylindrical pots. Dark purple or reddish brown colors are better, to set off the waxy yellow flowers and increase their ornamental effect.
2. Soil: Wintersweet is not strict about soil, but sandy loam with good drainage is best. For potting, rotted garden soil or leaf mold mixed with 20-30% rice husk ash is commonly used as the growing medium.
3. Planting: Wintersweet is mostly transplanted in early spring, and the period around the sprouting of new buds on the flower stems in early March is suitable. Generally, slanted planting is preferable, to make it easier to create momentum when shaping. Before planting, a shaping pruning can be carried out. When potting, sufficient base fertilizer can be applied at the bottom of the pot.
Shaping and styling
The shaping and styling of wintersweet mainly uses pruning and bud pinching, with wiring as a supplement. Xiyaojia Village in Yanling County, Henan, has long been known as "Yanling wintersweet tops the world." Its traditional styling arts include "screen-fan wintersweet," "knot wintersweet," "hanging-branch wintersweet," etc., with screen-fan wintersweet being the most popular. Its styling process: the time should be during March-April; use the "rolling knife method" and "dragon knife method" to make the main branch twist and spiral upward; when the buds just begin to swell, make a diagonal cut at the place to be bent, with the blade entering diagonally to a depth reaching 2B3 of the branch diameter. Bend carefully so that the upper part of the split xylem rests on the lower part, support the newly bent trunk with a stake, and tie it firmly with rope. Then make all the branch tips point downward. The cut must be coated with mud within 1 month and kept from falling off; if it falls off, reapply it. After the basic framework is formed, pay attention to pruning and pinch the tips in time to maintain the screen-fan shape.
Although wintersweet and plum blossom do not belong to the same family, their flowering periods are close, and their flowers and fragrance are also similar. Wintersweet is delicate in color and rich in fragrance, no less than red plum, so the plum blossom styling principles can be borrowed: "Plum is beautiful when curved; when straight it has no grace; beautiful when leaning; when upright it has no scenery; beautiful when sparse; when dense it has no form," "Plum is valued for being sparse rather than lush, old rather than young, thin rather than fat, and budded rather than open," etc. Therefore, the trunk should preferably be slanting and horizontal, the branches and leaves should be sparse and spreading, and the old stump should show strength. In addition to the "screen-fan style," "knot style" and "hanging-branch style" of Yanling, Henan, traditional styles also include "downwind style," "weeping-branch style," "swimming-dragon style," etc. In current styling, tree forms are mostly slanted-trunk style and natural style.
Well, the above is the whole process of making a wintersweet bonsai. Friends who are interested can try making a wintersweet bonsai.
How is a wintersweet bonsai?
Wintersweet generally blooms during the cold winter months, that is, from December each year to March of the following year. Its flower colors are mainly red, yellow and white, and its fragrance has a solid, rich quality. Wintersweet bonsai is usually cultivated both outdoors and indoors, which benefits from the strong survival ability of wintersweet.
How to grow wintersweet: fertilizer and water management
There is a saying about wintersweet: “wintersweet won't die of drought,” which fully shows that wintersweet's drought tolerance is very strong, so wintersweet bonsai is not sensitive to water needs. Generally, in spring and autumn, do not water unless the potting soil is dry; in summer, water once in the morning and once in the evening. During the flowering period of wintersweet, do not water too much or too often, otherwise it will cause the wintersweet flowers to drop.
Wintersweet likes fertilizer, but do not make it too concentrated. Fertilizing is generally done once a month with liquid fertilizer from April to November, and an additional fertilizing can be added in late June to prepare nutrients for flower bud differentiation.
How to grow wintersweet: shaping and pruning
To ensure good ornamental value of a wintersweet bonsai, the branches need to be pruned. The pruning method for a wintersweet bonsai depends on the tree form decided in advance. Taking the pruning method for a tree-like form as an example, in the seedling stage of wintersweet select one thick, strong branch and train it as the trunk; after the trunk grows to the desired height, pinch the tip (pinching the tip means topping, the work of treating the reserved trunk branch, basic branch or side branch) to form the crown.
How to grow wintersweet: pest and disease management
Wintersweet has relatively few pests and diseases. If any occur, you can use the dormant period of wintersweet to cut off the pest-affected branches and burn them.
After enjoying so many wintersweet pictures and learning about how to grow wintersweet along the way, you can start planting now, and next winter you will be able to see a wintersweet bonsai in full bloom.
