What causes Nandina (Nandina domestica) seeds to fail to sprout for a long time after sowing?
Nandina seeds are physiologically dormant seeds with incompletely developed embryos, and they must undergo a long period of moist sand stratification to promote embryo development to normal size before germination. It is best to harvest fully ripe, plump berries that are about to drop between January and February, mix them with coarse sand and rub them to remove the skin and flesh, then float off the empty shriveled seeds to obtain clean seed.
Mix the seeds with moist fine sand at a ratio of 1:3, then store them in a small jar or large flower pot, keeping the seeds moist at all times. If the sand turns white and dry, increase humidity by spraying water. Check and turn the mixture once every half month to prevent the seeds from becoming moldy. Around September, the seeds will crack open and show white, and then they can be sown in a prepared seedbed.
Generally the row spacing is 15-20 cm, the trench width is 10 cm, the trench depth is 5-8 cm, and the seed spacing is 1-2 cm. Cover lightly with a thin layer of soil about 0.5-1.0 cm thick, just enough that the seeds are no longer visible, then cover with straw to retain moisture. After about 2 weeks, 70% of the seeds will emerge. Remove the straw cover in 2-3 stages, build a shade frame, and strengthen water and fertilizer management. In the first year, seedlings can reach 5-6 cm in height.
Provide appropriate cold protection in winter, leave the seedlings in the bed for another year of growth, and only in the second year can they be transplanted at wider spacing. Seedlings grown from seed need 4-5 years before they flower and bear fruit. To avoid the trouble of storing seeds, you can also sow the harvested red berries directly, without treatment, in the seedbed, with a trench width of 10-15 cm, a trench depth of 5-8 cm, and a row spacing of 20-25 cm, covering with burned soil 4-5 cm deep and then covering with straw to retain moisture. They will not emerge until after about September, and during this period the seedbed must be kept moist.
A New Method for Sowing and Raising Nandina Seedlings
Nandina (Nandina domestica), also known as Tianzhu, is an evergreen shrub in the genus Nandina of the family Berberidaceae. It flowers from May to July, with terminal panicles and small white flowers; it fruits from October to November, with spherical, bright red berries. In autumn and winter the leaves turn red, and together with the abundant red berries that remain for a long time, it is bright and lovely, making it an excellent garden plant for both foliage and fruit display. At the same time, its roots, stems, leaves, and fruits can all be used medicinally: the fruit can treat whooping cough, the roots can treat colds and enteritis, the roots and stems can treat rheumatism and bruises, and external application can treat burns. In addition, Nandina is also an important plant for making stump bonsai and potted plants.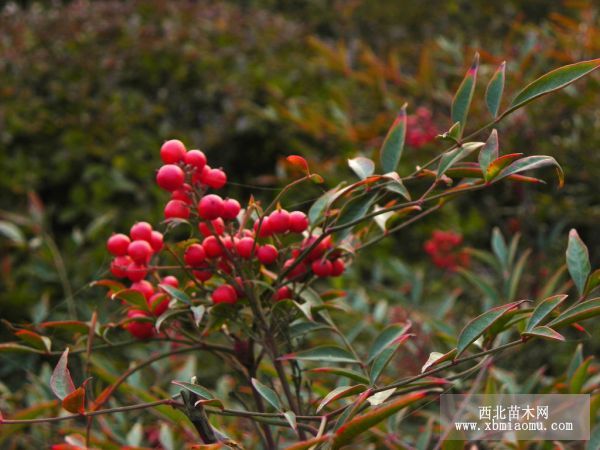
1. Timely seed collection: Between January and February, before the Nandina seeds turn black and drop while still bright red, pick fully ripe fruits from vigorously growing plants, remove the fruit stalk, and soak the berries in clean water for 2-3 days. Once the fruit skin softens, mix with river sand and rub to remove the skin and flesh, then use clean water to float off the shriveled seeds. After brief drying, they can be placed in sand for stratification to promote germination.
2. After-ripening and germination promotion: Because Nandina has physiologically dormant seeds with incompletely developed embryos, they must undergo a relatively long period of mixed storage with moist sand so that they can smoothly complete the after-ripening process before entering the normal germination stage. Generally, it takes 6-8 months from seed collection to germination. The specific method of storage for germination promotion is: mix the washed and dried seeds evenly with clean moist sand at a ratio of 1:3 (the moisture content of the sand should be such that it forms a ball when squeezed by hand and crumbles when released), then store them in a water jar or a large glazed flower pot, covering with a wooden board to prevent damage by rodents. During the after-ripening to germination process, check once every 15-20 days. If the sand is found to be dry, spray water to increase moisture; if seeds become moldy, clean them promptly and replace the sand. By early September, when the seeds begin to sprout and show white, take them out and sow.
3. Land preparation and bed making: Nandina seedlings are intolerant of strong sun exposure and waterlogging at the roots, so the nursery site should be chosen as a loose plot with side shade, shelter from wind, shade and moisture, and convenient drainage and irrigation. Before sowing, prepare the land carefully, apply decomposed cake fertilizer, and make seedbeds 10-20 cm high, 1-1.2 m wide, and about 10 m long. To prevent weeds from growing and affecting seedling growth, spray a herbicide prepared with 30 mL of dimethoate emulsifiable concentrate plus 75 kg of water. This herbicide not only controls weeds but also promotes seedling growth.
4. Opening trenches and sowing: On the seedbed, open trenches at a row spacing of 15 cm, with a trench depth of 5-7 cm. Evenly broadcast the germinated sand-mixed seeds that have shown white into the sowing trenches, with a seed spacing generally of 2-3 cm, then cover with a layer of fertile soil or burned soil about 2-3 cm thick, just enough that the seeds are no longer visible. Using burned soil can prevent seedling diseases. Finally, moisten the bed surface and cover with a layer of rice straw or stalks to retain moisture.
5. Management after sowing: Before emergence, spray water frequently to keep the bed surface moist. Generally after 15 days, more than 70% of the seeds will break through the soil. The straw (or stalks) cover should be removed in 2-3 stages. If the temperature is too high (above 30°C), while removing the cover, a shade frame must be built to create a cool and moist environment for seedling growth. When the plants have grown true leaves and the weather turns cooler, all coverings can be removed to harden the seedlings; in late autumn, scatter a layer of plant ash on the seedbed to increase the cold resistance of the seedlings for overwintering. If winter temperatures drop below 0°C, to prevent the seedlings from freezing, cover the seedbed with plastic film, and in particularly cold weather, also cover the film with straw mats. In March of the following year, remove the straw mats and plastic film, strengthen fertilizer and water management, and if the seedlings are too dense, carry out thinning and transplanting. After 2-3 years, they can grow into large seedlings for landscaping or potted display. For common leaf spot diseases (black spot, brown spot), use Bordeaux mixture for control; when leaf-eating pests such as tortrix moths are found, use 50% fenitrothion at 1000 times dilution for control.
Container Seedling Raising and Management of Nandina
Nandina is an evergreen shrub in the genus Nandina of the family Berberidaceae. It blooms with small white flowers in June, and its spherical berries ripen in mid-November, heavy with fruit and bright red and gorgeous in color, lasting through frost. Nandina has a long history of cultivation in China. It is not only a commonly used foliage and fruit ornamental species, but also a traditional cut flower material, and can also be potted and made into bonsai. Nandina prefers a warm and humid climate and is relatively cold tolerant. It is widely cultivated in China and deeply loved by people.
Seed Collection and Treatment
For seed collection, choose seedlings that are robust, vigorous, strongly resistant, and free of pests and diseases as mother plants. The seed collection time is generally from mid-November to early December.
Soak the harvested seeds in warm water with added disinfectant for 4 hours, then after air-drying and sorting, carry out indoor sand stratification for germination promotion, covering the sand pile with straw mats and checking frequently.
Preparation and Filling of Nutrient Soil
According to the nutrient soil formula, prepare fine soil and decomposed base fertilizer, mix and stir them evenly in proportion. After piling the prepared nutrient soil for 4-6 days, carry out soil disinfection, spraying disinfectant while stirring the nutrient soil, then add nitrogen, phosphorus, and potassium fertilizers in proportion. The prepared nutrient soil should be neither sandy nor sticky.
The most important thing when filling the nutrient soil is to pack the soil firmly, with the soil 2-3 cm below the upper rim of the nutrient pot. There must be no hollow spaces, but it also must not be too compacted. The purpose is to prevent poor contact between the seeds and the soil or a lack of air around the seeds that would affect respiration. After all the nutrient pots are filled, place them neatly in a low bed, then water the low bed, allowing water to seep through and moisten the soil in the nutrient pots (the watering time should be determined according to the state of the stratified seeds).
Sowing
Sow when the soil in the nutrient pots is neither wet nor sticky and the seeds have shown white. Place 2-3 seeds in each nutrient pot. After all spot sowing is completed, uniformly cover with fine nutrient soil 1-2 cm deep.
Seedling Management
Before emergence, the entire bed can be covered with easily movable straw mats or plastic film to raise the ground temperature. The straw mats should be removed promptly after emergence, and the plastic film should be ventilated and checked frequently. During this period, the soil should be kept moist to facilitate seed germination. It is best to water with a watering can, otherwise the seeds and soil in the containers may be washed out. As the seedlings continue to emerge, the time of covering and shading should be gradually reduced. If the cover is not removed in time, it will affect the normal growth of the seedlings.
During the seedling stage, the water supply should be sufficient to promote lateral root growth, and when the plants reach the suitable growth stage, control the amount of watering to promote full lignification of the seedlings. To promote more lateral roots and growth of the seedlings, the best results come from spraying water and alternating appropriate wet and dry watering.
When the seedlings have grown 2-4 true leaves, carry out thinning and filling in. Keep one healthy, strong seedling in each container, thin out the extra seedlings, and plant them in spare containers. Dead or poorly growing seedlings should be replanted. Water once before thinning and filling in, and carry out thinning and filling in after the water has drained, so that the seedling roots will not be damaged.
The nutrients needed for container seedling raising come not only from the nutrient soil, but also from continuous topdressing during the seedling stage to meet the nutrient needs of the seedlings at different stages. Generally, topdressing can begin after the seedlings shed their seed coats. Before the fast-growing period, if the base fertilizer is insufficient, mainly apply nitrogen and phosphorus fertilizers, topdressing about once every 1 month, but the amount of fertilizer each time should be small, and water promptly after topdressing. During the fast-growing period, the fertilizer concentration should be controlled when topdressing to avoid burning the seedlings.