Detailed Guide to Propagating Fuchsia by Cuttings
Fuchsia is a perennial evergreen subshrub in the genus Fuchsia of the family Onagraceae, also known as hanging bell flower, lantern flower, lantern begonia, hanging bell begonia and so on. The fuchsia bears drooping flowers one after another, like hanging colorful lanterns, graceful and varied in form, with brilliant colors. The flowering period is long, it is suitable for pot culture, and in cool summer regions it can be used to decorate flower beds and can also be used as cut flowers.
Cutting propagation can be carried out throughout the entire growing season. Cuttings root faster in spring and autumn. Autumn cuttings bloom in the following spring and summer, so autumn cuttings are the most suitable. The best cuttings are tender shoots from the tips, cut into small sections 5-10 cm long, keeping 3 small leaves on the upper part. Immediately after collection, insert them in a sand bed, or first soak all the cuttings in a 0.1% potassium permanganate solution for 30 seconds, then stand them upright with the leaves exposed and continue soaking the base for 30 minutes, then soak the base of the cuttings in clean water for 24-48 hours before inserting them. After insertion, shade them and keep the substrate moist, generally spraying water once a day, with the temperature controlled at around 20°C. All will have rooted in about 15 days. After rooting, transplant them early into containers 8-10 cm in diameter for growing on. Pinch out the growing tips when the seedlings are 15-20 cm tall.
Fuchsia can also be propagated by water cuttings. It can also be raised from seed and by tissue culture, though these are not much used in production at present. For tissue culture propagation, buds are used as explants and cultured on MS medium.
How Does Fuchsia Propagate? The Cutting Method for Fuchsia / Cutting Treatment Is Key
Fuchsia has certain requirements for cultivation techniques and environment, so a certain amount of skill is also needed when propagating it. For example, when taking cuttings, the tender shoots wilt quickly once separated from the mother plant, so how to keep them from dying before they are inserted into the substrate requires skill. So how does fuchsia propagate? What is the cutting method for fuchsia? Let us look at the details together.
How Does Fuchsia Propagate
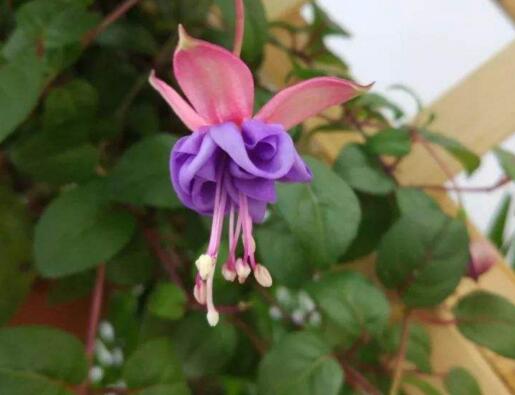
The propagation methods for fuchsia mainly include three kinds, namely cuttings, sowing and tissue culture. For fuchsia grown as a pot plant at home, cutting propagation is recommended; for breeding new varieties, tissue culture is suggested; and for large-scale greenhouse cultivation, seed propagation is best.
The Cutting Method for Fuchsia
1. Timing
Apart from summer, cutting propagation can be carried out in spring, autumn and winter as long as the temperature is suitable, but rooting is fastest in spring, followed by autumn. In many places the winter temperature is relatively low, so it is best to choose spring and autumn.
2. Specific Steps
(1) When using cuttings, how does fuchsia propagate? First, prepare the substrate and sand bed. The substrate is best made by mixing garden soil and river sand in a 1:1 ratio; this causes the least irritation to the young roots and helps the young roots survive after cutting.
(2) Next, make the cuttings. From the upper part of the fuchsia plant, choose 1-2 year old branches; the branches must not be lignified and must have tender tips. Cut the branches into cuttings 6-10 cm each, keeping 2-3 leaves on the upper part of the cutting and cutting off all the lower leaves.
(3) Because tender branches wilt quickly after leaving the mother plant and will easily die if inserted directly into the substrate, after cutting the cuttings, soak their bases in a potassium permanganate solution for 30 minutes, then take them out and insert them into the substrate for a higher survival rate.
(4) When inserting, the density should be such that the leaves do not shade one another, and the depth should be one third or one half of the length of the cutting. After inserting, water thoroughly, then place them in a bright place for management, spraying water 1-2 times a day; generally they will root after 20-3 days.
(5) After rooting, they need to be potted separately. Use a tool to gently lift the small seedlings, then plant them separately in prepared potting soil, straighten them, firm the soil, and water thoroughly to keep the soil moist. After one month, normal management can be carried out according to the cultivation methods for fuchsia.
How to Sow Fuchsia
Sowing is the propagation method for fuchsia that takes the longest to show results. Select plump seeds from ripe fruit, and the sowing time is spring and autumn, with the temperature needing to be kept at 15-20°C. The broadcast sowing method is used, and germination generally occurs 15 days after sowing. Only with spring sowing can you see fuchsia bloom in the following year.
A Detailed Introduction to the Method and Steps of Propagating Fuchsia by Cuttings
When it comes to fuchsia, I believe everyone is familiar with it. Fuchsia is a common herbaceous flower with extremely high ornamental value, deeply loved by many flower enthusiasts. So, do you know what the method and steps are for propagating fuchsia by cuttings? Today, the editor will give everyone a detailed introduction to the related knowledge.
1. Cutting Time
Apart from the summer dormant period, fuchsia can be propagated by cuttings at other times as long as the temperature is suitable, but the period from November each year to the first ten days of April of the following year is best. This is because this period is exactly the peak growing season for the plant, so cuttings with strong vitality can be chosen, and in addition the weather is cooler, so the cuttings are unlikely to rot and the survival rate is relatively high.
2. Selection of Cuttings
For cuttings, choose branches of the current year that have not yet lignified, preferably with tender tips. The length of the cuttings is generally 6 to 10 cm, and the lower leaves should be cut off. It should be noted that when taking cuttings, you must use sterilized scissors so that the cut ends of the cuttings are neat and smooth. Never pick cuttings directly from the plant with your hands.
3. Preparation of Cutting Substrate and Cutting Bed
The cutting substrate is best fine river sand that has been sifted clean, but it must be scalded and washed with boiling water to disinfect it. The cutting bed can be a shallow basin or a wooden box, and it should also be sprayed with a 0.1% potassium permanganate solution beforehand for disinfection.
4. Cutting Method
When inserting, first soak the cuttings in vitamin B12 for 20 minutes, use a thin bamboo stick to make a small hole in the sand, then insert the cutting into the sand hole, with a depth of 3 to 4 cm being suitable. The spacing between cuttings should be kept at about 8 cm, to facilitate potting after rooting. After inserting, water thoroughly once and cover with plastic sheeting to maintain the humidity of the cutting bed.
5. Management After Cutting
After cutting, the cutting bed should be placed indoors in a place with diffused light and must not be exposed to direct sunlight. The room temperature should be kept at around 20°C, and only after one week may it receive some light. After cutting, water should be sprayed into the cutting bed frequently: once a day in winter, and once each morning and evening in spring, keeping the humidity in the cutting bed above 80%. In winter, rooting generally occurs in about 25 days, and in spring rooting occurs in about 20 days.
6. Potting the Seedlings
After the cuttings have rooted, they should be potted promptly. The potting soil should be fertilizer-free sandy loam, and both the pot and the growing soil should be disinfected. Use broken pot pieces to make a drainage layer at the bottom of the pot. When transplanting, use a small bamboo spatula to gently lift the seedling, place it into a small hole made beforehand in the pot, straighten it, and then cover the roots with soil. Do not press the soil with your hands, lest too much force damages the roots and seedlings. After the small seedlings are planted, water thoroughly once immediately so that the soil settles naturally, then place the pot in a shaded place for tending. If after three days the leaves show no wilting, it may be given light. After one month, apply a little dilute liquid fertilizer and enter normal management.
The above is all the content I have learned today about fuchsia. I hope flower enthusiasts will find this article helpful after reading it. If you want to learn more about fuchsia, please continue to follow Duorou Huapu, and we will provide you with more related knowledge!