How to Propagate Spider Plants? A Detailed Guide to Several Common Propagation Methods
Spider plants are very easy to propagate, generally by the offset method or the division method.
Offset method
The offset method is not limited by season and can be done indoors in winter, but the survival rate is highest in spring and autumn.
From spring to autumn each year, slender, soft, drooping stems emerge from the leaves, and at the tips of the stems or below the nodes, new buds sprout and grow into small plantlets with aerial roots exposed to the air. Cut the plantlets off the stems, plant them separately in pots, water them thoroughly with clean water, place them in a cool, ventilated spot in summer, and keep them indoors in winter; the survival rate can reach 100%.
Division method
The division method is usually carried out in March to April of spring, when repotting and changing the soil.
Take the large spider plant out of the pot, and use a small trowel or knife to cut it apart along the natural clump divisions in the middle of the root ball (it is best for each divided plant to retain 3 stems), or gently pull it apart by hand (without damaging the roots and stems) to divide and plant it. Depending on the size of the plant, plant the divisions in pots of suitable size. The growing medium is generally 7 parts garden soil and 3 parts leaf mold.
In addition, propagation by seed can also be used, that is, at a temperature of 15%, cover the seeds with half a centimeter of soil, and they will germinate after 14 days.
How to Propagate Spider Plants: 8 Steps to Teach You How to Propagate Spider Plants
Spider plants hold a very important place among household potted plants, because spider plants can not only serve a decorative purpose and make a room more beautiful, but can also purify the air in a room. When we have a spider plant, how should we propagate it? Next, let us introduce how to propagate spider plants. 8 steps to teach you how to propagate spider plants.
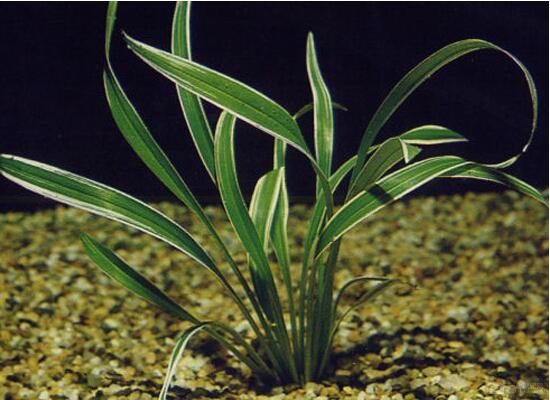
1. Prepare a spider plant, especially one that has grown runners, which is best (if there are really no runners, you can also divide and plant from the roots). Or if friends or relatives have a spider plant at home, you can get some plantlets to propagate and grow yourself. There are many kinds of spider plants: green spider plant, variegated spider plant with golden edges, and variegated spider plant with a golden center. Here, my own golden-edged spider plant is used as an example; the methods are all much the same.
2. Gently pinch off the small spider plantlets one by one from the runners, either with your hands or with scissors. Note that keeping some of the roots that have grown on them makes it easier to survive. Cut them directly from the stem. Do not let the leaves scatter and fall off. The cut-off plantlets can retain a short section of stem.
3. Prepare one flower pot. There is no need for too large a flower pot, otherwise it is easy for too much water to accumulate, which is hard to manage and hard to move; a diameter of about 15 cm is about right. Wooden flower pots are not recommended; although wooden flower pots are very beautiful, with long-term watering they are prone to deteriorating, rotting, and becoming moldy. The flower pot must have holes.
4. Spider plants grow easily and have ordinary soil requirements; of course, the more fertile the soil, the better. Here, garden soil with added coal cinders and leaf mold is used. Coal cinders increase air permeability and do not have much nutrient fertility. Leaf mold is rich in nutrients.
5. Insert the cut small plantlets into the soil. There is no need to bury them too deep; make sure all the leaves are above the soil surface. After planting, there is no need to fertilize immediately. Do not place them in an open area with direct sunlight. (A temperature of around 20°C is enough for planting and propagation.) Both spring and autumn are fine.
6. Water thoroughly once, then place in a shady, ventilated spot. Do not water frequently after that, because the spider plant has not yet grown new roots and has no ability to absorb water; too much watering easily causes rot.
7. Generally, roots begin to grow in about a week. The method for judging whether roots have grown is very simple: gently hold the leaves and give a slight tug upward; if it feels like it will not pull loose, that proves the roots have already grown. After one month, fertilization can begin, mainly with liquid fertilizer.
8. After half a year, the spider plant's root system will be very developed. You can prune away part of the roots and add some nutrient soil, which will make it grow more luxuriantly. Remember to place the spider plant beside a sunny window at home. In winter, it also needs to be placed in a windproof spot indoors, or use plastic wrap or the like to make a small greenhouse. Keep it warm through the winter. In this way, the following spring, the spider plant will still be full of green and luxuriant and pleasing to the eye.
How to Propagate Spider Plants: Spider Plant Propagation Methods
Spider plant is also known as ribbon plant, bracket plant and so on. It is native to South Africa and is a quite common trailing foliage plant. Spider plants have leaves clustered at the tops of stems, drooping outward from the edge of the pot and fluttering in the wind, resembling a crane spreading its wings and leaping, so it is a common household potted plant. Spider plants have strong adaptability, are drought-tolerant, easy to grow, and also easy to propagate. So how are spider plants propagated? Today let us learn together the propagation methods of spider plants.
How to Propagate Spider Plants: Spider Plant Propagation Methods
Spider plants can be propagated by methods such as cuttings, division, and sowing.
Spider plant propagation by cuttings and division can be carried out at any time from spring to autumn. Spider plants have strong adaptability and a high survival rate, and are generally very easy to propagate. When taking cuttings, simply take a 5-10 cm runner with new buds and insert it into the soil; roots will form in about one week, and after about 20 days it can be transplanted into a pot, watered thoroughly, and kept in a shady spot for care.
When dividing spider plants, you can take the spider plant out of the pot, remove the old soil and rotten roots, cut apart the old roots, make sure each divided plant retains three stems, and then transplant and cultivate them separately. You can also cut off the clustered stems and leaves on the spider plant's runners (which are actually a young new plant body, with leaves above and aerial roots below) and directly plant them into a flower pot for cultivation.
Seed propagation of spider plants can be carried out in March each year. Because its seeds are not large, after sowing the seeds, the covering soil should not be thick; generally 0.5 cm is enough. At a temperature of 15°C, the seeds can sprout in about 2 weeks, and after the seedlings take shape, they can be transplanted for cultivation. When varieties with leaf variegation are propagated by seed, the offspring revert to an all-green variety.
How to propagate spider plants and the propagation methods of spider plants are briefly introduced here. Spider plants like a warm, moist, semi-shady environment. But they are demanding about soil, generally growing better in well-drained, loose, fertile sandy soil. Spider plants have unique drooping leaves; placed at home, they are elegant and full of vitality.