How to grow spider plants in water? Detailed method and steps for you
1. Spider plant water propagation method: how to choose the material
You can select the small plantlets growing at the tip of the runners, or take the spider plant out of its pot, wash off the soil, remove old roots and rotten roots, keep the fibrous roots and healthy leaves, and plant it in a container, with the roots immersed 1/2 to 2/3 in water, placed indoors or in a cool spot for care.
2. Spider plant water propagation management
For a single-layer container bottle, add water once every 4 days; for a double-layer bottle, change the water once every 7 days. Spider plants have many leaves and consume a lot of nutrient solution and water, so it is recommended to replace the nutrient solution about once every 30 days. The leaves are sensitive to light: with insufficient light, the leaves are light green or yellow-green; with too strong light, the leaves turn withered yellow, or even die. In summer, place it under a shade canopy outdoors for cultivation and care. The optimum growing temperature is around 20°C. In winter, keep it in a greenhouse and appropriately increase light; in high-temperature summer weather, appropriately spray water on the leaves and the ground to lower the temperature and raise air humidity.
3. Choosing a container for water-grown spider plants
Spider plants are very suitable for water cultivation and have low demands for containers. You can choose a single-layer or double-layer glass container, or choose a container according to personal preference.
4. Pest and disease control for water-grown spider plants
Spider plants are not prone to pests and diseases, but roots immersed too deep in water will cause root rot, so pay attention to controlling the immersion depth of the roots. Cut off the rotten parts, soak them in a 800-times dilution of thiophanate-methyl, then place them in the air to let the wounds dry. After drying, re-induce new roots.
5. Suitable placement for water-grown spider plants
Indoors in a sunny spot but without direct light.
How to grow Variegated Spider Plant in water, notes on the water cultivation method for Variegated Spider Plant
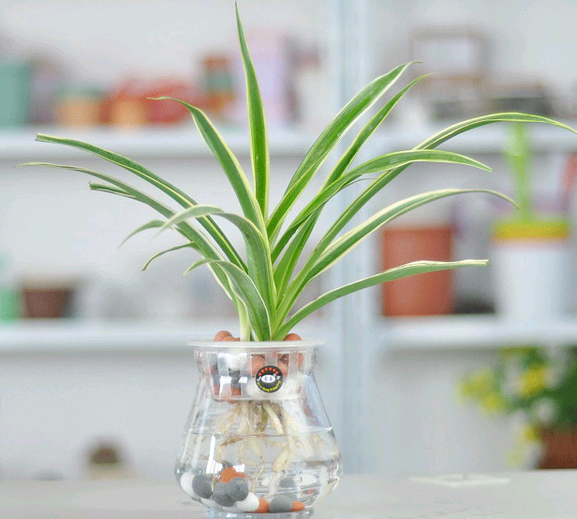
How to grow Variegated Spider Plant in water: first, the Variegated Spider Plant has very strong adaptability and is easy to grow in any environment, and its plant shape is attractive, so it is sought after by flower enthusiasts. It has been confirmed that the Variegated Spider Plant can be grown by water cultivation. Below are the compiled steps and precautions for water cultivation of Variegated Spider Plant, hoping to help flower enthusiasts who are about to water-grow spider plants.
Water cultivation method for Variegated Spider Plant 1. Container selectionThe container bottle can be single-layer or double-layer. For a single-layer bottle, take a plastic bottle without a bottom hole or a ceramic bottle without a bottom hole and plant the spider plant in it. For a double-layer bottle, take a plastic sieve as the upper layer, and the lower bottle is a bottle without a bottom hole; plant the spider plant in the upper plastic sieve so that the roots hang down into the bottle.
2. Plant selectionTake the potted or ground-planted spider plant out of the pot or dig it up from the ground, remove the soil from the roots, wash the roots with clean water, cut off old roots and rotten roots, keep the fibrous roots, cut off some leaves (old leaves, pest- or disease-damaged leaves), and keep healthy leaves, generally leaving 6 to 10 leaves.
3. Potting and plantingPlant the spider plant on the plastic sieve, with the roots passing through the small holes of the plastic sieve into the lower bottle, put ceramic granules or pebbles in the sieve to keep the spider plant upright, and fill the lower bottle with clean water and flower nutrient solution. After potting, place the spider plant indoors or in a cool spot for care.
4. Maintenance and managementChange the water once every 2 to 3 days. For those changed from soil cultivation to water cultivation, some roots will rot in the early stage, and these need to be cut off when changing the water, and disinfection is best. When the new water roots are 3 to 5 cm long, add nutrient solution to the water, in a small amount.
5. FertilizingIn the root zone, add flower nutrient solution while adding and changing water; for foliar feeding, spray the branches and leaves once every 3 days with diluted flower nutrient solution.
Precautions for water cultivation of Variegated Spider Plant1. To carry out water cultivation, you need a container for water cultivation. You can choose a glass bottle or ceramic bottle according to your own habits and preferences, but it must be a container without a bottom hole. Once you have the container, next choose a plant suitable for water cultivation. Do not use a plant with rotten roots, and clean up old roots and rotten roots on the roots of the selected plant. Also cut off leaves with pests or diseases. Generally, 6 to 10 healthy leaves need to be kept.
2. After preparing the container and plant, wash the soil off the plant roots and carefully plant it in a plastic sieve filled with ceramic granules or pebbles, keeping the spider plant upright with the roots going into the clean water bottle.
3. Next, place the planted spider plant indoors and change the water once every two or three days. When the new roots grow to 3 cm long, add nutrient solution to the clean water, but do not pour in a large amount of nutrient solution, because a large amount of nutrient solution will breed a lot of mold and bacteria and cause root rot. At the beginning of water cultivation, the roots of the spider plant will have rotten parts. There is no need to worry about this; just cut them off and disinfect when changing the water.
4. Based on my experience growing spider plants in water, if you water-cultivate a spider plant, do not put craft items and ornaments in the water cultivation container, as this is not conducive to the growth of the spider plant. If you really must beautify the container, put in some natural stones such as pebbles, which are both attractive and will not harm the spider plant.
How to grow Aptenia cordifolia in water, Aptenia cordifolia water cultivation method / cut branches, dry them, insert into water
As a powerful type of spider plant, Aptenia cordifolia not only has attractive leaves and a strong ability to absorb formaldehyde, but can also produce beautiful flowers. Compared with soil cultivation, many flower enthusiasts prefer water cultivation. So can Aptenia cordifolia be water-cultivated? If so, how is Aptenia cordifolia water-cultivated? Below is the Aptenia cordifolia water cultivation method, very detailed, flower enthusiasts must take a look~
I. How to grow Aptenia cordifolia in water, the method is important
According to the editor's research, the leaves of Aptenia cordifolia can survive when inserted into water, so Aptenia cordifolia can be water-cultivated. It is also very simple to do: choose a water cultivation seedling and insert it into a glass container. But although it sounds simple, it is not easy to do. As for how to operate specifically, let us go on to look at the Aptenia cordifolia water cultivation method.
II. The water cultivation method for Aptenia cordifolia
The water cultivation method for Aptenia cordifolia, simply put, is to prepare a glass bottle, pour in an appropriate amount of water, choose a healthy branch and insert it into the water, then place it in a ventilated and cool place. More specifically, it can be divided into 5 steps:
1. Choose a container
For the water cultivation container for Aptenia cordifolia, as with other plants, choose reasonably mainly according to the size of the plant and the growth space. It is best to use a transparent glass vase, which is both attractive and convenient for observing the rooting situation in real time.
Prepare water and disinfect: after choosing the water cultivation container, wash it clean and pour in 1/3-1/2 water, preferably cooled boiled water. If it is tap water, it still needs to be left outside to air for 2-3 days.
2. Water cultivation branches
If you have a pot of Aptenia cordifolia, then the water cultivation branches need to be taken by yourself. Method: on the Aptenia cordifolia, use sterilized scissors to take well-growing branches free of pests and diseases, and cut them into several short sections, with a length about 10 cm above the glass bottle as appropriate.
Branch treatment: keep the upper half of the short branches unchanged, remove the leaves and side branches from the lower half, then place them in a ventilated, cool, dry place to let the wounds dry.
3. Insert into water
Aptenia cordifolia water cultivation method, next comes the key point: insert the water cultivation branches into the glass bottle, with the lower half submerged about 5 cm in water, then place it in a ventilated and cool place, keep the temperature at 15-20°C, and roots will form in about a week. After rooting, it can continue to be grown in water, or it can be moved into a flowerpot for soil cultivation.
4. Precautions
① Light: although Aptenia cordifolia likes light, newly water-cultivated branches are very fragile, so never place them directly under strong sunlight. Because even slightly stronger light will make the branches wilt quickly, flower enthusiasts should place the glass container in a semi-shaded, cool place.
② Changing water: How to grow Aptenia cordifolia in water? One point is very important, and that is changing the water. If the outside ambient temperature is high, to prevent the water from spoiling, change the water about once every 3 days; if the outside temperature is low, then change the water about once every 15 days. In addition, during the rooting process there is no need to add nutrient solution.