How to Grow Hoya kerrii? Detailed Guide to Cultivation Methods and Precautions
Hoya kerrii Morphological Characteristics
Description of traits - it is a subshrub. Stems and branches climb up to 2 m, yellow-gray. Petioles stout, plump, 5 mm long, with 3-5 adaxial glands; leaf blades ovate to oblong-ovate, size 5-9*4, 5-5 cm, thinly leathery when dry, glabrous adaxially, midrib plump abaxially, base subcordate, apex acute to obtuse; lateral veins 6-8 pairs. Axillary umbellate inflorescences, hemispherical, 30-50 flowers per cluster; peduncle 1-1, 5 cm long. Pedicels 2, 5-3 cm long. Sepals 2, 5 mm in size. Corolla white, rotate, plump, 1 cm in diameter; lobes obtusely triangular, 2, 5 mm in size. Outer angles of corona acute. Flowering period May.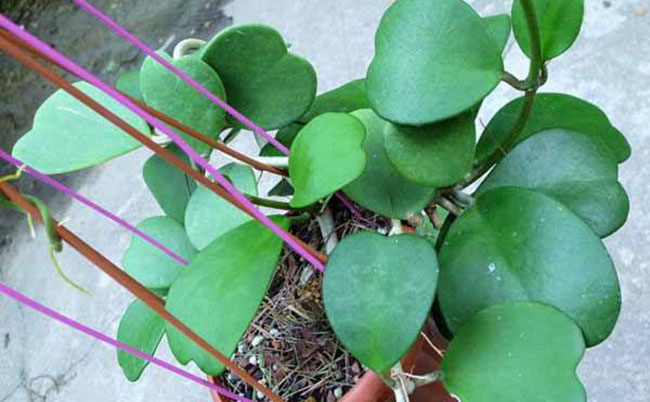
Hoya kerrii Growing Environment
Also known as wax orchid, wax flower, wax spring flower, with fleshy stems and thick succulent leaves shaped like a heart. Potted plants must be placed in indirect light or half-day shade, and the leaves should be misted frequently. The optimum growing temperature is 18°C-28°C, and the overwintering temperature is around 5°C.
Hoya kerrii Cultivation Management
1, Soil:
Hoya is suitable for indoor cultivation. The potting soil can be mixed with garden soil, leaf mold and sand in a 2:2:1 ratio, and drainage must be good.
2. Light:
The amount of light affects how brilliantly hoya blooms. If you want a colorful and long flowering period, it is best to place the hoya in the brightest spot indoors, but avoid direct sunlight so as not to scorch the leaves. Potted plants should be placed in a sunny spot, avoiding direct sunlight; indoors they can be placed not far from a south-facing window, which keeps the leaves emerald green and glossy and the flowering good. In summer they need to be moved to a shaded spot to prevent strong direct light, otherwise the leaves easily turn yellow. If kept in a place with insufficient light for a long time, the leaf color becomes pale and the flowers are few and not vivid. Wire can be made into a ring, and the branches wound around it, letting them climb and grow, which is even better for light exposure. After flower buds appear, the position of the pot must not be moved; the flower ball always faces the spot with the best light.
3, Temperature:
It likes warmth and humidity, and the optimum growing temperature is 18-28°C; after mid-October, the temperature should be 10-14°C, and it should be placed in a dry, sunny spot to overwinter, with a minimum overwintering temperature of 7°C. If below 5°C, it is prone to cold damage, causing leaf drop, or even the death of the whole plant.
4, Watering:
In the fertilizer and water growing season, besides watering according to the principle of letting the soil dry before watering thoroughly, the leaves should also be misted frequently. In summer, watering should be ample, and at the same time air humidity should be increased to promote robust growth. In the peak growing season, apply a dilute thin cake fertilizer water combining nitrogen and phosphorus once or twice a month.
Hoya kerrii Propagation Methods
This hoya can be propagated by either cuttings or layering. For cuttings, be sure to note that the cut must be flat, and if conditions permit, a moderate amount of rooting hormone can be applied. If this method is chosen, another point to note is that the temperature must be kept at 20-25°C. This takes a little longer, about 2 months or so. After the roots emerge, just observe for another 2 weeks; once the root development is fine, it can be transplanted and given normal care.
Hoya kerrii Propagation Time
This plant can basically be propagated before spring ends, because this is the good time when they readily root, and their stems and leaves can also grow very well; too hot or too cold is not conducive to rooting.
Hoya kerrii Aftercare Following Propagation
After transplanting, you cannot easily relax; careful care is needed for a period of time. In midsummer, do not think that this flower is very short of water and increase the watering frequency. In fact, in summer watering should actually be reduced, especially not around 2 o'clock when the sunlight is strongest; do it in the evening as much as possible.
Hoya kerrii Precautions:
1. Hoya should be watered thoroughly only after the soil has dried out.
2. Do not water too much in winter.
3. The temperature should be kept above 10 degrees; when the temperature is high, hoya grows fast, and when the temperature is low, it does not grow.
4. It must not be exposed to the sun; if exposed to the sun, spots will appear on the leaves, affecting its ornamental value. It should be placed in a bright spot, not under the sun. The other planting requirements are the same as for ordinary hoya.
How to Cultivate Hoya kerrii - Hoya kerrii Cultivation Methods
How to cultivate Hoya kerrii? Hoya kerrii, also known as wax orchid, wax flower, wax spring flower, has fleshy stems and thick succulent leaves shaped like a heart. Potted plants must be placed in indirect light or half-day shade, and the optimum growing temperature is 18°C-28°C. Below, the editor will introduce in detail the cultivation techniques and growing methods for Hoya kerrii.
Introduction to Hoya kerrii
Hoya belongs to the family Asclepiadaceae, subfamily Asclepiadoideae, likes shade and humidity, and is shaped like a heart. It has a more colloquial name, “Valentine hoya.” In spring and autumn, when there is sunlight, it should be exposed to absorb ultraviolet rays. The planting soil does not need to be too rich in fertilizer, but the soil must be kept loose and soft. To retain moisture, some moss can be spread on top of the flowerpot. In summer, the sunlight exposure time should not be too long. If there are rotten leaves, they should be cut off in time. If the root rot is severe, the planting soil needs to be replaced, and the flowerpot should be replaced or disinfected before replanting. The new soil should be kept on the dry side and not too wet. Only after new shoots grow can watering continue. During the replacement period, it is best not to water; just use a sprayer to spray the leaf surfaces. It is best to place it in a sunny and ventilated place, and the best sunlight position is direct half-day sunlight in the morning or afternoon.
Also known as wax orchid, wax flower, wax spring flower, with fleshy stems and thick succulent leaves shaped like a heart. Potted plants must be placed in indirect light or half-day shade, and the leaves should be misted frequently. The optimum growing temperature is 18°C-28°C, and the overwintering temperature is around 5°C.
I. Morphological Characteristics
Description of traits - it is a subshrub. Stems and branches climb up to 2 m, yellow-gray. Petioles stout, plump, 5 mm long, with 3-5 adaxial glands; leaf blades ovate to oblong-ovate, size 5-9*4, 5-5 cm, thinly leathery when dry, glabrous adaxially, midrib plump abaxially, base subcordate, apex acute to obtuse; lateral veins 6-8 pairs. Axillary umbellate inflorescences, hemispherical, 30-50 flowers per cluster; peduncle 1-1, 5 cm long. Pedicels 2, 5-3 cm long. Sepals 2, 5 mm in size. Corolla white, rotate, plump, 1 cm in diameter; lobes obtusely triangular, 2, 5 mm in size. Outer angles of corona acute. Flowering period May.
II. Ecological Habits
It likes warmth and humidity, and the optimum growing temperature is 18-28°C; after mid-October, the temperature should be 10-14°C, and it should be placed in a dry, sunny spot to overwinter, with a minimum overwintering temperature of 7°C. If below 5°C, it is prone to cold damage, causing leaf drop, or even the death of the whole plant.
III. Distribution Range
Distribution status: grows in low pine forests; produced in Guangxi.
IV. Propagation Methods
Propagation uses cuttings or layering, and rooting is easy. Generally, cutting propagation is carried out in late spring; cut a section of stem tip about 10 cm long, dip the cut in rooting hormone, and then insert it into the soil for cutting; bud cuttings can also be used. During cutting, the soil temperature should be kept at 20-25°C. After about 8-10 weeks of cultivation, roots will grow; after another two weeks, once the roots have developed well, they can be transplanted. Air layering can be done in spring.
How to Cultivate Hoya kerrii
I. Planting Management Methods
We usually treat hoya plants as succulents, and indeed many varieties in this genus are plump, but most are not true succulents. Hoya plants are also often treated as vines, and of course many of them have little or even no climbing tendency. Enthusiasts collect hoya plants for different reasons and cultivate them in different ways: some like twining vines, some like woody clumping small shrubs, some like potted plants, some like to grow them as epiphytes, and some start by planting them in pots, only for them to wrap around something later and become climbing growers, eventually abandoning their own original roots. Some varieties cling to supports by both twining and adventitious roots, but some species grow completely upright as small shrub clumps. Some species start out growing like small shrubs, and after reaching a few feet tall, they begin to send out climbing vines. Some species are woody, some are soft and succulent, some have woody stems and succulent leaves, and some have slender stems and paper-thin leaves.
II. Cultivation Management
Hoya is suitable for indoor cultivation. The potting soil can be mixed with garden soil, leaf mold and sand in a 2:2:1 ratio, and drainage must be good.
The amount of light affects how brilliantly hoya blooms. If you want a colorful and long flowering period, it is best to place the hoya in the brightest spot indoors, but avoid direct sunlight so as not to scorch the leaves. Potted plants should be placed in a sunny spot, avoiding direct sunlight; indoors they can be placed not far from a south-facing window, which keeps the leaves emerald green and glossy and the flowering good. In summer they need to be moved to a shaded spot to prevent strong direct light, otherwise the leaves easily turn yellow. If kept in a place with insufficient light for a long time, the leaf color becomes pale and the flowers are few and not vivid. Wire can be made into a ring, and the branches wound around it, letting them climb and grow, which is even better for light exposure. After flower buds appear, the position of the pot must not be moved; the flower ball always faces the spot with the best light.
Hoya kerrii Cultivation Methods and Precautions
I. Cultivation Methods
It is best to place the hoya in the brightest spot indoors, but avoid direct sunlight so as not to scorch the leaves. Potted plants should be placed in a sunny spot, avoiding direct sunlight; indoors they can be placed not far from a south-facing window, which keeps the leaves emerald green and glossy and the flowering good. In summer they need to be moved to a shaded spot to prevent strong direct light, otherwise the leaves easily turn yellow. If kept in a place with insufficient light for a long time, the leaf color becomes pale and the flowers are few and not vivid. Wire can be made into a ring, and the branches wound around it, letting them climb and grow, which is even better for light exposure. After flower buds appear, the position of the pot must not be moved; the flower ball always faces the spot with the best light.
It likes warmth and humidity, and the optimum growing temperature is 18-28°C; after mid-October, the temperature should be 10-14°C, and it should be placed in a dry, sunny spot to overwinter, with a minimum overwintering temperature of 7°C. If below 5°C, it is prone to cold damage, causing leaf drop, or even the death of the whole plant.
II. Precautions for Growing Hoya kerrii
The flower soil should have good drainage and air permeability, maintain a weakly acidic soil nature, not stay for long at a minimum temperature of 5°C, no water accumulation at the bottom of the pot, soil moisture content not lower than 15%, no scorching sun with a shading rate of 75%, and frequent application of thin fertilizer can ensure the healthy growth of hoya.
Hoya propagation is best carried out in spring and autumn. For cuttings, be sure to choose vigorously growing branches, and the cutting medium can be sphagnum moss, coconut coir, sawdust, etc.
Hoya - Hoya kerrii Cultivation Methods and Precautions
Soil Requirements for Hoya kerrii
Hoya is suitable for indoor cultivation. The potting soil can be mixed with garden soil, leaf mold and sand in a 2:2:1 ratio, and drainage must be good.
Light Requirements for Hoya kerrii
The amount of light affects how brilliantly hoya blooms. If you want a colorful and long flowering period, it is best to place the hoya in the brightest spot indoors, but avoid direct sunlight so as not to scorch the leaves. Potted plants should be placed in a sunny spot, avoiding direct sunlight; indoors they can be placed not far from a south-facing window, which keeps the leaves emerald green and glossy and the flowering good. In summer they need to be moved to a shaded spot to prevent strong direct light, otherwise the leaves easily turn yellow. If kept in a place with insufficient light for a long time, the leaf color becomes pale and the flowers are few and not vivid. Wire can be made into a ring, and the branches wound around it, letting them climb and grow, which is even better for light exposure. After flower buds appear, the position of the pot must not be moved; the flower ball always faces the spot with the best light.
Temperature Requirements for Hoya kerrii
It likes warmth and humidity, and the optimum growing temperature is 18-28°C; after mid-October, the temperature should be 10-14°C, and it should be placed in a dry, sunny spot to overwinter, with a minimum overwintering temperature of 7°C. If below 5°C, it is prone to cold damage, causing leaf drop, or even the death of the whole plant.
Propagation Methods for Hoya kerrii
Propagation uses cuttings or layering, and rooting is easy. Generally, cutting propagation is carried out in late spring; cut a section of stem tip about 10 cm long, dip the cut in rooting hormone, and then insert it into the soil for cutting; bud cuttings can also be used. During cutting, the soil temperature should be kept at 20-25°C. After about 8-10 weeks of cultivation, roots will grow; after another two weeks, once the roots have developed well, they can be transplanted. Air layering can be done in spring.