Detailed Guide to Camellia Seedling Planting Techniques and Container Cultivation Methods
Camellias are evergreen year-round, widely distributed, and graceful in form, making them one of the important plant landscaping materials in southern China. Using the different natural tree shapes of camellias, planting them as specimens in landscaped environments, especially against a backdrop of green lawn, is considered best; using the natural tree shapes of camellias, with staggered heights, in groups of three to five, in clusters and patches, highlights the landscape effect of camellias; camellias can also be shaped artificially for ornamental use, such as: through pruning and shaping, training the canopy into spherical, umbrella-shaped, or cylindrical forms, camellia espalier style, or prostrate ground-cover style, making camellias grow creeping along the ground, spreading as ground cover.
Camellias are best suited for garden landscaping; in terms of cultural connotation, they are a traditional auspicious flowering tree, a lucky tree of good fortune. In terms of form, camellias are evergreen year-round, moderate in tree shape, and suitable for ground planting, container planting, and flower bed planting alike. However, Yunnan camellias are tree-type and require a larger courtyard space to be planted in the ground, so they are more commonly planted in temples and academies. Among the Bai people of Dali, every household has flowing water and every household grows flowers, and camellias must be planted first, but mainly in beds or containers.
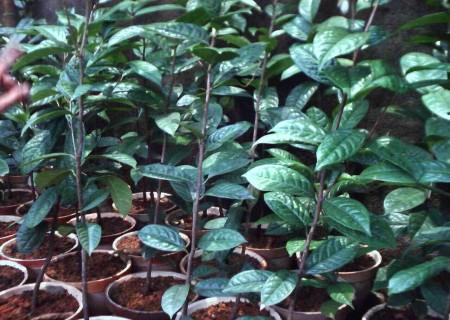
1. Potting soil formula
For camellias, you can use Clivia cultivation soil, or mix leaf mold with coarse river sand and stir evenly; this kind of soil has good drainage and good aeration.
If you have red soil, you can use a ratio of red soil : coconut coir : peat soil at 3:1:1, or you can use red soil : leaf mold : coarse sand at 6:3:1; this kind of soil is loose, breathable, and does not compact.
2. Flower pot selection
For container-grown camellias, purple clay pots or earthenware pots are preferred, and the size should be moderate, neither too large nor too small. For example: a camellia plant 40-50 cm tall with a crown width of 20-25 cm can be planted in a pot with a diameter of about 20 cm. Other sizes follow the same principle.
3. Potting time
The suitable time for potting camellias is in winter in November, and in early spring from February to March. At this time the flower buds are plump and the flowers are in full bloom, making it the most suitable time for potting. If potting during the period after flowers fade and new roots are sprouting, special care must be taken not to damage the roots. Generally, potting should be stopped around the budding period, because at this time new shoots are about to emerge and leaves are unfurling, requiring a large amount of water; if potting is carried out, the new roots may be injured, which can easily affect the growth and development of that year. Potting is also taboo in high-temperature and severe winter seasons, to avoid causing the plant to shrivel and die.
4. Potting method
After the camellia seedling arrives, first observe the original soil formula. If it is relatively sticky and heavy soil, you can soak it in water for half a minute, then gently shake it to wash off some of the original soil. If it is lightweight, breathable soil, you only need to gently shake off some loose surface soil. First place broken tiles, stones, etc. at the bottom of the pot to facilitate water control, then fill in part of the coarse soil. Place the seedling in the pot, fill fine soil around the roots, then gently shake the pot so that the soil and root system are closely combined. Fill the soil to a height of 2 cm from the pot rim to allow for watering. After planting, water thoroughly once promptly, also known as the settling water. After that, keep the soil moist for 1 month.
5. Watering method
Camellias like a moist and well-ventilated environment, so be sure to note that the potting soil should not be too dry or too wet. This is why the soil formula requires good permeability. Generally in spring, you can water more to meet the water needs of sprouting. In summer, watering should be done in the morning and evening, and the leaves should be moistened. In the plum rain season in southern China, water accumulation should be prevented. Watering in autumn is the same as in spring, but in winter the amount of watering should be controlled, keeping the potting soil moist as appropriate, and winter watering should be done at noon.
6. Key points of fertilizing
Camellias do not like heavy fertilizer. Generally, apply phosphorus and potassium fertilizer 2-3 times before flowering in October-November, and apply mixed organic fertilizer 2-3 times after flowering in April-May, such as cake fertilizer, manure, etc. Camellias should avoid large amounts of nitrogen fertilizer, and phosphorus and potassium fertilizer should be the main focus; too much nitrogen fertilizer will cause excessive vegetative growth of branches and reduce flowering. Fertilization should be appropriately controlled according to the strength of the seedling: strong seedlings get more, weak seedlings get less or no fertilizer. For seedlings that are too weak, repotting can be used instead of fertilizing, and good results can also be achieved.
7. Pruning techniques
Pruning camellias is very important. Generally, branches that affect the tree shape and diseased or weak branches are cut off. There is also the tidying of flower buds; once the flower buds are too dense, they should also be thinned, and after the flowers fade they should be removed promptly, which can reduce nutrient consumption.
8. Repotting camellias
Repotting camellias is something many people overlook. Many people never repot after planting, but this is actually very wrong. Camellias generally need to be repotted once every two years, changing to a larger pot, which is beneficial to their growth. The timing of repotting requires special attention; it is best in April. When repotting, be careful not to remove all the old soil, and also add a small amount of base fertilizer, then water.
Care and management:
1. After each wiring and shaping of a camellia bonsai, direct sunlight and scorching exposure should be prevented. Generally it must be placed in a shady place for a few days.
2. Indoor placement time generally should not exceed one month. It is suitable to place it when the flower buds first begin to show red or when the petals first begin to open, and when the number of open flowers reaches eighty to ninety percent, move it into the cultivation nursery.
3. During cultivation, the surface of the potting soil should preferably have moss or low ground-cover grass to keep the soil moist. The greatest taboo is bare potting soil that produces salt efflorescence.
4. Pay attention to pest and disease control. The main diseases include sooty mold and anthracnose, which can be controlled by spraying 0.5 degree Bordeaux mixture. The main pest is the tea shoot borer; the control method is to cut off the infested shoots, generally best done from April to June.
5. Fertilizer should be fully decomposed and applied diluted. Avoid concentrated fertilizer and quick-acting fertilizer, to prevent root rot and leaf scorch.
6. Side branches, fine branches, and small branches can have the wire released after half a year, removing the palm fiber, to prevent the branches from thickening and causing the palm fiber to sink in, which would lead to broken branches and death. The main trunk's wire can be released after one year.
7. Carry out supplementary wiring and shaping every year in summer and winter, and cut off excess leggy branches, so as to ensure the overall shaping effect of the whole plant is preserved intact.