Detailed Guide to Peony Cultivation Methods and Daily Care Techniques
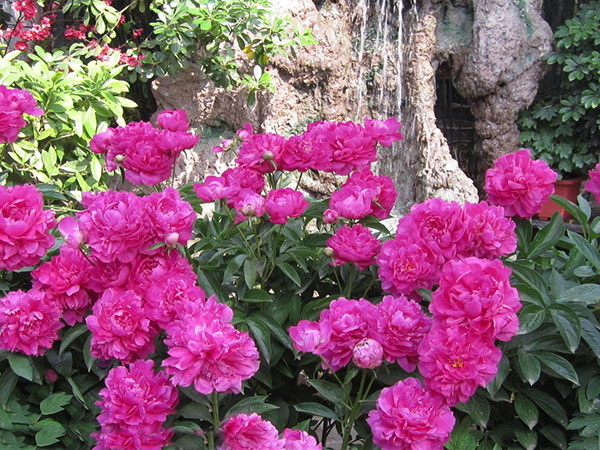
Planting: The soil should be loose in texture, fertile, and neutral to slightly alkaline. Cut off any broken or diseased roots of the peony seedling to be planted, dip in insecticide and fungicide, and place into a pre-prepared pot or hole. The roots should be spread out. Fill soil to more than half of the pot or hole, then gently lift and shake the seedling, firm the soil and seal it. The depth should be such that the root crown is slightly below the pot surface or ground level.
Watering: Water thoroughly once after planting. Peonies dislike waterlogging, so water as appropriate during the growing season. In arid northern regions, generally water before flowering, after flowering, and before the ground freezes. For potted plants, to facilitate management, you can cut off the faded flowers after blooming and bury the whole pot in the ground.
Fertilizing: One year after planting, fertilize in autumn, mainly with well-rotted organic fertilizer. This can be applied together with loosening the soil, by broadcasting, or by hole application. In spring and summer, mostly use chemical fertilizers, applying pre-flowering and post-flowering fertilizer along with watering. For potted plants, apply liquid fertilizer together with watering.
Pruning: In the year of planting, mostly cut back to the base. After spring sprouting, keep about 5 branches and remove the rest to concentrate nutrients, so that the flowers in the second year will be large and brightly colored. In autumn and winter, along with clearing the garden, cut off dried flower stalks, thin and weak branches, and non-flowering branches. For potted plants, prune into whatever shape you like as needed.
Cultivation: During the growing season, cultivate the soil in time, pull out weeds, and watch for the occurrence of diseases and pests. In autumn and winter, carry out tilling of the crown area for peonies more than two years old.
Repotting: When potted peonies have grown for three or four years, they need to be repotted in autumn into a larger pot with fresh fertilized soil, or divided and replanted separately.
Spraying: Before sprouting in early spring, spray with lime sulfur mixture; in summer, use a mixed solution of insecticide and fungicide, once every 2 weeks depending on the condition. Along with fertilizing, it is also advisable to add chemical fertilizers and growth regulators, etc.
Forcing blooms: To add flowers for festivals or celebratory events, depending on the variety, you can heat peonies about 50 days in advance, controlling the temperature at normal temperature 10--25C, with a daily average of about 15C. In the early stage, keep the plant moist; after buds appear, ensure ventilation and light; after the buds are formed, control the temperature according to the flowering schedule. Usually, apply foliar fertilizer and ensure an adequate water supply. In this way, flowers can be seen at any time in winter and spring.
Ornamental display: A single peony plant has a natural flowering period of about 10--15 days, which shortens as the temperature rises; at 3--8C it can last more than a month. For field planting, temporary sheds can be set up to shelter from wind and light to extend the viewing time; for potted plants, move them to a place without direct sunlight, at a temperature of 5--10C, in a ventilated and well-lit environment, and water timely according to the plant's appearance and the moisture level of the potting soil. Do not splash water on the flowers; this way the flowering period will be the longest. When cut flowers are needed, the cut should be made in water or the wound should be cauterized. The water for cut flowers should contain a preservative or a little white sugar to extend the blooming time of the cut flowers.
Analysis of Hibiscus rosa-sinensis Cultivation Methods: Teaching You to Easily Grow Hibiscus rosa-sinensis
Hibiscus rosa-sinensis is a famous flower in our country, with large blooms and many colors. Although each flower opens in the morning and fades by evening, they continue in an endless succession, with a long flowering period and the most abundant blooms in summer and autumn. It is deeply loved by people, and many want to grow Hibiscus rosa-sinensis themselves but do not know how. Now let us learn about it in detail together with the editor of Yiqizhuangxiu.com.
Analysis of Hibiscus rosa-sinensis Cultivation Methods: Teaching You to Easily Grow Hibiscus rosa-sinensis
Cultivation Methods of Hibiscus rosa-sinensis
1. Because Hibiscus rosa-sinensis is a sun-loving flower, it should be placed in a place with long sunshine hours so that it can fully receive sunlight. In summer, full sunlight can be given. Insufficient light easily causes buds to drop, flowers to become smaller, and flower color to become dull.
2. Both excessive dryness and excessive moisture will affect flowering. During the peak flowering period in summer, depending on the temperature and the dryness or moisture of the potting soil, water 1 to 2 times a day, but make sure to water thoroughly only after the soil has dried out, to prevent root rot caused by high temperature and waterlogging. Watering is best done before 9 a.m. or after 5 p.m., to minimize the temperature difference between the air and the water. At noon, you can spray water on the leaves and around the flower pot to lower the leaf surface temperature and maintain air humidity. The flowers of Hibiscus rosa-sinensis are very delicate, and water must not be sprayed directly onto the flowers, otherwise it can easily cause the flowers to be scorched.
3. Repot every year, using well-rotted bean cake and poultry manure as base fertilizer. Afterward, apply a compound fertilizer that is well absorbed and quick-acting. Every 7 to 10 days, spray 0.2% monopotassium phosphate once on the leaves to promote emerald-green foliage and produce more flower buds.
4. Hibiscus rosa-sinensis is not cold-tolerant, so whether it can safely overwinter is key. In winter, the temperature should be kept at 12 to 15C; below 5C it is very likely to freeze to death. But note that the temperature should also not exceed 20C; too high a temperature will cause leggy branches and leaves, affect dormancy, and result in poor flowering the following year. In winter, the potting soil should maintain about 30% relative humidity, and it should not be watered heavily. Generally, no fertilizing is needed in winter; if fertilizing at all, apply only a small amount of liquid fertilizer.
5. In spring, pruning should be carried out, keeping thick and strong branches to ensure concentrated nutrients and more vigorous flowering.
Propagation Methods of Hibiscus rosa-sinensis
1. Hibiscus rosa-sinensis cuttings
Cuttings are the most commonly used method for propagating Hibiscus rosa-sinensis. They can be taken anytime from early spring to late autumn, with the highest survival rate during the plum rain season; in winter they can only be done in a greenhouse. The best cuttings are one-year-old semi-lignified ones, about 10 cm long. Remove the lower leaves, keep the top leaves, make the cut flat, and insert into a sand bed, spraying water daily to maintain relatively high air humidity. Roots form three weeks after insertion, and after 45 days of growth they can be potted. Generally speaking, Hibiscus rosa-sinensis propagated by cuttings in the same year can bloom the following year.
2. Air layering propagation of Hibiscus rosa-sinensis
This is mainly for lignified branches and is relatively commonly used among woody plants. Hibiscus rosa-sinensis can also be tried with it. Compared with cuttings, air layering is safer; at least it will not die, haha. Below is a sample picture of air layering; the plant in the picture is not Hibiscus rosa-sinensis.
3. Ground layering propagation
This is also very simple: just press the branches of Hibiscus rosa-sinensis into the soil to let them root, and after rooting, cut them off. The principle is similar to air layering, only with slight differences according to actual conditions. These three methods are all very simple and highly practicable, and flower lovers can all give them a try.
Cultivation Methods of Bleeding Heart
1. Watering:
Bleeding Heart has fleshy roots, and waterlogging will cause root rot. Therefore, water appropriately according to factors such as the weather, potting soil, and plant growth conditions, adhering to the principle of not watering until dry, watering as soon as it dries, and never allowing waterlogging.
2. Fertilizing:
Bleeding Heart likes fertilizer. When planting and when repotting and changing soil, add some bone meal or organic fertilizer to the growing medium. During the growing period, apply a diluted nitrogen-phosphorus-potassium liquid fertilizer once every two weeks. Proper fertilizing can help it produce abundant flowers and lush leaves. Do not fertilize during the dormant period or after the flower buds show color.
3. Light:
Bleeding Heart fears high temperatures and direct strong light, and likes a semi-shaded environment with ample diffused light. It is relatively cold-tolerant, so it is suitable to place it under large trees in the courtyard, under a grape trellis, on the shady side of tall buildings, or on an east- or north-facing balcony.
4. Humidity:
During the high-temperature period in summer, Bleeding Heart enters dormancy. At this time, place the Bleeding Heart plant in a well-ventilated shady spot where it cannot receive direct light. At this time, sprinkle water on the nearby ground more often to increase air humidity and lower the temperature.